
助力自动驾驶:行车检测和车道线分割
该项目着眼于基于视觉深度学习的自动驾驶场景,旨在对车载摄像头采集的视频数据进行道路场景解析(行车检测和车道线分割),为自动驾驶提供一种解决思路。该项目完成了ONNX部署和安卓部署。...
助力自动驾驶:行车检测和车道线分割
一、项目简介
项目背景:
该项目着眼于基于视觉深度学习的自动驾驶场景,旨在对车载摄像头采集的视频数据进行道路场景解析,为自动驾驶提供一种解决思路。利用轻量级检测模型PP-PicoDet完成车辆检测,并利用DeepLabv3p实现车道线分割,二者各司其职,并且在硬件支持下可以完全并行,最终将推理结果进行合并,实现一种高效高精度的道路场景解析方式。
项目意义:
首先,在行车检测方面,现有检测模型可以实现多种类型的车辆检测,然而,一方面,检测模型在速度和精度上存在矛盾,对于精度较高的模型,如两阶段检测网络Faster R-CNN,其FPS较低,无法满足实时检测,因此其商用价值受到很大限制。另一方面,对于道路场景的目标检测,许多数据集会对场景中很多类型的目标进行标注,然而,经过我们的实践和观察,使用这种数据集训练模型并不能带来很好的效果。由于目标类别本身存在多样性,例如各式各样的货车,电瓶车,亦或是各式各样的路标和交通灯等,这会对模型的学习造成混淆,最终导致模型在现实场景中对很多目标造成误判,极大的影响模型在现实中的应用。为解决这两个问题,我们在本项目中使用飞桨开源的轻量检测网络PicoDet作为检测模型,在检测速度和检测精度上实现了较好的权衡。另外,我们对大规模道路场景数据集的标签进行了重构处理,仅学习数据集中的汽车类型,保证足以商用的准确率和召回率,对于其他类别,暂时当做背景类,后续可以再使用初始模型重新对背景类中的部分或全部目标进行训练,让不同模型各司其职,专注于不同目标来降低错误率,提高泛化能力。
其次,在车道线分割方面,传统的基于low-level的图像处理方式对外界环境十分敏感,不同的天气情况或者夜间照明环境会极大影响车道线的分割结果。我们认为这是由于这种车道线的分割方法并未借助图像中的其他语义信息,实际上,我们在识别车道线时,并不是直接寻找相应的颜色差别,而是先“凭感觉”确认车道线的大体位置,再进一步根据颜色来判断。因此,本项目使用语义分割原理实现车道线的分割,借助语义分割模型DeepLabv3p在大规模数据集上进行训练,最终实现高精度的车道线分割。
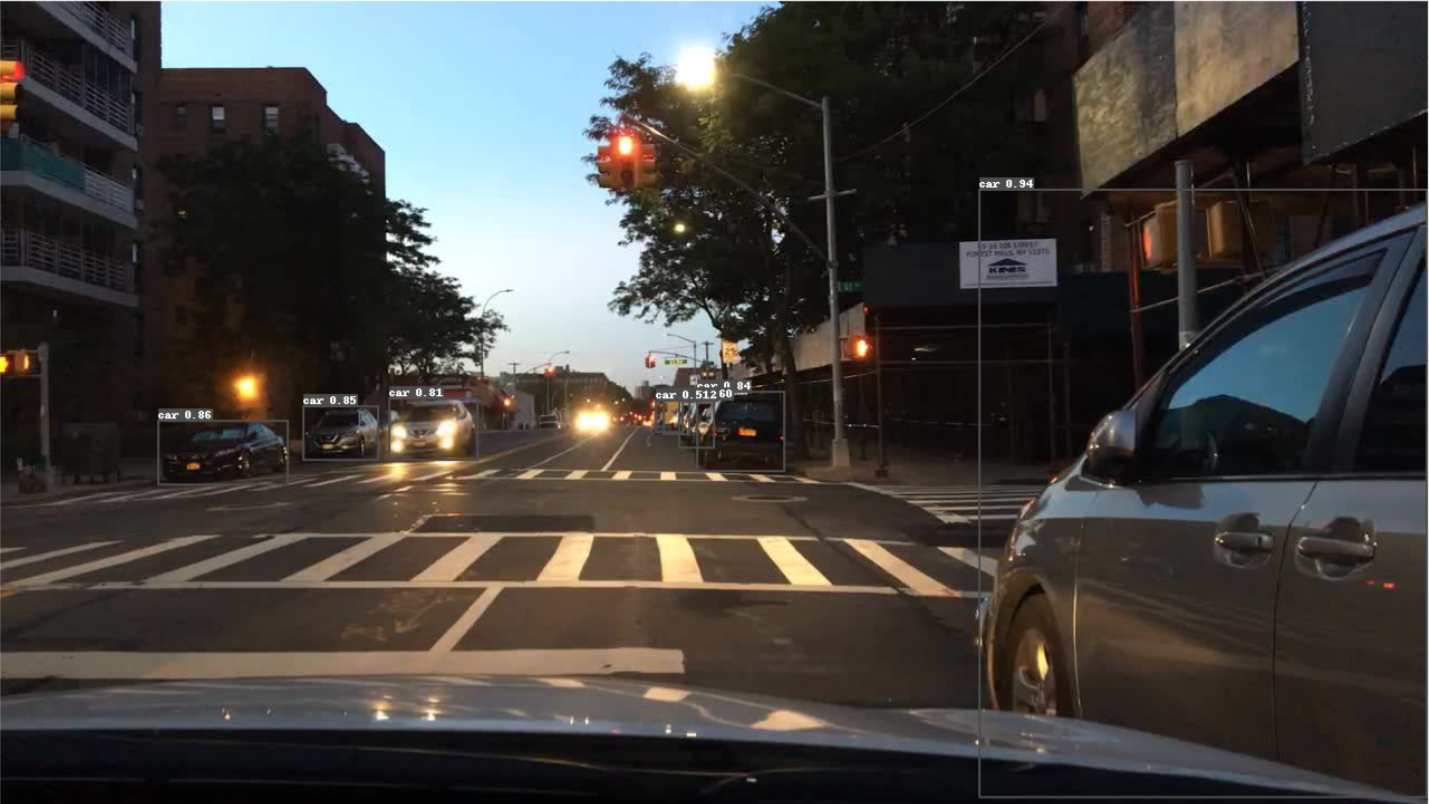
效果演示:
二、数据集介绍
数据集地址:BDD100K 自动驾驶数据集
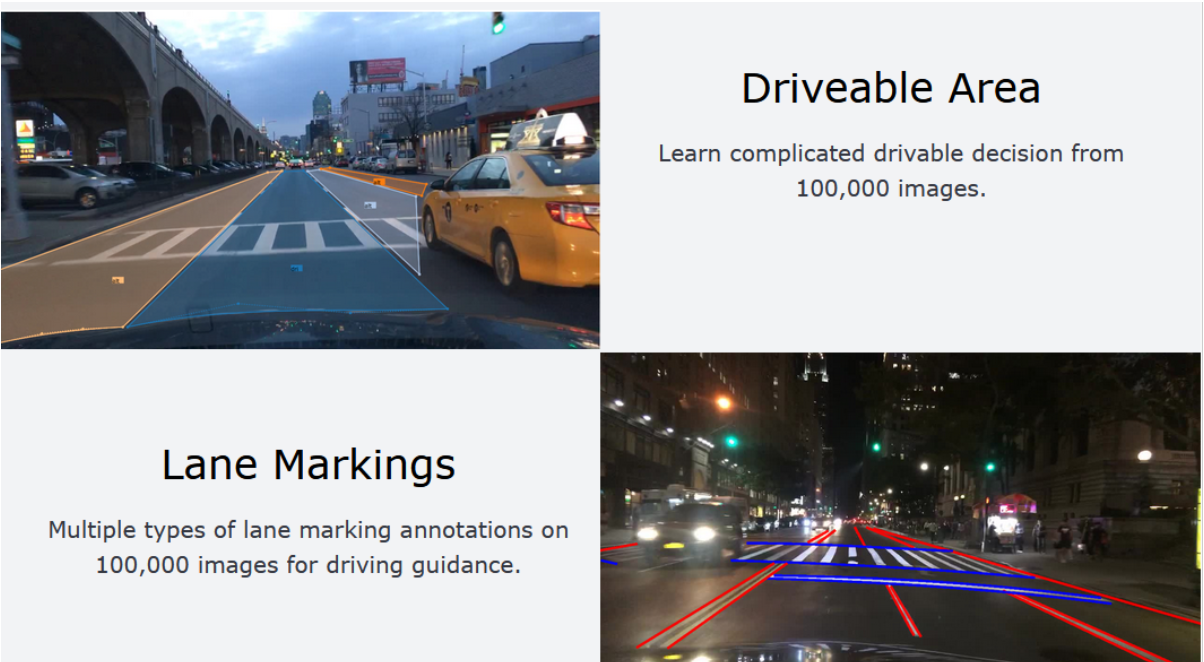
视频数据: 超过1,100小时的100000个高清视频序列在一天中许多不同的时间,天气条件,和驾驶场景驾驶经验。视频序列还包括GPS位置、IMU数据和时间戳。
道路目标检测:2D边框框注释了100,000张图片,用于公交、交通灯、交通标志、人、自行车、卡车、摩托车、小汽车、火车和骑手。
实例分割:超过10,000张具有像素级和丰富实例级注释的不同图像。
引擎区域:从10万张图片中学习复杂的可驾驶决策。
车道标记:10万张图片上多类型的车道标注,用于引导驾驶。

三、技术路线
1、PaddleDetection简介:
PaddleDetection是飞桨推出的端到端目标检测开发套件,旨在帮助开发者更快更好地完成检测模型的训练、精度速度优化到部署全流程。PaddleDetection以模块化的设计实现了多种主流目标检测算法,并且提供了丰富的数据增强、网络组件、损失函数等模块,集成了模型压缩和跨平台高性能部署能力。目前基于PaddleDetection已经完成落地的项目涉及工业质检、遥感图像检测、无人巡检等多个领域。
PaddleDetection模块式地提供YOLOv3,EfficientDet等10余种目标检测算法、ResNet-vd,MobileNetV3等10余种backbone,以及sync batch norm, IoU Loss、可变性卷积等多个扩展模块,这些模块可以定制化地自由组合,灵活配置;同时预置提供100余种训练好的检测模型。
在YOLOv3系列模型上,通过一键式剪裁+蒸馏的方案,YOLOv3_MobileNetV1剪裁了近70%的计算量,在精度基本无损或略有提升的情况,模型在高通855芯片上加速2.3倍,GPU上也有60%的加速;YOLOv3-ResNet50vd-DCN剪裁模型,精度提升了0.6,GPU上加速20%。同时,对应压缩后的模型、压缩脚本和操作方法均可以在Github上获取。

2、模型库链接:
PaddleDetection代码GitHub链接:https://github.com/PaddlePaddle/PaddleDetection
PaddleDetection代码Gitee链接:https://gitee.com/paddlepaddle/PaddleDetection
PaddleDetection文档链接:https://paddledetection.readthedocs.io/
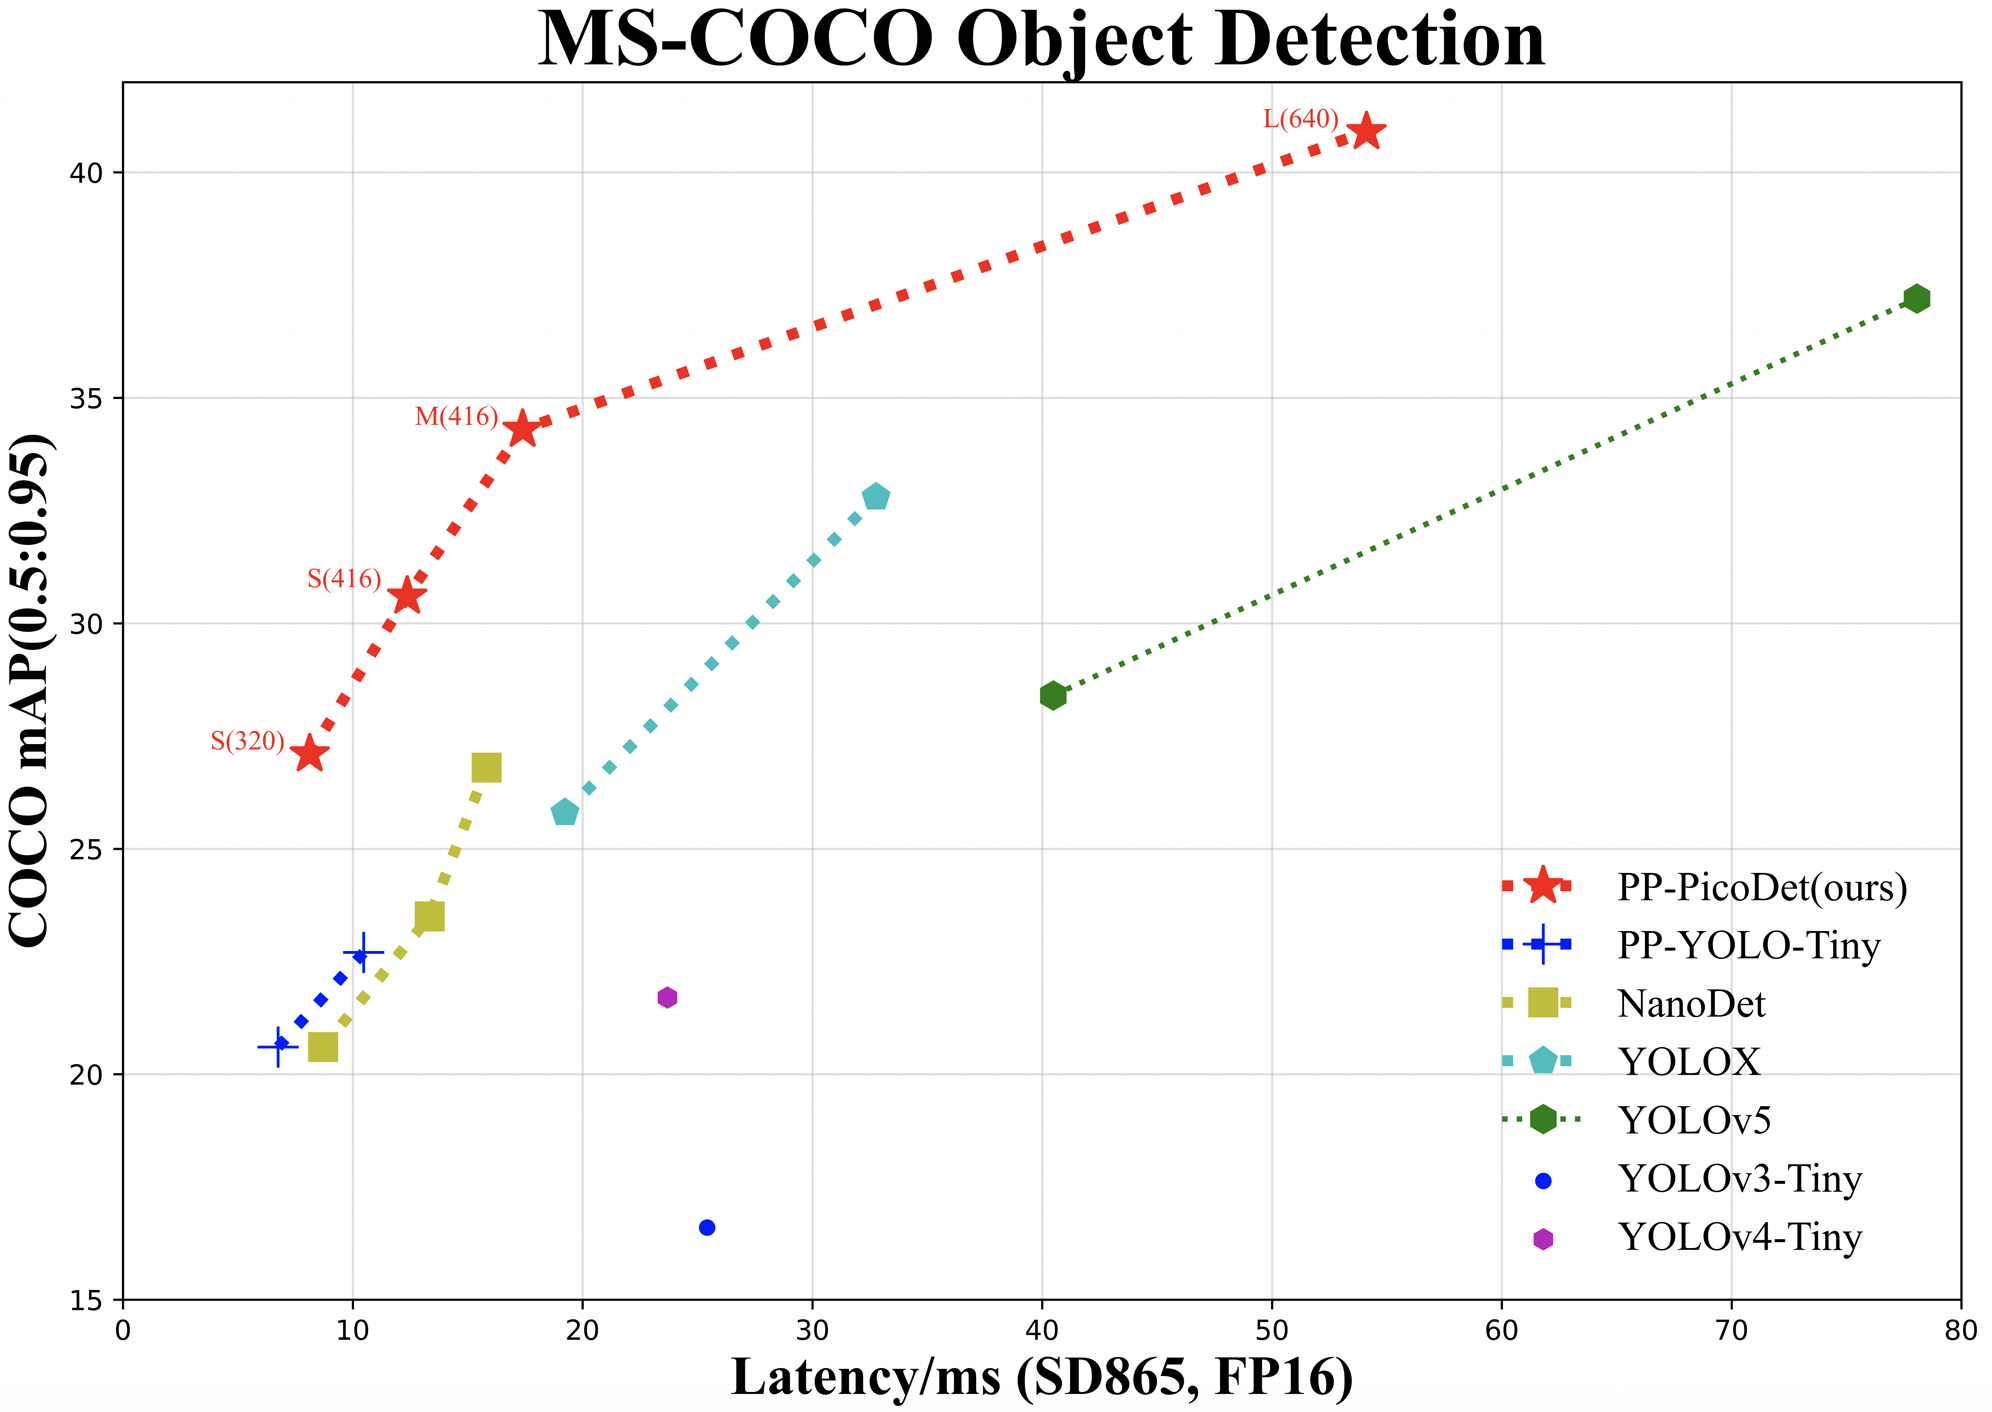
四、轻量检测器PP-PicoDet
PP-PicoDet模型有如下特点:
- 🌟 更高的mAP: 第一个在1M参数量之内mAP(0.5:0.95)超越30+(输入416像素时)。
- 🚀 更快的预测速度: 网络预测在ARM CPU下可达150FPS。
- 😊 部署友好: 支持PaddleLite/MNN/NCNN/OpenVINO等预测库,支持转出ONNX,提供了C++/Python/Android的demo。
- 😍 先进的算法: 我们在现有SOTA算法中进行了创新, 包括:ESNet, CSP-PAN, SimOTA等等。
技术报告地址:https://arxiv.org/abs/2111.00902
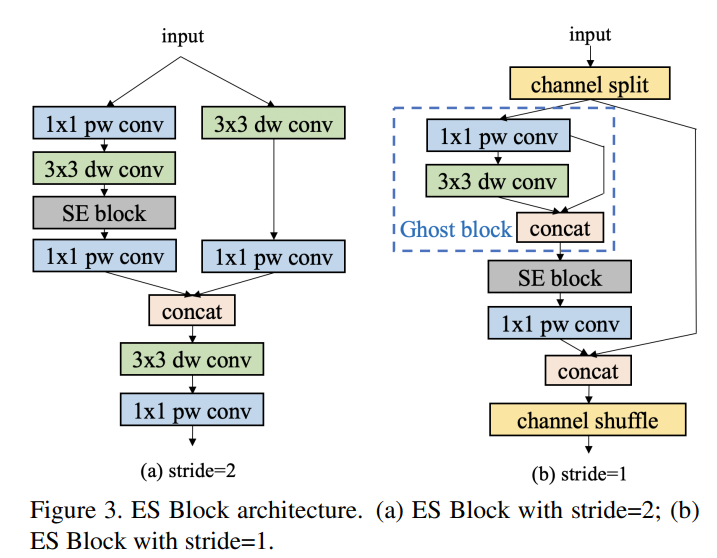
1、骨干网络:
PicoDet的骨架网络为ESNet(Enhanced ShuffleNetv2),在原ShuffleNetv2网络基础上加入了SE模块和Ghost模块,细节使用了pointwise, deepwise(深度可分离卷积)来减小计算量,提高推理速度,同时解决了ShuffleNetV2中channel shuffle带来的融合特征的丢失,并且激活函数替换为H-swish。设计出ES Block具体结构如下图所示:
2、neck:CSP-PAN
引入CSP-PAN结构,并使用1x1卷积统一各分支输入通道数减小计算量。
CSP neck常见于Yolov4和YoloX,可以保证在精度几乎不变的前提下减小计算量,是轻量模型的不二之选。
PAN结构简单理解就是在FPN的基础上添加一条上采样数据融合路径来进一步融合多尺度的特征,再配合使用CSP做相邻通道特征图的融合。
除了1x1卷积之外,CSP-PAN中所有的卷积都变成了空洞卷积,增加了模型的感受野。
3、整体架构

五、环境配置
# 克隆paddledetection仓库
# gitee 国内下载比较快
!git clone https://gitee.com/paddlepaddle/PaddleDetection.git

# github
# !git clone https://github.com/PaddlePaddle/PaddleDetection.git
Cloning into 'PaddleDetection'...
remote: Enumerating objects: 25252, done.[K
remote: Counting objects: 100% (5722/5722), done.[K
remote: Compressing objects: 100% (2478/2478), done.[K
remote: Total 25252 (delta 4224), reused 4442 (delta 3233), pack-reused 19530[K
Receiving objects: 100% (25252/25252), 266.33 MiB | 2.33 MiB/s, done.
Resolving deltas: 100% (18773/18773), done.
Checking connectivity... done.
# 导入package
!pip install -r ~/PaddleDetection/requirements.txt
# 继续安装依赖库
!python3 ~/PaddleDetection/setup.py install
六、数据准备
# 解压数据集
!unzip -oq /home/aistudio/data/data102832/bdd100kcar.zip -d /home/aistudio/PaddleDetection/dataset/bd100k
- 接下来需要将数据集中的json文件转换为xml文件,需要用到第三方库dicttoxml,请先在终端执行以下命令:
pip install dicttoxml
# 生成train_list.txt和val_list.txt
import os
os.chdir('/home/aistudio/PaddleDetection/dataset/bd100k/')
base_dir = 'images/100k/'
label_dir = 'labels/voc_labels/'
with open('train_list.txt', 'w') as train:
    for filename in os.listdir(base_dir + 'train'):
        train.write(base_dir + 'train/' + filename + " " + label_dir + 'train/' + filename.split('.')[0] + '.xml\n')

with open('val_list.txt', 'w') as val:
    for filename in os.listdir(base_dir + 'val'):
        val.write(base_dir + 'val/' + filename + " " + label_dir + 'val/' + filename.split('.')[0] + '.xml\n')
# 查看数据集数量
import os
os.chdir('/home/aistudio/PaddleDetection/dataset/bd100k/')
base_dir = 'images/100k/'
imgs = os.listdir(base_dir + 'train')
print('训练集图片总量: {}'.format(len(imgs)))

imgs = os.listdir(base_dir + 'val')
print('验证集图片总量: {}'.format(len(imgs)))

imgs = os.listdir(base_dir + 'test')
print('测试集图片总量: {}'.format(len(imgs)))
训练集图片总量: 68943
验证集图片总量: 9882
测试集图片总量: 20000
七、数据预处理
  sample_transforms:
  - Decode: {}
  - RandomCrop: {}
  - RandomFlip: {prob: 0.5}
  - RandomDistort: {}
  batch_transforms:
  - BatchRandomResize: {target_size: [576, 608, 640, 672, 704], random_size: True, random_interp: True, keep_ratio: False}
  - NormalizeImage: {is_scale: true, mean: [0.485,0.456,0.406], std: [0.229, 0.224,0.225]}
  - Permute: {}
  - PadGT: {}
- RandomCrop:随机裁剪图像。
- RandomFlip:实现图像的随机翻转(翻转概率为0.5)。
- RandomDistort:以一定的概率对图像进行随机像素内容变换,可包括亮度、对比度、饱和度、色相角度、通道顺序的调整,模型训练时的数据增强操作。
- BatchRandomResize:对一个批次中的图片随机指定尺寸,范围是[576, 608, 640, 672, 704],插值方式为随机插值,进行多尺度训练。
- Normalize:图像归一化,均值默认为[0.485, 0.456, 0.406]。长度应与图像通道数量相同。标准差默认为[0.229, 0.224, 0.225]。长度应与图像通道数量相同。
八、模型训练
本项目使用的配置文件是~/PaddleDetection/configs/picodet/picodet_xs_416_coco_lcnet.yml
包含的配置文件如下:
_BASE_: [
  '../datasets/voc.yml',
  '../runtime.yml',
  '_base_/picodet_v2.yml',
  '_base_/optimizer_200e.yml',
  '_base_/picodet_416_reader.yml',
]
- 训练阶段采用的学习率衰减策略为余弦衰减,最大迭代轮次为200,由于该数据集只进行二分类,即汽车和背景类,观察vdl模型基本收敛即可停止训练。
# 开启训练
%cd ~/PaddleDetection
!python3 tools/train.py -c configs/picodet/picodet_xs_416_coco_lcnet.yml --eval \
     --use_vdl True \
     --vdl_log_dir output/vdl_picodet_xs/ \
     -o use_gpu=true
九、模型评估
# 评估 默认使用训练过程中保存的best_model
# -c 参数表示指定使用哪个配置文件
# -o 参数表示指定配置文件中的全局变量(覆盖配置文件中的设置),需使用单卡评估
%cd ~/PaddleDetection
!python tools/eval.py -c configs/picodet/picodet_xs_416_coco_lcnet.yml \
    -o weights=output/picodet_xs_416_coco_lcnet/best_model.pdparams \
    -o use_gpu=true
/home/aistudio/PaddleDetection
Warning: import ppdet from source directory without installing, run 'python setup.py install' to install ppdet firstly
W0729 15:38:26.861335   851 gpu_resources.cc:61] Please NOTE: device: 0, GPU Compute Capability: 7.0, Driver API Version: 11.2, Runtime API Version: 10.1
W0729 15:38:26.865715   851 gpu_resources.cc:91] device: 0, cuDNN Version: 7.6.
[07/29 15:38:32] ppdet.utils.checkpoint INFO: Finish loading model weights: output/picodet_xs_416_coco_lcnet/best_model.pdparams
[07/29 15:38:35] ppdet.engine INFO: Eval iter: 0
[07/29 15:38:54] ppdet.engine INFO: Eval iter: 100
[07/29 15:39:12] ppdet.engine INFO: Eval iter: 200
[07/29 15:39:32] ppdet.engine INFO: Eval iter: 300
[07/29 15:39:52] ppdet.engine INFO: Eval iter: 400
[07/29 15:40:12] ppdet.engine INFO: Eval iter: 500
[07/29 15:40:30] ppdet.engine INFO: Eval iter: 600
[07/29 15:40:52] ppdet.engine INFO: Eval iter: 700
[07/29 15:41:11] ppdet.engine INFO: Eval iter: 800
[07/29 15:41:29] ppdet.engine INFO: Eval iter: 900
[07/29 15:41:49] ppdet.engine INFO: Eval iter: 1000
[07/29 15:42:10] ppdet.engine INFO: Eval iter: 1100
[07/29 15:42:28] ppdet.engine INFO: Eval iter: 1200
[07/29 15:42:35] ppdet.metrics.metrics INFO: Accumulating evaluatation results...
[07/29 15:42:39] ppdet.metrics.metrics INFO: mAP(0.50, 11point) = 64.39%
[07/29 15:42:39] ppdet.engine INFO: Total sample number: 9882, averge FPS: 40.73875503344224
十、模型测试
动态图测试
# 测试 -c 参数表示指定使用哪个配置文件
# -o 参数表示指定配置文件中的全局变量(覆盖配置文件中的设置)
# --infer_dir 参数指定预测图像所在文件夹路径
# --infer_img 参数指定预测图像路径
# --output_dir 输出结果文件夹路径
# 预测结束后会在output文件夹中生成一张画有预测结果的同名图像
%cd ~/PaddleDetection
!python tools/infer.py -c configs/picodet/picodet_xs_416_coco_lcnet.yml \
--infer_dir=dataset/bd100k/images/100k/test \
--output_dir=dataset/result \
-o use_gpu=true \
-o weights=output/picodet_xs_416_coco_lcnet/best_model.pdparams
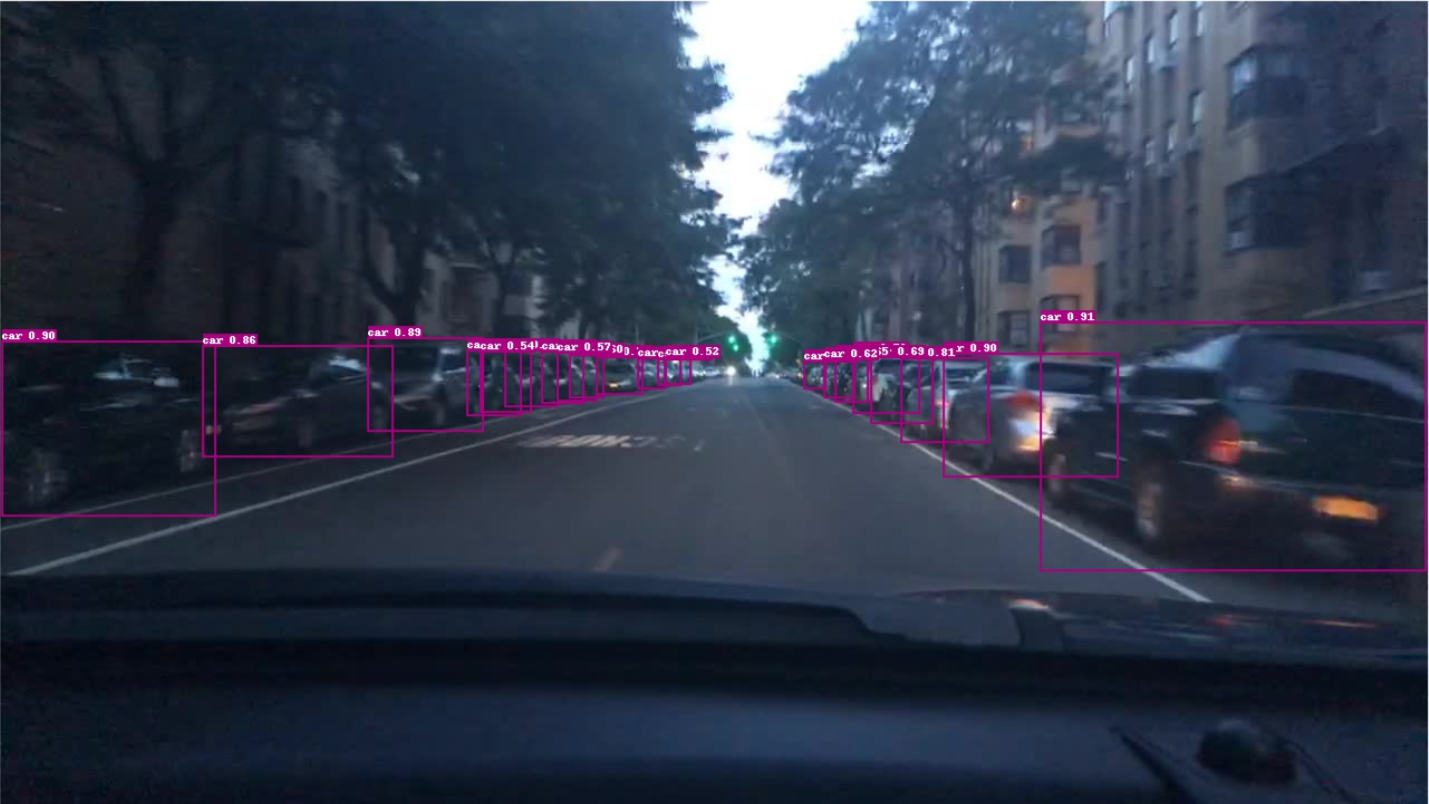
测试集效果
静态图测试
# 将训练好的模型导出为静态图
%cd ~/PaddleDetection
!python tools/export_model.py -c configs/picodet/picodet_xs_416_coco_lcnet.yml \
              -o weights=output/picodet_xs_416_coco_lcnet/best_model.pdparams \
              --output_dir=inference
/home/aistudio/PaddleDetection
Warning: import ppdet from source directory without installing, run 'python setup.py install' to install ppdet firstly
[07/29 16:39:17] ppdet.utils.checkpoint INFO: Finish loading model weights: output/picodet_xs_416_coco_lcnet/best_model.pdparams
[07/29 16:39:17] ppdet.engine INFO: Export inference config file to inference/picodet_xs_416_coco_lcnet/infer_cfg.yml
W0729 16:39:21.464596  6651 gpu_resources.cc:61] Please NOTE: device: 0, GPU Compute Capability: 7.0, Driver API Version: 11.2, Runtime API Version: 10.1
W0729 16:39:21.464648  6651 gpu_resources.cc:91] device: 0, cuDNN Version: 7.6.
[07/29 16:39:22] ppdet.engine INFO: Export model and saved in inference/picodet_xs_416_coco_lcnet
导出文件结构如下
inference/picodet_xs_416_coco_lcnet
       |--infer_cfg.yml
       |--model.pdmodel
       |--model.pdiparams
       |--model.pdiparams.info
Picodet静态图性能测试
在这里,随机从20000张测试集中选择1000张图片进行性能测试,测试环境包括以下三种配置:
- CPU+4 Thread
- CPU+MKL+4 Thread
- GPU
# 随机采样
import shutil
import os
import numpy as np
data_dir = "dataset/bd100k/images/100k/test/"
pathlist= os.listdir(data_dir)
t = np.random.choice(pathlist, size=1000, replace=False)
for path in t:
    src = data_dir + path
    dst = "dataset/static_test/" + path
    shutil.copy(src, dst)
# CPU测试推理模型(不开启mkldnn加速)
!python deploy/python/infer.py --model_dir=inference/picodet_xs_416_coco_lcnet \
            --image_dir dataset/static_test \
            --output_dir dataset/static_result \
            --device=CPU --batch_size=1 \
            --cpu_threads=4
# CPU测试推理模型(开启mkldnn加速)
!python deploy/python/infer.py --model_dir=inference/picodet_xs_416_coco_lcnet \
            --image_dir dataset/static_test \
            --output_dir dataset/static_result \
            --device=CPU --batch_size=1 \
            --cpu_threads=4 \
            --enable_mkldnn=True
# GPU测试推理模型
!python deploy/python/infer.py --model_dir=inference/picodet_xs_416_coco_lcnet \
            --image_dir dataset/static_test \
            --output_dir dataset/static_result \
            --device=GPU --batch_size=1
测试结果
| picodet_xs_416_coco_lcnet | preprocess_time(ms) | inference_time(ms) | postprocess_time(ms) | average latency time(ms) |
|---|---|---|---|---|
| CPU | 38.20 | 346.30 | 0.10 | 384.49 |
| CPU+MKL | 37.40 | 44.20 | 0.10 | 81.69 |
| GPU | 17.30 | 9.70 | 0.00 | 27.04 |
可以看到,picodet_xs_416_coco_lcnet在开了MKL加速后推理速度快了约87%,而GPU模式下相比于MKL加速的CPU模式推理速度快了约74%。由此,在硬件只提供CPU的情况下,开启MKL加速可以大大提高推理速度,如果提供GPU,那么将会使得推理速度进一步大幅提升。
另外,开启MKL加速对前处理和后处理影响不大,然而,开启GPU加速则对前后处理和模型推理都有较大的提升。
十一、模型部署
1、ONNX部署
- 首先需要转换paddle静态图模型到onnx,然后使用Python或者C++接口编写代码进行onnx推理和前后处理(以python为例)
# 导入依赖
!pip install onnx
!pip install paddle2onnx==0.9.2
!pip install onnxruntime
# 由于转换过程中并不强制要求reshape操作第一维度设置为-1,所以这里转换代码暂不支持动态batch,仅支持batchsize = 1
# 将静态图推理模型转换成onnx模型
!paddle2onnx --model_dir inference/picodet_xs_416_coco_lcnet/ \
            --model_filename model.pdmodel  \
            --params_filename model.pdiparams \
            --opset_version 11 \
            --save_file picodet_xs_416_coco_lcnet.onnx
# ONNX模型测试
import os
import onnxruntime
%cd ~/PaddleDetection/
model_path = 'picodet_xs_416_coco_lcnet.onnx'
session = onnxruntime.InferenceSession(model_path)

input_names = [input.name for input in session.get_inputs()]
output_names = [output.name for output in session.get_outputs()]

print(input_names, output_names)
/home/aistudio/PaddleDetection
['image', 'scale_factor'] ['multiclass_nms3_0.tmp_0', 'multiclass_nms3_0.tmp_2']


2022-08-04 22:22:31.233490381 [W:onnxruntime:, graph.cc:3494 CleanUnusedInitializersAndNodeArgs] Removing initializer 'Constant_350'. It is not used by any node and should be removed from the model.
# # ONNX模型前向推理
%cd ~/PaddleDetection/
import numpy as np    # we're going to use numpy to process input and output data
import onnxruntime    # to inference ONNX models, we use the ONNX Runtime
import onnx
from onnx import numpy_helper
import urllib.request
import json
import time

import pandas as pd
from imageio import imread
import warnings
warnings.filterwarnings('ignore')
# display images in notebook
import matplotlib.pyplot as plt
%matplotlib inline
import cv2
from PIL import Image, ImageDraw, ImageFont

picdet_onnx_model = 'picodet_xs_416_coco_lcnet.onnx'

img_file = r"dataset/static_test/f950fbec-c7db9046.jpg"

# 预处理
def preprocess(img_file, w, h):
    input_shape = (1, 3, w, h)
    img = Image.open(img_file)
    img = img.resize((w, h), Image.BILINEAR)
    # convert the input data into the float32 input
    img_data = np.array(img)
    img_data = np.transpose(img_data, [2, 0, 1])
    img_data = np.expand_dims(img_data, 0)
    mean_vec = np.array([0.485, 0.456, 0.406])
    stddev_vec = np.array([0.229, 0.224, 0.225])
    norm_img_data = np.zeros(img_data.shape).astype('float32')
    for i in range(img_data.shape[1]):
        norm_img_data[:,i,:,:] = (img_data[:,i,:,:]/255 - mean_vec[i]) / stddev_vec[i]
    return norm_img_data.astype('float32'), np.array(img)


def infer_sim_picodet(img_file, picdet_onnx_model:str):

    # Run the model on the backend
    session = onnxruntime.InferenceSession(picdet_onnx_model, None)

    # get the name of the first input of the model
    input_name = session.get_inputs()[0].name
    output_name = session.get_outputs()[0].name
    pre_start = time.time()
    input_data, raw_img = preprocess(img_file, 416, 416)
    image_size = np.array([raw_img.shape[1], raw_img.shape[0]], dtype=np.float32).reshape(1, 2)
    pre_end = time.time()
    print('preprocess', pre_end-pre_start,'s')
    start = time.time()
    raw_result = session.run([], {input_name: input_data,
                                  'scale_factor':image_size})
    end = time.time()
    print('推理时间:', end-start,'s')
    yolonms_layer_1 = raw_result[0]
    yolonms_layer_1_1 = raw_result[1]

    img = cv2.imread(img_file)
    h, w = img.shape[0], img.shape[1]
    for res in yolonms_layer_1:
        cls, score,  x_min, y_min, x_max, y_max = res
        bboxes = [x_min, y_min, x_max, y_max]
        if(score > 0.5):
            x1 = w*bboxes[0]
            y1 = h*bboxes[1]
            x2 = w*bboxes[2]
            y2 = h*bboxes[3]
            cv2.rectangle(img, (int(x1), int(y1)), (int(x2), int(y2)), (0, 0, 255), 4)
            cv2.putText(img, "car", (int(x1), int(y1)), cv2.FONT_HERSHEY_SIMPLEX, 1, (0, 0, 255), 4)
    plt.imshow(img[:,:,::-1])
    plt.show()

infer_sim_picodet(img_file, picdet_onnx_model)
preprocess 0.020409345626831055 s
推理时间:

2022-08-04 19:16:52.626830400 [W:onnxruntime:, graph.cc:3494 CleanUnusedInitializersAndNodeArgs] Removing initializer 'Constant_350'. It is not used by any node and should be removed from the model.


0.1867048740386963 s

2、安卓端部署
# 首先安装PaddleLite
!pip install paddlelite==2.9.0
# 模型导出
#--valid_targets中参数(arm)用于传统手机,(npu,arm )用于华为带有npu处理器的手机
%cd ~/PaddleDetection
!paddle_lite_opt \
    --model_file=inference/picodet_xs_416_coco_lcnet/model.pdmodel \
    --param_file=inference/picodet_xs_416_coco_lcnet/model.pdiparams \
    --optimize_out=inference/model \
    --optimize_out_type=naive_buffer \
    --valid_targets=arm
/home/aistudio/PaddleDetection
Loading topology data from inference/picodet_xs_416_coco_lcnet/model.pdmodel
Loading params data from inference/picodet_xs_416_coco_lcnet/model.pdiparams
1. Model is successfully loaded!
2. Model is optimized and saved into inference/model.nb successfully
导出picodet.nb文件之后就可以进行安卓部署了。AI Studio上有很多安卓部署的讲解,本项目就不再赘述,我参考的是这个项目:
十二、车道线分割
参考开源项目:基于DeepLabv3p的高精度车道线分割
分割模型选用DeepLabv3p,其架构如下图所示。
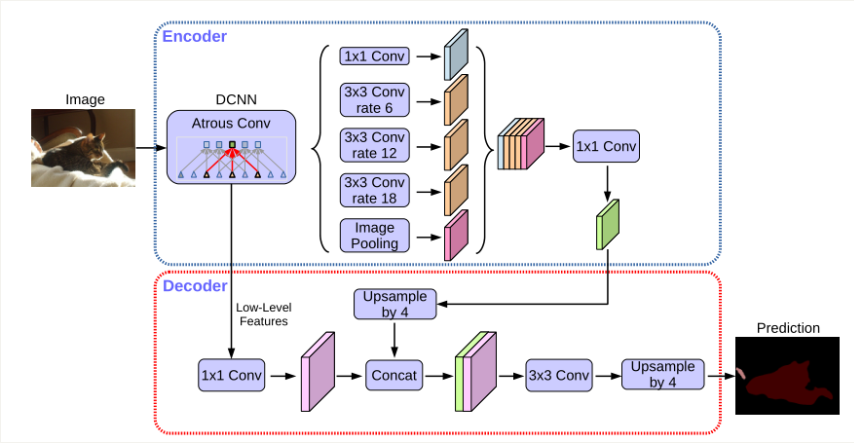
- 🌟该网络采用经典的Encoder-Decoder结构,通过ASPP模块实现不同感受野特征图的融合,并引入encoder实现更大的下采样倍率,减小计算量。由于分割场景简单,因此考虑到模型的推理时间,该项目在精度和速度之间进行了权衡,对模型推理时采取了抽取关键帧的策略。
# 使用pip安装方式安装2.0.0版本:
!pip install paddlex==2.0.0 -i https://mirror.baidu.com/pypi/simple
# 解压数据集
! unzip -oq /home/aistudio/data/data111458/mini_CULane.zip -d PaddleDetection/dataset
# 加载训练好的分割模型(已提前下载)
import paddlex as pdx
model = pdx.load_model('/home/aistudio/PaddleDetection/output/seg_model')
# test_jpg = '/home/aistudio/PaddleDetection/dataset/mini_CULane/JPEGImages/13.jpg'
test_jpg = '/home/aistudio/PaddleDetection/dataset/bd100k/images/100k/test/cb078020-5bfd7122.jpg'
result = model.predict(test_jpg)
pdx.seg.visualize(test_jpg, result, weight=0.0, save_dir='/home/aistudio/PaddleDetection/dataset/seg_result')
2022-08-01 17:10:46 [INFO] The visualized result is saved as /home/aistudio/PaddleDetection/dataset/seg_result/visualize_cb078020-5bfd7122.jpg
# 单张图片车道线分割测试效果
import matplotlib.pyplot as plt
from PIL import Image
import numpy as np
%matplotlib inline
visual_path = '/home/aistudio/PaddleDetection/dataset/seg_result/visualize_cb078020-5bfd7122.jpg'
test_jpg = '/home/aistudio/PaddleDetection/dataset/bd100k/images/100k/test/cb078020-5bfd7122.jpg'
res = np.array(Image.open(visual_path))
ori = np.array(Image.open(test_jpg))

def merge(img, anno):
    if img.shape[0:2] != anno.shape[0:2]:
        raise ValueError("the shape of image is {}, which is not equal to the shape of mask {}.".format(img.shape[0:2], anno.shape[0:2]))
    for i in range(0, anno.shape[0]):
        for j in range(0, anno.shape[1]):
            rgb = anno[i][j]
            if rgb.sum() > 100:
                img[i][j] = anno[i][j]
    return img

img = merge(ori, res)

plt.figure(figsize=(15,12))
plt.imshow(img)
plt.show()

十三、最终效果展示
步骤如下:
-
首先将视频逐帧划分成图像,然后利用进行车道线的分割和增强,并存储推理后的图片;
-
然后将这些图片利用导出的ONNX模型推理一次,产生后处理的锚框作为最终的结果;
# 首先保存分割图像
save_dir = 'dataset/seg_result'
for root, dirs, files in os.walk(save_dir, topdown=False):
    for name in files:
        os.remove(os.path.join(root, name))
    for name in dirs:
        os.rmdir(os.path.join(root, name))

for test_jpg in [r'dataset/mini_CULane/JPEGImages/{}.jpg'.format(str(i)) for i in range(1, 1000)]:
    result = model.predict(test_jpg)
    pdx.seg.visualize(test_jpg, result, weight=0.0, save_dir=save_dir)
# 对保存的分割mask与原图合并(这一步比较慢)
import cv2
from tqdm import tqdm
def merge(img, anno):
    if img.shape[0:2] != anno.shape[0:2]:
        raise ValueError("the shape of image is {}, which is not equal to the shape of mask {}.".format(img.shape[0:2], anno.shape[0:2]))
    for i in range(0, anno.shape[0]):
        for j in range(0, anno.shape[1]):
            rgb = anno[i][j]
            if rgb.sum() > 100:
                img[i][j] = anno[i][j]
    return img
if not os.path.exists("dataset/merge_result"):
    os.mkdir("dataset/merge_result")
else:
    for root, dirs, files in os.walk("dataset/merge_result", topdown=False):
        for name in files:
            os.remove(os.path.join(root, name))
        for name in dirs:
            os.rmdir(os.path.join(root, name))
for i in tqdm(range(1, 1000)):
    jpg = 'dataset/mini_CULane/JPEGImages/{}.jpg'.format(i)
    mask = 'dataset/seg_result/visualize_{}.jpg'.format(i)
    img = np.array(Image.open(jpg))
    anno = np.array(Image.open(mask))
    target = merge(img, anno)
    cv2.imwrite("dataset/merge_result/visualize_{}.jpg".format(i), target[:,:,::-1])
# 接下来读取merge_result的图片进行推理
# 注意这里是对原图进行检测,然后结果标注在带有分割mask的图中
# 预处理
from PIL import Image
import numpy as np
import os, cv2
def preprocess(img_file, w, h):
    input_shape = (1, 3, w, h)
    img = Image.open(img_file)
    img = img.resize((w, h), Image.BILINEAR)
    # convert the input data into the float32 input
    img_data = np.array(img)
    img_data = np.transpose(img_data, [2, 0, 1])
    img_data = np.expand_dims(img_data, 0)
    mean_vec = np.array([0.485, 0.456, 0.406])
    stddev_vec = np.array([0.229, 0.224, 0.225])
    norm_img_data = np.zeros(img_data.shape).astype('float32')
    for i in range(img_data.shape[1]):
        norm_img_data[:,i,:,:] = (img_data[:,i,:,:]/255 - mean_vec[i]) / stddev_vec[i]
    return norm_img_data.astype('float32'), np.array(img)

def picodet_onnx_inference(img_file, idx):

    # Run the model on the backend
    session = onnxruntime.InferenceSession('picodet_xs_416_coco_lcnet.onnx', None)

    # get the name of the first input of the model
    input_name = session.get_inputs()[0].name
    output_name = session.get_outputs()[0].name
    input_data, raw_img = preprocess(img_file, 416, 416)
    image_size = np.array([raw_img.shape[1], raw_img.shape[0]], dtype=np.float32).reshape(1, 2)
    raw_result = session.run([], {input_name: input_data,
                                  'scale_factor':image_size})
    yolonms_layer_1 = raw_result[0]
    yolonms_layer_1_1 = raw_result[1]

    img = "dataset/merge_result/visualize_{}.jpg".format(idx)
    img = cv2.imread(img)
    h, w = img.shape[0], img.shape[1]
    for res in yolonms_layer_1:
        cls, score, x_min, y_min, x_max, y_max = res
        bboxes = [x_min, y_min, x_max, y_max]
        if(score > 0.5):
            x1 = w*bboxes[0]
            y1 = h*bboxes[1]
            x2 = w*bboxes[2]
            y2 = h*bboxes[3]
            cv2.rectangle(img, (int(x1), int(y1)), (int(x2), int(y2)), (102, 136, 255), 2)
            cv2.putText(img, "car", (int(x1), int(y1)), cv2.FONT_HERSHEY_SIMPLEX, 0.55, (102, 136, 255), 2)
            cv2.imwrite("dataset/onnx_result/visualize_{}.jpg".format(idx), img)

if not os.path.exists("dataset/onnx_result"):
    os.mkdir("dataset/onnx_result")
else:
    for root, dirs, files in os.walk("dataset/onnx_result", topdown=False):
        for name in files:
            os.remove(os.path.join(root, name))
        for name in dirs:
            os.rmdir(os.path.join(root, name))
for i in range(1, 1000):
    img = 'dataset/mini_CULane/JPEGImages/{}.jpg'.format(str(i))
    picodet_onnx_inference(img, i)
# 检测结果生成视频(如无法运行请在本地运行)
import cv2
size = (1640, 590)
# 分割结果
# 完成写入对象的创建,第一个参数是合成之后的视频的名称,第二个参数是可以使用的编码器,第三个参数是帧率即每秒钟展示多少张图片,第四个参数是图片大小信息
fourcc = cv2.VideoWriter.fourcc('m', 'p', '4', 'v')
videowrite = cv2.VideoWriter('dataset/final.mp4', fourcc, 15, size)#15是帧数,size是图片尺寸
img_array = []
for filename in [r'dataset/onnx_result/visualize_{}.jpg'.format(i) for i in range(1, 1000)]:
    if not os.path.exists(filename):
        filename = filename.replace('onnx', 'merge')
    img = cv2.imread(filename)
    img_array.append(img)
for i in range(len(img_array)):
    videowrite.write(img_array[i])

array = []
for filename in [r'dataset/onnx_result/visualize_{}.jpg'.format(i) for i in range(1, 1000)]:
    if not os.path.exists(filename):
        filename = filename.replace('onnx', 'merge')
    img = cv2.imread(filename)
    img_array.append(img)
for i in range(len(img_array)):
    videowrite.write(img_array[i])

videowrite.release()
项目总结
利用PP-PicoDet在大规模车辆数据集BDD100k上进行了200个epoch的预训练,并导出了静态模型和ONNX模型实现高效推理。
在静态图模型的基础上,利用Paddlelite进行安卓部署,使用官方提供的安卓部署demo的develop分支实现了移动端的实时检测。
除此之外,使用Deeplabv3p在小规模的车道线数据集进行预训练,实现车道线的分割。
最终通过动态图分割车道线,并对原始图像进行ONNX车辆检测后处理,将检测结果绘制在车道线分割图上。
个人介绍:赵祎安 大连理工大学 计算机专业大三 大工飞桨领航团团长
请点击此处查看本环境基本用法.
Please click here for more detailed instructions.
声明
此项目为搬运
原项目地址

学大模型,用大模型上飞桨星河社区!每天8点V100G算力免费领!免费领取ERNIE 4.0 100w Token >>>
更多推荐


 2
2 0
0- 0


 已为社区贡献1436条内容

所有评论(0)