
基于PaddleDetection的医疗显微图像-结核杆菌识别_副本
本项目使用VOC数据集,同时教你快速上手PaddleDetection套件。此项目使用PP-yolov2
🔥基于PaddleDetection的医疗显微图像-结核杆菌识别
此项目使用PP-yolov2检测痰液中的结合杆菌,从而实现异常检测。
标题转载自AI Studio
标题项目链接https://aistudio.baidu.com/aistudio/projectdetail/3503450
相信你看完这篇项目一定会有所收获的
先看后赞,养成习惯
folk收藏,人生辉煌

一、项目背景
结核病(Tuberculosis,TB)是由结核分枝杆菌(Mycobacterium tuberculosis) 引起的一种慢性人畜共患病,它不受年龄、性别、种族、职业、地区的影响,人体许多器官、系统均可患结核病,其中以肺结核最为常见。结核病既是一个公共卫生问题,也是一个社会经济问题,对人类的公共健康构成很大威胁,因此对其快速诊断检测就至关重要。
1.虽然染色处理可以使得结核杆菌在显微镜拍摄的医学图像中显现,医生则可以通过检测图像中的结核杆菌辅助诊断患者是否有结核病。🎯
2.但是通过构建准确率的目标检测模型可实现由智能系统辅助医生进行检测工作,应用于目前的医疗检测产品中能够满足真实的结核病检测需求。🎯
3.实现AI+医疗,为产业赋能。🎯
二、数据简介
数据说明
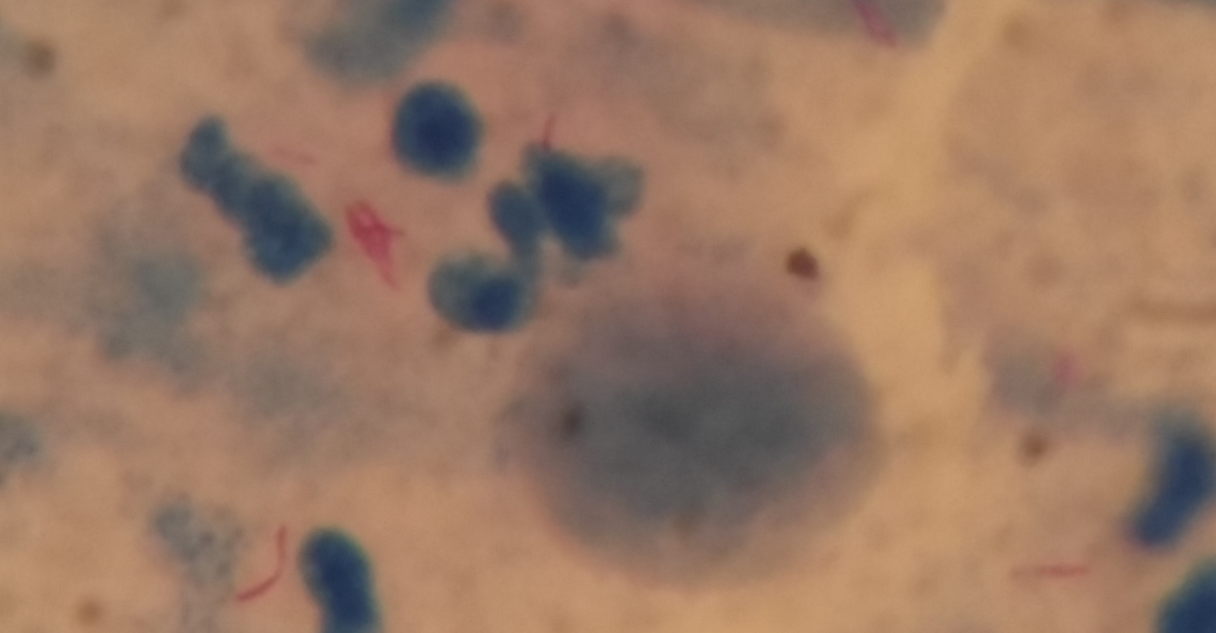
该数据集全部与结核有关,取自痰液样本。它包含1265个痰液图像以及3734个细菌的边界框。XML文件包含图像的边界框详细信息。
数据来源 AI Research and Automated Laboratory Diagnostics
# 1.加载数据集
!unzip /home/aistudio/data/data83968/Tuberculosis6208.zip -d ./Dataset
三、模型的选择与开发
使用PaddleDetection,使用pp-yolov2算法
1.简介
相较20年发布的PP-YOLO,v2版本在COCO 2017 test-dev上的精度提升了3.6个百分点,由45.9%提升到了49.5%;在640*640的输入尺寸下,FPS达到68.9FPS。 PP-YOLOv2在同等速度下,精度超越YOLOv5!

2.模型库
PP-YOLO模型库
| Model | GPU number | images/GPU | backbone | input shape | Box APval | Box APtest | V100 FP32(FPS) | V100 TensorRT FP16(FPS) | download | config |
|---|---|---|---|---|---|---|---|---|---|---|
| PP-YOLO | 8 | 24 | ResNet50vd | 608 | 44.8 | 45.2 | 72.9 | 155.6 | model | config |
| PP-YOLO | 8 | 24 | ResNet50vd | 512 | 43.9 | 44.4 | 89.9 | 188.4 | model | config |
| PP-YOLO | 8 | 24 | ResNet50vd | 416 | 42.1 | 42.5 | 109.1 | 215.4 | model | config |
| PP-YOLO | 8 | 24 | ResNet50vd | 320 | 38.9 | 39.3 | 132.2 | 242.2 | model | config |
| PP-YOLO_2x | 8 | 24 | ResNet50vd | 608 | 45.3 | 45.9 | 72.9 | 155.6 | model | config |
| PP-YOLO_2x | 8 | 24 | ResNet50vd | 512 | 44.4 | 45.0 | 89.9 | 188.4 | model | config |
| PP-YOLO_2x | 8 | 24 | ResNet50vd | 416 | 42.7 | 43.2 | 109.1 | 215.4 | model | config |
| PP-YOLO_2x | 8 | 24 | ResNet50vd | 320 | 39.5 | 40.1 | 132.2 | 242.2 | model | config |
| PP-YOLO | 4 | 32 | ResNet18vd | 512 | 29.2 | 29.5 | 357.1 | 657.9 | model | config |
| PP-YOLO | 4 | 32 | ResNet18vd | 416 | 28.6 | 28.9 | 409.8 | 719.4 | model | config |
| PP-YOLO | 4 | 32 | ResNet18vd | 320 | 26.2 | 26.4 | 480.7 | 763.4 | model | config |
| PP-YOLOv2 | 8 | 12 | ResNet50vd | 640 | 49.1 | 49.5 | 68.9 | 106.5 | model | config |
| PP-YOLOv2 | 8 | 12 | ResNet101vd | 640 | 49.7 | 50.3 | 49.5 | 87.0 | model | config |
注意:
- PP-YOLO模型使用COCO数据集中train2017作为训练集,使用val2017和test-dev2017作为测试集,Box APtest为
mAP(IoU=0.5:0.95)评估结果。 - PP-YOLO模型训练过程中使用8 GPUs,每GPU batch size为24进行训练,如训练GPU数和batch size不使用上述配置,须参考FAQ调整学习率和迭代次数。
- PP-YOLO模型推理速度测试采用单卡V100,batch size=1进行测试,使用CUDA 10.2, CUDNN 7.5.1,TensorRT推理速度测试使用TensorRT 5.1.2.2。
- PP-YOLO模型FP32的推理速度测试数据为使用
tools/export_model.py脚本导出模型后,使用deploy/python/infer.py脚本中的--run_benchnark参数使用Paddle预测库进行推理速度benchmark测试结果, 且测试的均为不包含数据预处理和模型输出后处理(NMS)的数据(与YOLOv4(AlexyAB)测试方法一致)。 - TensorRT FP16的速度测试相比于FP32去除了
yolo_box(bbox解码)部分耗时,即不包含数据预处理,bbox解码和NMS(与YOLOv4(AlexyAB)测试方法一致)。
综合分析后我选择使用了PP-YOLOv2+ResNet50vd
3.基于PaddleDetection代码算法实现
此项目使用的是PaddleDetection套件,下载地址为:
github:https://github.com/PaddlePaddle/PaddleDetection
# 下载PaddleDetection
!git clone https://gitee.com/paddlepaddle/PaddleDetection.git
3.1 配置数据集
由于发现数据集中提供的的标注文件和图片混在一起,所以我们将其分类。
以下提供两种方法:
# 方法一:

import os
# 创建一层目录
os.mkdir("Dataset/JPEGImages")
os.makedirs("Dataset/Annotations")

import os
import shutil

# 创建文件夹
path_xml = "Dataset/tuberculosis-phonecamera"
filelist = os.listdir(path_xml)
path1 = "Dataset/tuberculosis-phonecamera"
path2 = "Dataset/JPEGImages/"
path3 = "Dataset/Annotations/"


for files in filelist:
    filename1 = os.path.splitext(files)[1]  # 读取文件后缀名
    filename0 = os.path.splitext(files)[0]  #读取文件名
    # print(filename1)
    m = filename1 == '.jpg'
    # print(m)
    if m :
        full_path = os.path.join(path1, files)
        despath = path2 + filename0+'.jpg' #.jpg为你的文件类型,即后缀名
        shutil.move(full_path, despath)

    else :
        full_path = os.path.join(path1, files)
        despath = path3 + filename0 + '.xml'  # .jpg为你的文件类型,即后缀名
        shutil.move(full_path, despath)
# 移动文件到PaddlDetection下
os.makedirs("PaddleDetection/dataset/data")

shutil.move('Dataset/Annotations','PaddleDetection/dataset/data')
shutil.move('Dataset/JPEGImages','PaddleDetection/dataset/data')
# 方法二:

# 创建文件夹
!mkdir /home/aistudio/PaddleDetection/data/
!mkdir /home/aistudio/PaddleDetection/data/JPEGImages/
!mkdir /home/aistudio/PaddleDetection/data/Annotations/
# 分别移动两种文件
!mv ../tuberculosis-phonecamera/*.jpg /home/aistudio/PaddleDetection/data/JPEGImages/
!mv ../tuberculosis-phonecamera/*.xml /home/aistudio/PaddleDetection/data/Annotations/
3.2 划分训练集与验证集
同样提供两种方法:
1.使用PaddleX直接划分!paddlex --split_dataset --format VOC --dataset_dir 文件路径 --val_value 0.2 --test_value 0.1(记得修改文件路径)
2.见下方演示
import os
import random
# 类别数量
file_saved = []   # 保存数据
random.seed(2022) # 设置随机数种子
# voc数据路径问题
# 根目录信息,子目录信息,files_img--该文件夹下的文件名称
for _, _, files_img in os.walk('PaddleDetection/dataset/data/JPEGImages'):
    random.shuffle(files_img)
    for _, _, files_xml in os.walk('PaddleDetection/dataset/data/Annotations'):
        # indexs = 0
        # 1.jpg
        # 1.xml
        for i in range(len(files_img)):  # 遍历图片文件--一张一张的
            for j in range(len(files_xml)):
                # 匹配,与图片前缀名称一致的xml文件
                # 前缀是否一致
                if files_img[i][:-4] == files_xml[j][:-4]:
                    # 图片的相对路径 + 空格 + 标注文件的相对路径 + '\n'
                    # jpeg, img -- join -> jpeg/img
                    # JPEGImages/files_img[i]
                    file_maked = os.path.join('JPEGImages', files_img[i]) + ' ' + os.path.join('Annotations', files_xml[j])  + '\n'

                    file_saved.append(file_maked)          # 每一个类别放在对应的缓存空间中
                    break
# example: 图片的相对路径 + 空格 + 标注文件的相对路径 + '\n'
# 训练集的划分
# 训练集占80%的数据
# 验证集/评估数据集:1-80% = 20%
Train_percent = 0.8
# train.txt保存
with open('PaddleDetection/dataset/data/train.txt', 'w') as f:
    # int(Train_percent * len(file_saved))
    # final_index = int(len(file_saved)*Train_percent) - 1
    f.writelines(file_saved[:int(len(file_saved)*Train_percent)])  # 写入多行数据
    print('train.txt Has Writed {0} records!'.format(len(file_saved[:int(len(file_saved)*Train_percent)])))
# eval.txt保存
with open('PaddleDetection/dataset/data/eval.txt', 'w') as f:
    # final_index + 1 == int(len(file_saved)*Train_percent)
    f.writelines(file_saved[int(len(file_saved)*Train_percent):])
    print('eval.txt Has Writed {0} records!'.format(len(file_saved[int(len(file_saved)*Train_percent):])))
3.3 修改源码,配置文件
新建label_list.txt
经过划分我们已经有了eval.txt以及train.txt,我们还需要我们的标签文件,通过分析数据集我们所要识别的只有一类TBbacillus结合杆菌,所以我们新建label_list.txt加入标签
def text_create(name, msg):
    desktop_path = "PaddleDetection/dataset/data/"  # 新创建的txt文件的存放路径
    full_path = desktop_path + name + '.txt'
    file = open(full_path, 'w')
    file.write(msg)       # msg也就是下面的TBbacillus!
    file.close()      # 记得关闭文件

text_create('label_list', 'TBbacillus')
修改源文件,并配置模型
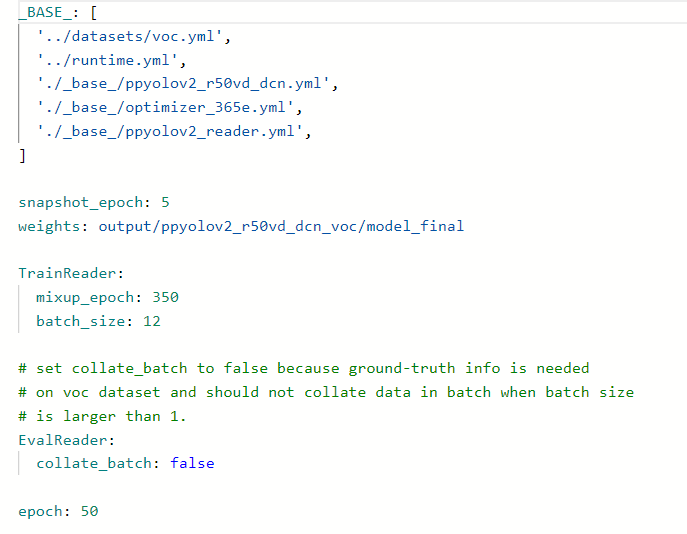
打开此目录下文件并修改为图片样式PaddleDetection/configs/ppyolo/ppyolov2_r50vd_dcn_voc.ymlsnapshot_epoch为迭代轮次以及参数保存轮次、周期,这要根据你的具体样数本来决定,可以先保持默认数值(因为只是实例,为了方便我写为了5)epoch训练批次
之后,再修改以下目录文件PaddleDetection/configs/datasets/voc.yml
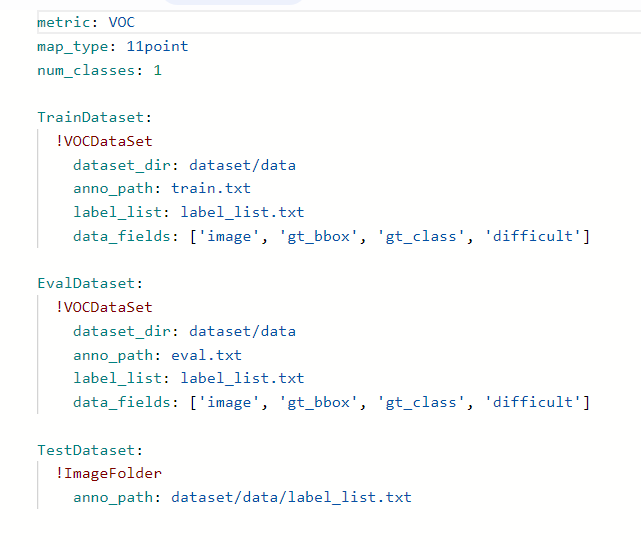
将其中路径修改为之前存放的训练集、验证集以及标签的路径.
🎯易错警示
我在训练时候发现标签文件中没有size关键字(就是相当于没有原始图片的大小),所以我通过如下测试:
import cv2
img = cv2.imread('PaddleDetection/dataset/data/JPEGImages/tuberculosis-phone-0002.jpg')
h,w,c = img.shape
print(h)
print(w)
print(c)
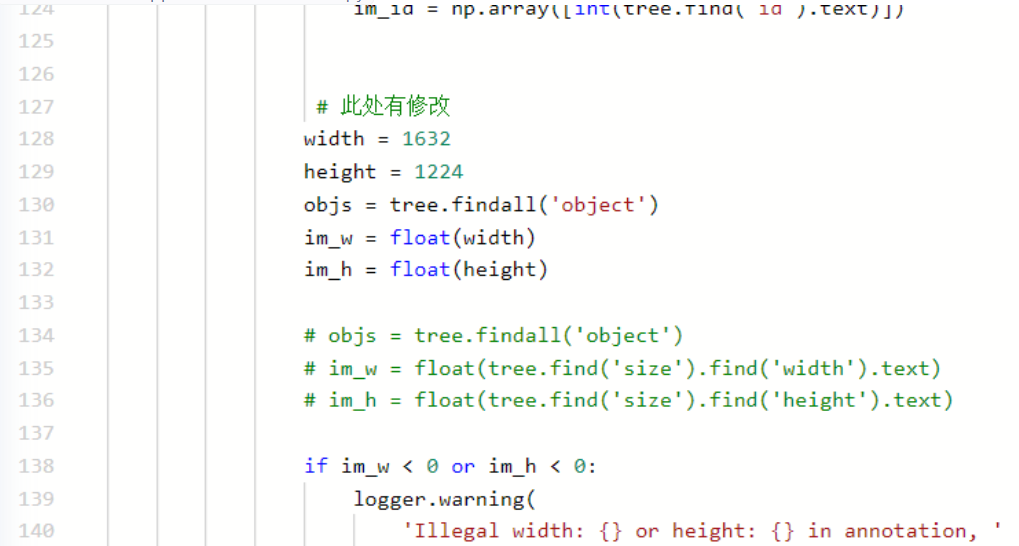
通过如上代码我测试了众多图片,发现数据集中图片都为这个尺寸:width = 1632,height = 1224,depth = 3,所以将PaddleDetection/ppdet/data/source/voc.py此目录下进行修改.并赋予了一个初始值.
4. 模型训练
# 下载PaddleDetection依赖库
%cd /home/aistudio/PaddleDetection/
!pip install -r requirements.txt
# 因为他提示我更新pip,所以更新了一下
以更新了一下
!/opt/conda/envs/python35-paddle120-env/bin/python -m pip install --use --upgrade pip
!python setup.py install
# 模型训练,并配置GPU训练
import os
os.environ['CUDA_VISIBLE_DEVICES'] = '0'
%cd /home/aistudio/PaddleDetection/
# !CUDA_VISIBLE_DEVICES=0
!python tools/train.py -c configs/ppyolo/ppyolov2_r50vd_dcn_voc.yml  --use_vdl=True --vdl_log_dir="./output"
5. 数据模型可视化
将下列设置好后
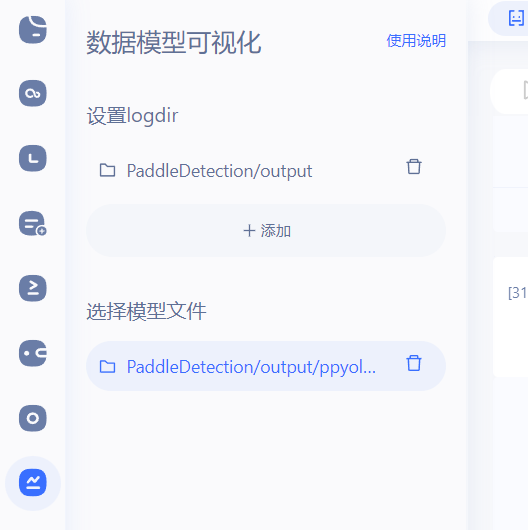
我们就可以查看,我们训练时的参数
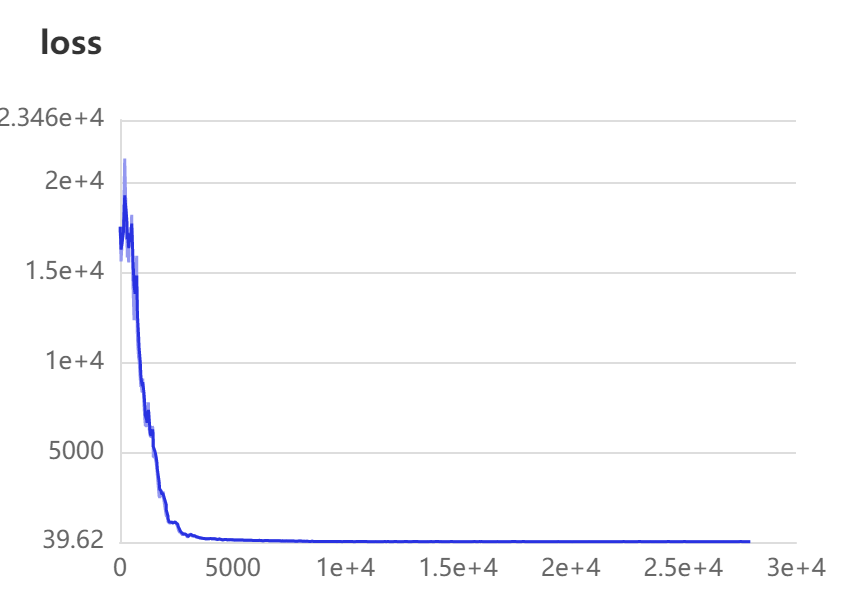
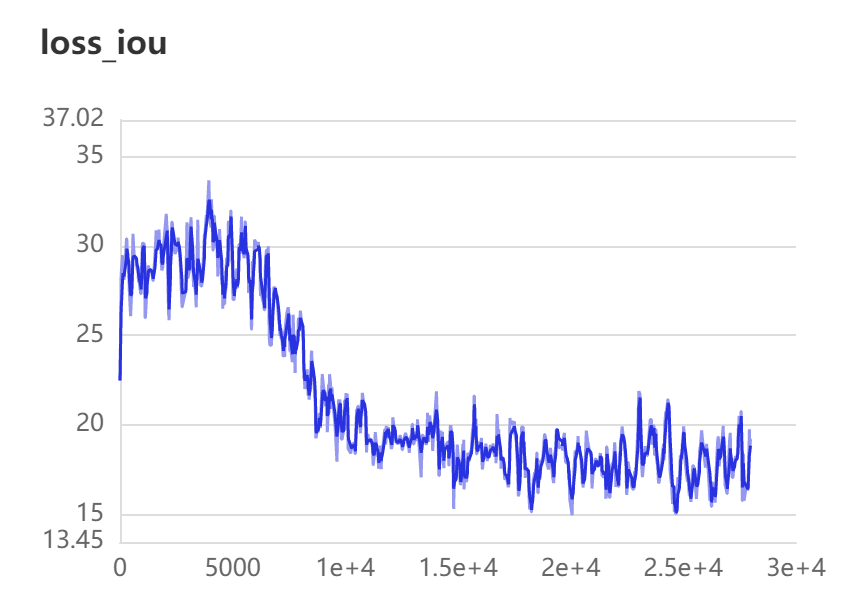
6. 模型评估
因为训练时间过长,所以我只进行了短暂的训练,最后的最佳为这个文件,我们可以通过后面的代码,测试他的精确度.
!python -u tools/eval.py -c configs/ppyolo/ppyolov2_r50vd_dcn_voc.yml
7. 模型预测
!python tools/infer.py -c configs/ppyolo/ppyolov2_r50vd_dcn_voc.yml\
--infer_img=/home/aistudio/PaddleDetection/dataset/data/JPEGImages/tuberculosis-phone-0641.jpg \
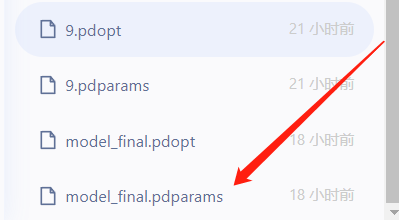
-o weights=/home/aistudio/PaddleDetection/output/ppyolov2_r50vd_dcn_voc/model_final.pdparams
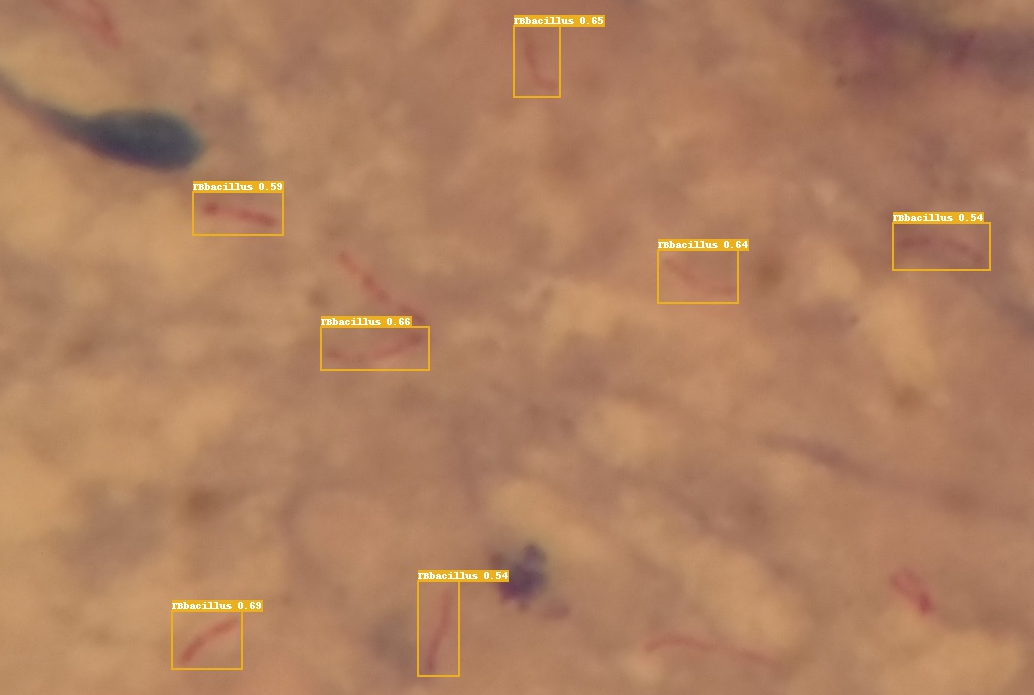
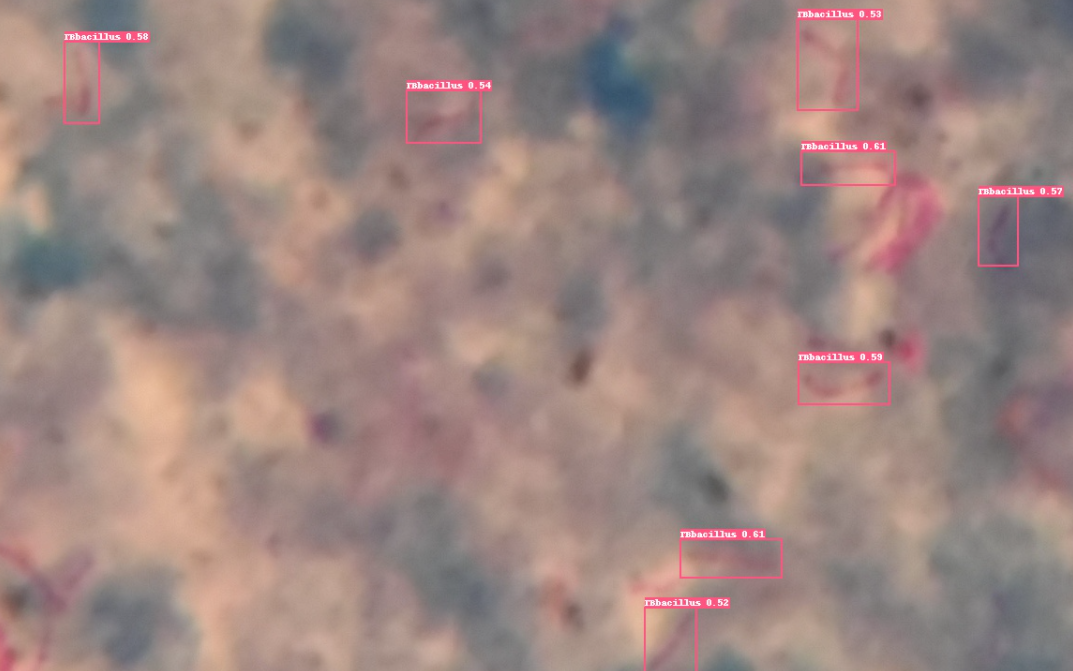
以下为我们检测出的效果
总结
目前项目还有很多可以优化的方面,欢迎大家的提问与建议.
本项目已在Github和Gitee开源,欢迎大家点赞
Github链接:https://github.com/Yao-BH/PaddleDetection-TBbacillus
Gitee链接:https://gitee.com/yao-bohao/PaddleDetection-TBbacillus
1.一定要结合源码,进行项目的完善与学习
2.本项目数据集还不算太多,大家之后可以添加更多数据进入,并对相关参数进行修改,那么精确度就会更好的.
3.同时也感谢大佬的帮助,让我在遇到问题时可以更快的解决。🔥🔥🔥
作者简介
2020级 数据科学与大数据技术专业 本科生 姚博豪
本人也是一名在深度学习路上奔跑的小白。也希望我踩过坑的一些经验,可以对大家有一些帮助。
百度飞桨领航团团长
互联网+省级银奖,中国高校计算机大赛西北赛区二等奖等

学大模型,用大模型上飞桨星河社区!每天8点V100G算力免费领!免费领取ERNIE 4.0 100w Token >>>
更多推荐


 0
0 0
0- 0


 已为社区贡献1437条内容

所有评论(0)