
【从踩坑到入门】基于Jetson Nano的深度学习模型部署教程
模型部署的思路很简单,但往往会遇到很多坑,本文整理了一些模型部署时经常会遇到的问题及解决方法
基于Jetson Nano的深度学习模型部署教程
模型部署的思路很简单,但看起来简单的部署思路,在实际部署时往往会遇到很多坑,本文整理了在Jetson Nano部署深度学习模型的思路以及一些在部署模型时经常会遇到的问题及解决方法。
参考资料:
一、Jetson Nano的入门
Jetson Nano是Nvidia推出的低配版GPU运算平台,可以用来入门深度学习模型的部署,上手起来也是非常简单。
1.系统安装
系统安装过程分为3步:
1.下载必要的软件及镜像
- Jetson Nano Developer Kit SD卡映像
- Windows版SD存储卡格式化程序
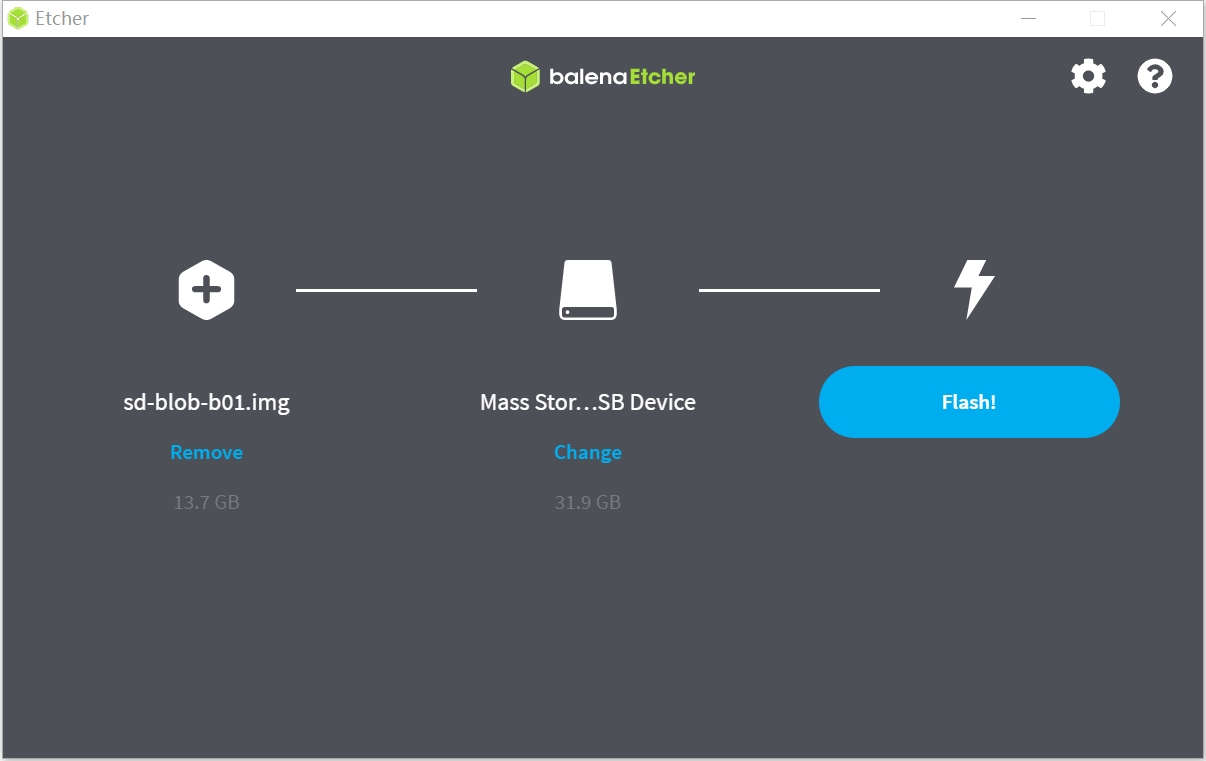
- 镜像烧录工具balenaEtcher
2.格式化SD卡并写入镜像
3.连接电源并启动
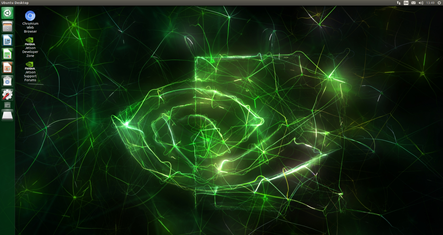
开机后,如果能够成功进入上面的显示界面,那么恭喜你,你已成功安装。
如果你在安装过程中遇到了问题,或者是想深入配置(风扇,wifi,,换源,远程桌面等),那么可以看看下面这几篇文章:
2.CSI摄像头的安装与调试
在摄像头安装与调试过程中,很多同学往往会遇到很多问题,特别是使用CSI摄像头的时候,会遇到不少坑。
安装方法
安装前,安装摄像头的插槽需要打开,如果没有打开插槽的话,摄像头的排线是插不进去的。打开方法也很简单,往上提一下就能打开:
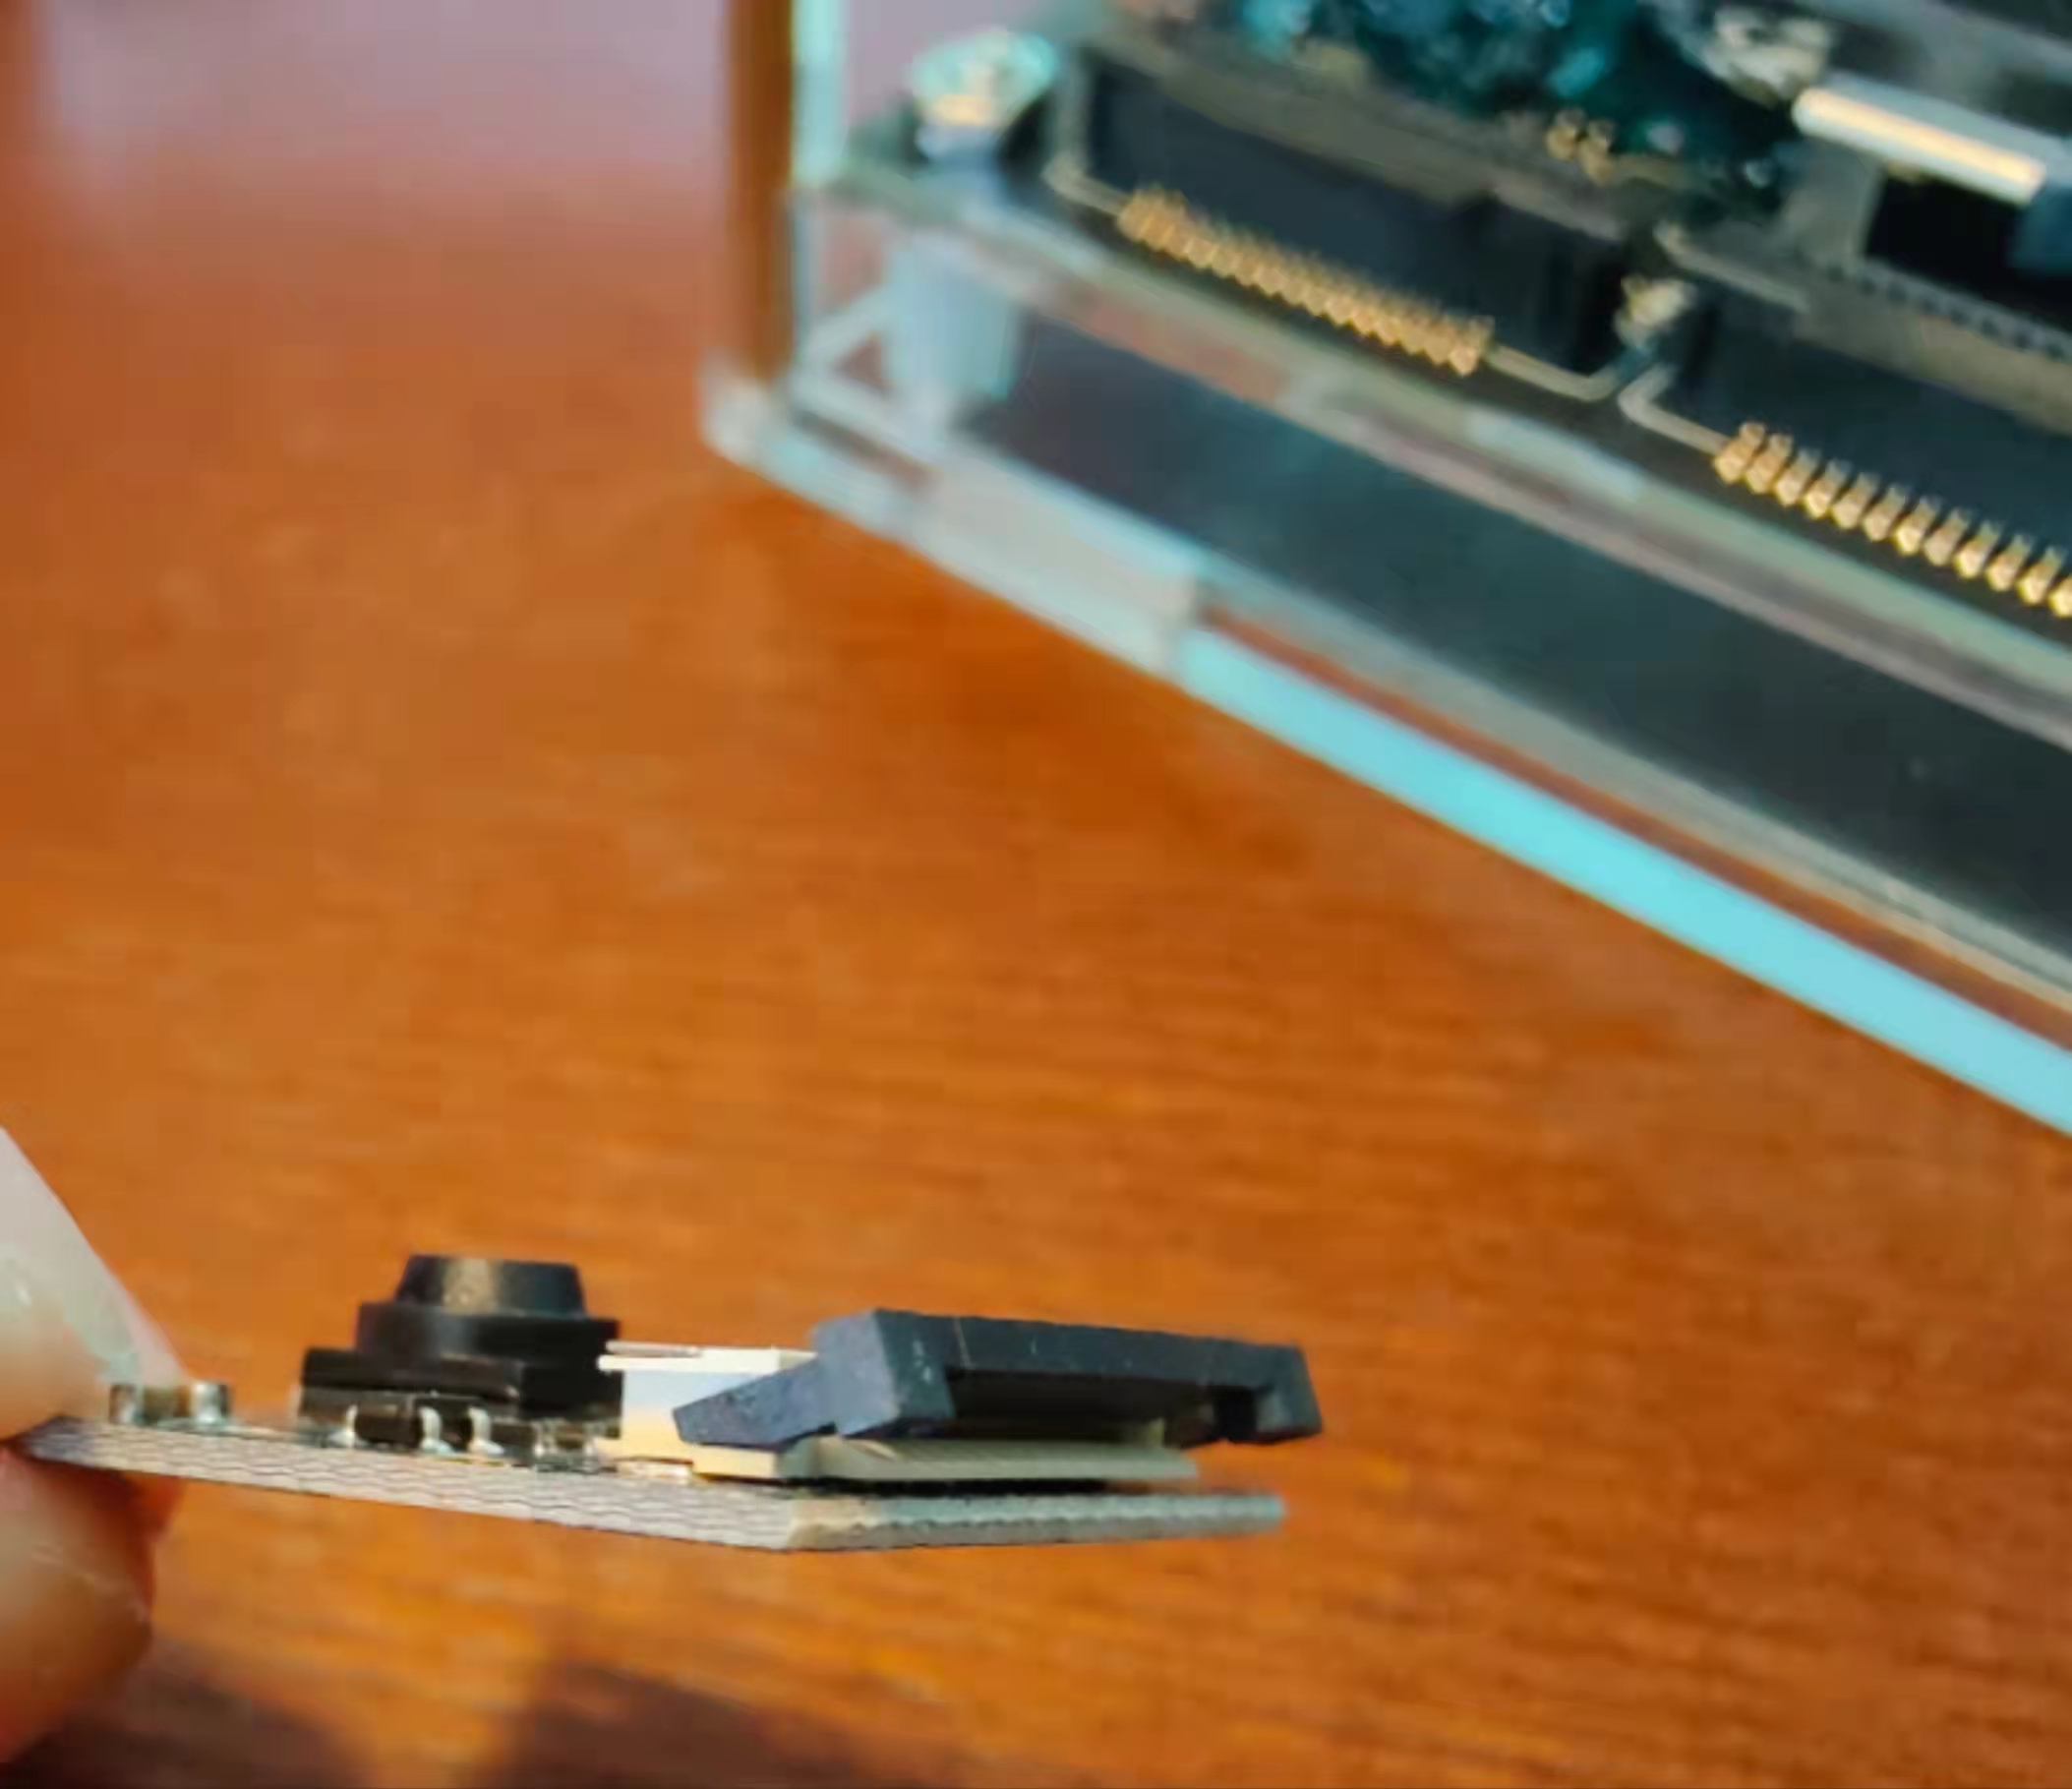
插入排线时有金属条的一侧朝内:
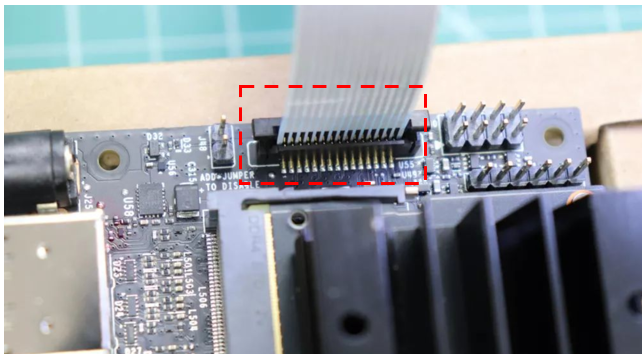
一定注意不要插反了!
异常解决
一般我们使用OpenCV打开摄像头的方法是用cap = cv2.VideoCapture(),如果是USB摄像头,里面的参数写0即可。
但如果你使用的是CSI摄像头,直接用cap = cv2.VideoCapture(0)打开摄像头的话,可能会是这样的结果:
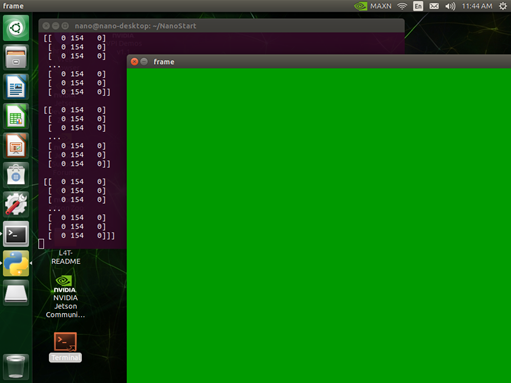
这时你需要把里面的参数改一下,改成CSI摄像头的配置参数:
cap = cv2.VideoCapture("nvarguscamerasrc \
                       !video/x-raw(memory:NVMM), width=640, height=480, format=NV12, framerate=30/1\
                       !nvvidconv flip-method=0 ! videoconvert ! video/x-raw, format=BGR ! appsink")
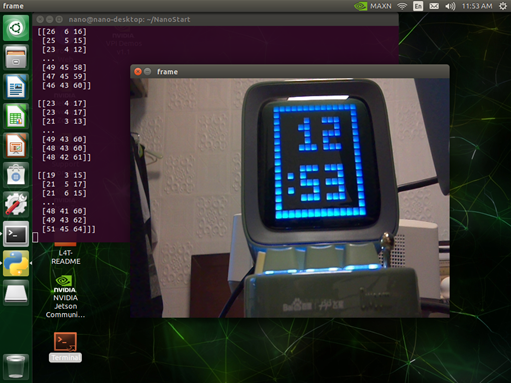
修改后,读取到的图像就是正常的RGB图像了:
二、安装必要的资源库
Paddle Inference 是飞桨的原生推理库, 作用于服务器端和云端,提供高性能的推理能力,在使用之前,我们需要在Jetson Nano里安装好PaddlePaddle。
1.安装pip并更新
sudo apt-get install python3-pip
pip3 install --upgrade pip
2.更新Numpy
Numpy版本过高或过低都不行,如果Numpy版本较低,那么第4步安装PaddlePaddle的时候会报错;如果Numpy版本过高,在import paddle的时候会有一个核心已转移的报错:

可尝试1.16.1版本的Numpy:
pip3 install --upgrade numpy==1.16.1
3.查看Jetpack版本
cat /etc/nv_tegra_release
4.下载并安装与Jetpack版本对应的PaddlePaddle
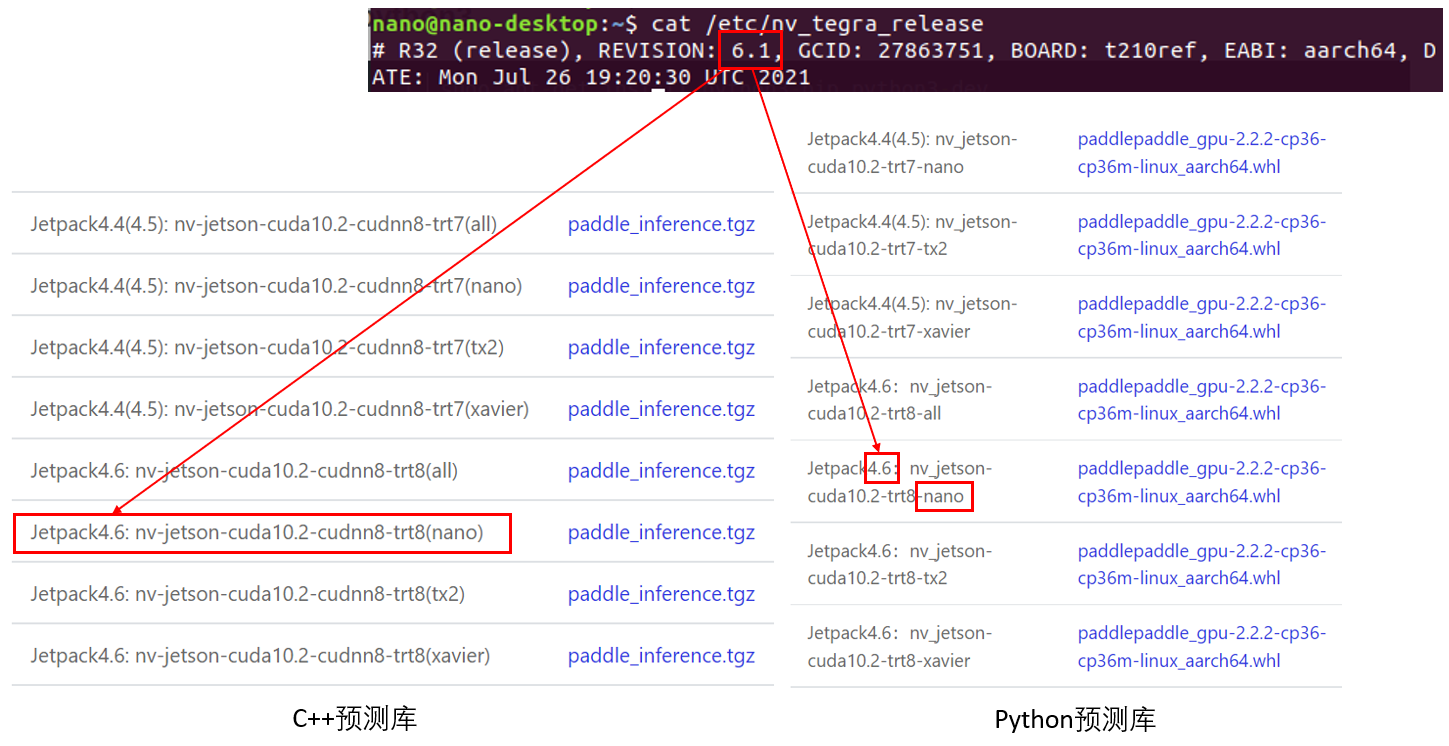
下载链接:
https://paddleinference.paddlepaddle.org.cn/user_guides/download_lib.html
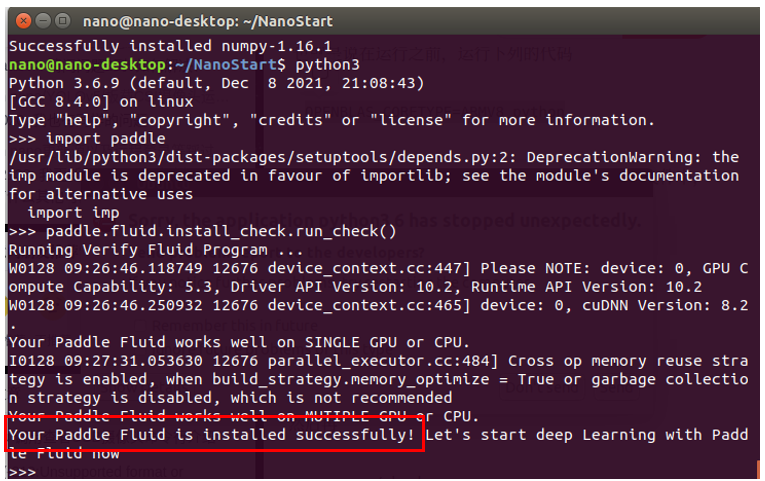
成功安装PaddlePaddle:
三、准备预测部署模型
在部署之前,我们需要得到 Paddle 预测格式的模型:
- 存储模型结构的
inference.pdmodel - 存储模型参数的
inference.pdiparams
获取方式有很多种,可以自己训练一个模型,并使用paddle.static.save_inference_model接口保存推理模型和参数
当然你也可以使用套件训练一个模型,然后将模型导出成推理模型,下面我们以PaddleDetection为例。
1.拉取PaddleDetection源码
以PaddleDetection为例,获取推理模型。
# 拉取PaddleDetection源码
!git clone https://gitee.com/PaddlePaddle/PaddleDetection
# 安装依赖库
!pip install pycocotools
!pip install motmetrics
!pip install lap
2.导出推理模型
我们可以在/PaddleDetection/configs下找到很多模型,这里以ppyolo为例,选择你想导出的预训练模型。
模型权重可以在PaddleDetection的官方文档里找到。如果你想导出别的模型,直接替换下面config和weight的参数即可。
%cd ~/PaddleDetection/
!python tools/export_model.py -c configs/ppyolo/ppyolo_tiny_650e_coco.yml --output_dir=./inference_model \
del \
                              -o weights=https://paddledet.bj.bcebos.com/models/ppyolo_tiny_650e_coco.pdparams
/home/aistudio/PaddleDetection
Warning: import ppdet from source directory without installing, run 'python setup.py install' to install ppdet firstly
[01/29 11:44:45] ppdet.utils.download INFO: Downloading ppyolo_tiny_650e_coco.pdparams from https://paddledet.bj.bcebos.com/models/ppyolo_tiny_650e_coco.pdparams
100%|████████████████████████████████████| 4342/4342 [00:00<00:00, 28952.68KB/s]
[01/29 11:44:46] ppdet.utils.checkpoint INFO: Finish loading model weights: /home/aistudio/.cache/paddle/weights/ppyolo_tiny_650e_coco.pdparams
[01/29 11:44:46] ppdet.engine INFO: Export inference config file to ./inference_model/ppyolo_tiny_650e_coco/infer_cfg.yml
W0129 11:44:50.769462  8325 device_context.cc:447] Please NOTE: device: 0, GPU Compute Capability: 7.0, Driver API Version: 11.0, Runtime API Version: 10.1
W0129 11:44:50.769573  8325 device_context.cc:465] device: 0, cuDNN Version: 7.6.
[01/29 11:44:58] ppdet.engine INFO: Export model and saved in ./inference_model/ppyolo_tiny_650e_coco
推理模型准备好之后,下载到Jetson Nano即可使用。
四、准备预测部署程序
此部分代码参考Irving.Gao的在Jetson Nano上基于python部署Paddle Inference
以下代码请在Jetson Nano上运行。
1.导入资源库
import cv2
import numpy as np
from paddle.inference import Config
from paddle.inference import PrecisionType
from paddle.inference import create_predictor
import yaml
import time
2.图像预处理
def resize(img, target_size):
    """resize to target size"""
    if not isinstance(img, np.ndarray):
        raise TypeError('image type is not numpy.')
    im_shape = img.shape
    im_size_min = np.min(im_shape[0:2])
    im_size_max = np.max(im_shape[0:2])
    im_scale_x = float(target_size) / float(im_shape[1])
    im_scale_y = float(target_size) / float(im_shape[0])
    img = cv2.resize(img, None, None, fx=im_scale_x, fy=im_scale_y)
    return img

def normalize(img, mean, std):
    img = img / 255.0
    mean = np.array(mean)[np.newaxis, np.newaxis, :]
    std = np.array(std)[np.newaxis, np.newaxis, :]
    img -= mean
    img /= std
    return img

def preprocess(img, img_size):
    mean = [0.485, 0.456, 0.406]
    std = [0.229, 0.224, 0.225]
    img = resize(img, img_size)
    img = img[:, :, ::-1].astype('float32')  # bgr -> rgb
    img = normalize(img, mean, std)
    img = img.transpose((2, 0, 1))  # hwc -> chw
    return img[np.newaxis, :]
3.模型配置
def predict_config(model_file, params_file):
    '''
    函数功能:初始化预测模型predictor
    函数输入:模型结构文件,模型参数文件
    函数输出:预测器predictor
    '''
    # 根据预测部署的实际情况,设置Config
    config = Config()
    # 读取模型文件
    config.set_prog_file(model_file)
    config.set_params_file(params_file)
    # Config默认是使用CPU预测,若要使用GPU预测,需要手动开启,设置运行的GPU卡号和分配的初始显存。
    config.enable_use_gpu(500, 0)
    # 可以设置开启IR优化、开启内存优化。
    config.switch_ir_optim()
    config.enable_memory_optim()
    config.enable_tensorrt_engine(workspace_size=1 << 30, precision_mode=PrecisionType.Float32,max_batch_size=1, min_subgraph_size=5, use_static=False, use_calib_mode=False)
    predictor = create_predictor(config)
    return predictor

def predict(predictor, img):

    '''
    函数功能:初始化预测模型predictor
    函数输入:模型结构文件,模型参数文件
    函数输出:预测器predictor
    '''
    input_names = predictor.get_input_names()
    for i, name in enumerate(input_names):
        input_tensor = predictor.get_input_handle(name)
        input_tensor.reshape(img[i].shape)
        input_tensor.copy_from_cpu(img[i].copy())
    # 执行Predictor
    predictor.run()
    # 获取输出
    results = []
    # 获取输出
    output_names = predictor.get_output_names()
    for i, name in enumerate(output_names):
        output_tensor = predictor.get_output_handle(name)
        output_data = output_tensor.copy_to_cpu()
        results.append(output_data)
    return results
4.后处理
def draw_bbox_image(frame, result, label_list, threshold=0.5):

    for res in result:
        cat_id, score, bbox = res[0], res[1], res[2:]
        if score < threshold:
    	    continue
        for i in bbox:
            int(i)
        xmin, ymin, xmax, ymax = bbox
        cv2.rectangle(frame, (xmin, ymin), (xmax, ymax), (255,0,255), 2)
        print('category id is {}, bbox is {}'.format(cat_id, bbox))
        try:
            label_id = label_list[int(cat_id)]
            # #cv2.putText(图像, 文字, (x, y), 字体, 大小, (b, g, r), 宽度)
            cv2.putText(frame, label_id, (int(xmin), int(ymin-2)), cv2.FONT_HERSHEY_SIMPLEX, 0.5, (255,0,0), 2)
            cv2.putText(frame, str(round(score,2)), (int(xmin-35), int(ymin-2)), cv2.FONT_HERSHEY_SIMPLEX, 0.5, (0,255,0), 2)
        except KeyError:
            pass
5.主函数
# 从infer_cfg.yml中读出label
infer_cfg = open('inference_model/ppyolo_tiny_650e_coco/infer_cfg.yml')
data = infer_cfg.read()
yaml_reader = yaml.load(data)
label_list = yaml_reader['label_list']
print(label_list)
# 配置模型参数
model_file = "inference_model/ppyolo_tiny_650e_coco/model.pdmodel"
params_file = "inference_model/ppyolo_tiny_650e_coco/model.pdiparams"
# 初始化预测模型
predictor = predict_config(model_file, params_file)
# cap = cv2.VideoCapture(0)
cap = cv2.VideoCapture("nvarguscamerasrc \
!video/x-raw(memory:NVMM), width=640, height=480, format=NV12, framerate=30/1\
!nvvidconv flip-method=0 ! videoconvert ! video/x-raw, format=BGR ! appsink")
# 图像尺寸相关参数初始化
ret, img = cap.read()
im_size = 320
scale_factor = np.array([im_size * 1. / img.shape[0], im_size * 1. / img.shape[1]]).reshape((1, 2)).astype(np.float32)
im_shape = np.array([im_size, im_size]).reshape((1, 2)).astype(np.float32)
while True:
ret, frame = cap.read()
# print(frame)
# 预处理
data = preprocess(frame, im_size)
time_start = time.time()
# 预测
result = predict(predictor, [im_shape, data, scale_factor])
# print(result)
print('Time Cost:{}'.format(time.time()-time_start) , "s")
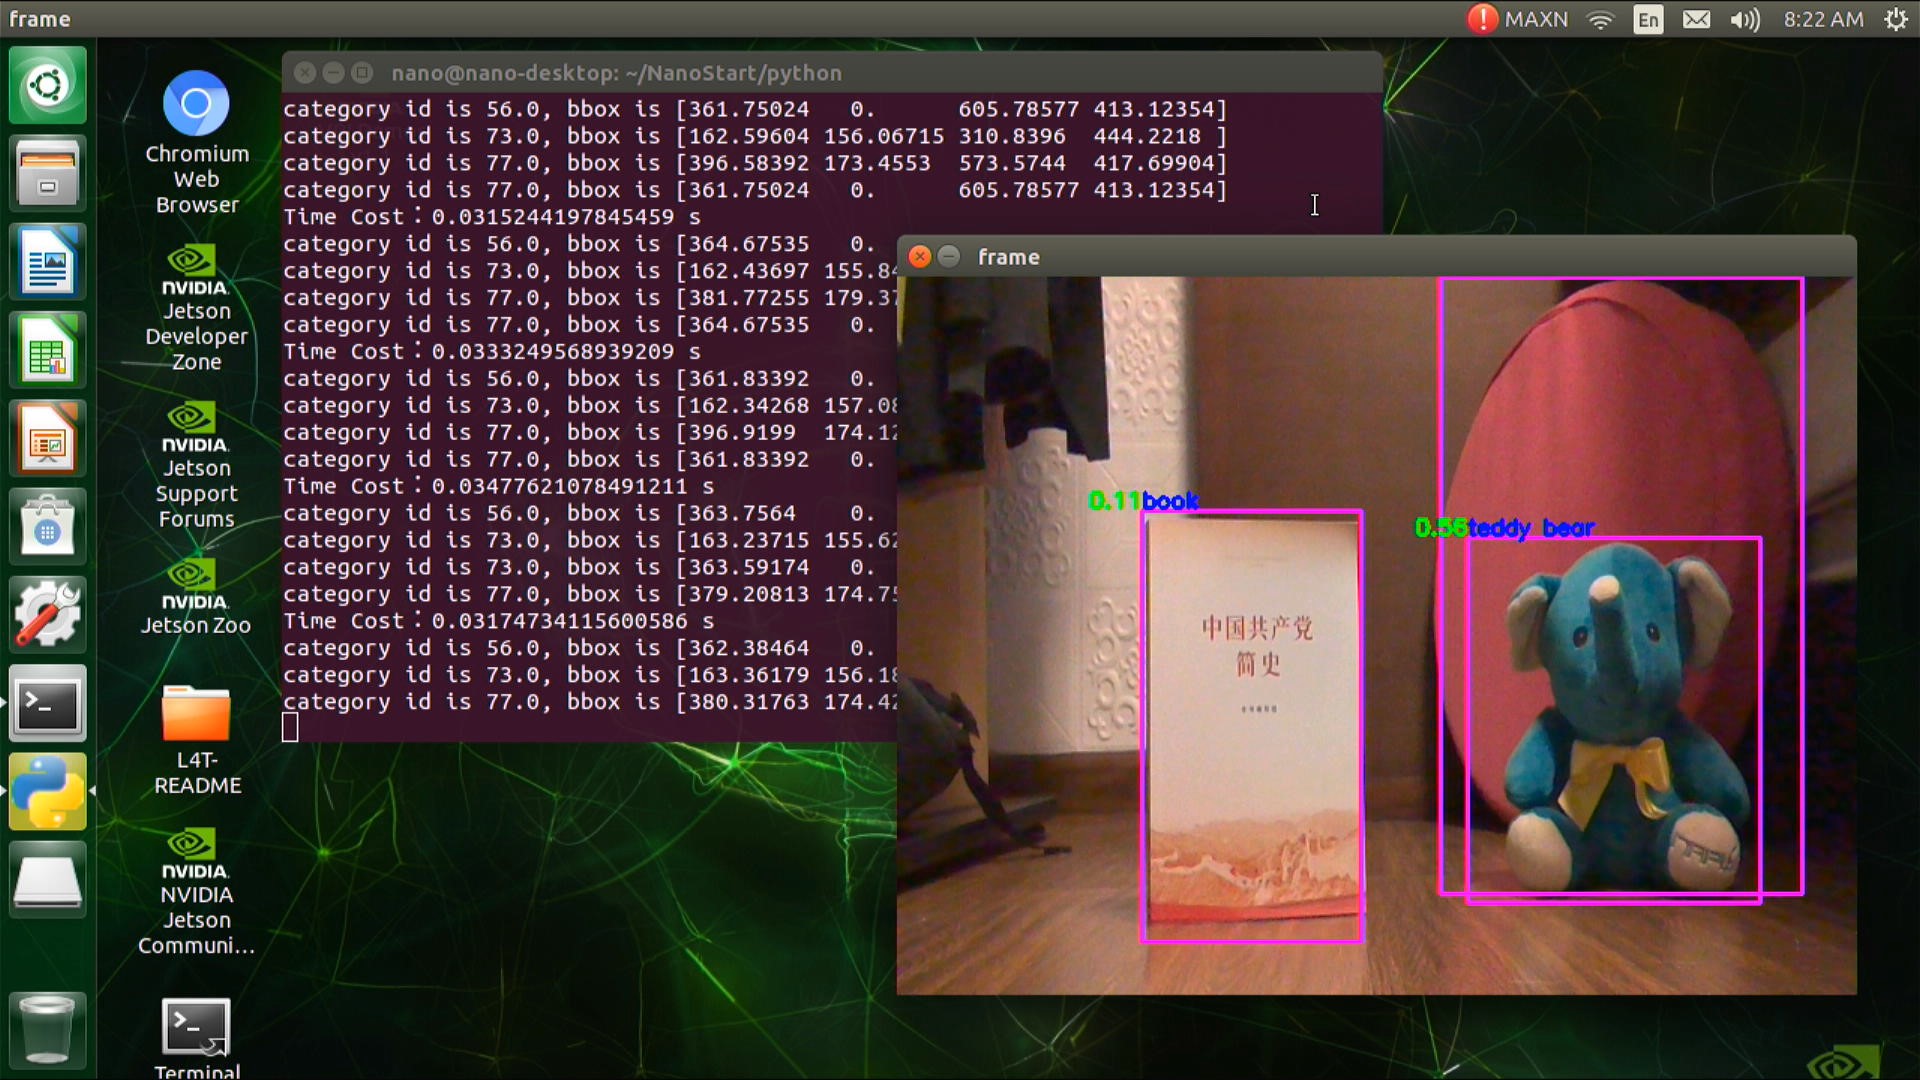
draw_bbox_image(frame, result[0], label_list, threshold=0.1)
cv2.imshow("frame", frame)
if cv2.waitKey(1) & 0xFF == ord('q'):
break
五、性能优化技巧
在实际运行过程中,如果摄像头帧率较高,但Nano的处理速度跟不上时,会出现卡帧的情况,这时我们可以通过多线程的技巧改善这一问题。
import cv2
import threading

class Camera:
    def __init__(self, src=0):
        self.src = src
        self.stream = cv2.VideoCapture(src)
        self.stopped = False
        for _ in range(10): #warm up the camera
            (self.grabbed, self.frame) = self.stream.read()

    def start(self):
        threading.Thread(target=self.update, args=()).start()

    def update(self):
        while True:
            if self.stopped:
                return
            (self.grabbed, self.frame) = self.stream.read()

    def read(self):
        return self.frame

    def stop(self):
        self.stopped = True
六、效果展示
b站视频链接:https://www.bilibili.com/video/BV1xb4y1E7HA/
七、总结与升华
在实际部署的过程中,可能会遇到很多问题,包括我在做这个项目的时候也遇到了不少问题,不过遇事不要慌,我们一定要学会解决问题的思路:
1.与摄像头有关的问题,首先排查硬件问题(排线是否松了,摄像头是否损坏等),确认硬件没问题之后再排查代码的问题。
2.Jetson Nano的系统存储在TF卡中,使用过程中不能直接断电或直接插拔TF卡,否则会造成文件系统错乱。如果在使用过程中发现Jetson Nano不好使了,可尝试重新烧写系统。
3.程序跑通以后,如果发现程序运行速度变慢或卡死,先检查板子是否过热,然后考虑能否从程序上进行性能优化,如开多线程等。
作者简介
北京联合大学 机器人学院 自动化专业 2018级 本科生 郑博培
中国科学院自动化研究所复杂系统管理与控制国家重点实验室实习生
百度飞桨开发者技术专家 PPDE
百度飞桨北京领航团团长
百度飞桨官方帮帮团、答疑团成员
深圳柴火创客空间 认证会员
百度大脑 智能对话训练师
阿里云人工智能、DevOps助理工程师
我在AI Studio上获得至尊等级,点亮10个徽章,来互关呀!!!
https://aistudio.baidu.com/aistudio/personalcenter/thirdview/147378

学大模型,用大模型上飞桨星河社区!每天8点V100G算力免费领!免费领取ERNIE 4.0 100w Token >>>
更多推荐


 11
11 0
0- 0


 已为社区贡献1436条内容

所有评论(0)