
BERT系列-BERT模型的核心架构
BERT系列(2)-BERT模型的核心架构
0.BERT模型的核心架构
通过上一篇的阅读,大家对BERT应该有了基本的认识。在运行最后一段代码时应该已经发现,我们采用了PaddleNLP来实现BERT的功能,所以我们这节课的代码依然以此为基础。
从理论的角度看,想要了解BERT的模型结构,需要补充Transformer(以自注意力为主)结构的相关知识,Attention Is All You Need论文已经给出。不过BERT并没有采用整个的Transformer结构(Encoder+Decoder),仅仅使用了Transformer结构里的Encoder部分。BERT将多层的Encoder搭建一起组成了它的基本网络结构,本篇内容我们会从BERT的源代码角度分析其核心。
# 导入一些需要的包
import paddle
import collections
from paddle.nn import Linear, Dropout, LayerNorm, LayerList, Layer
import paddle.nn.functional as F
import paddle.nn as nn
1.Encoder的核心模型
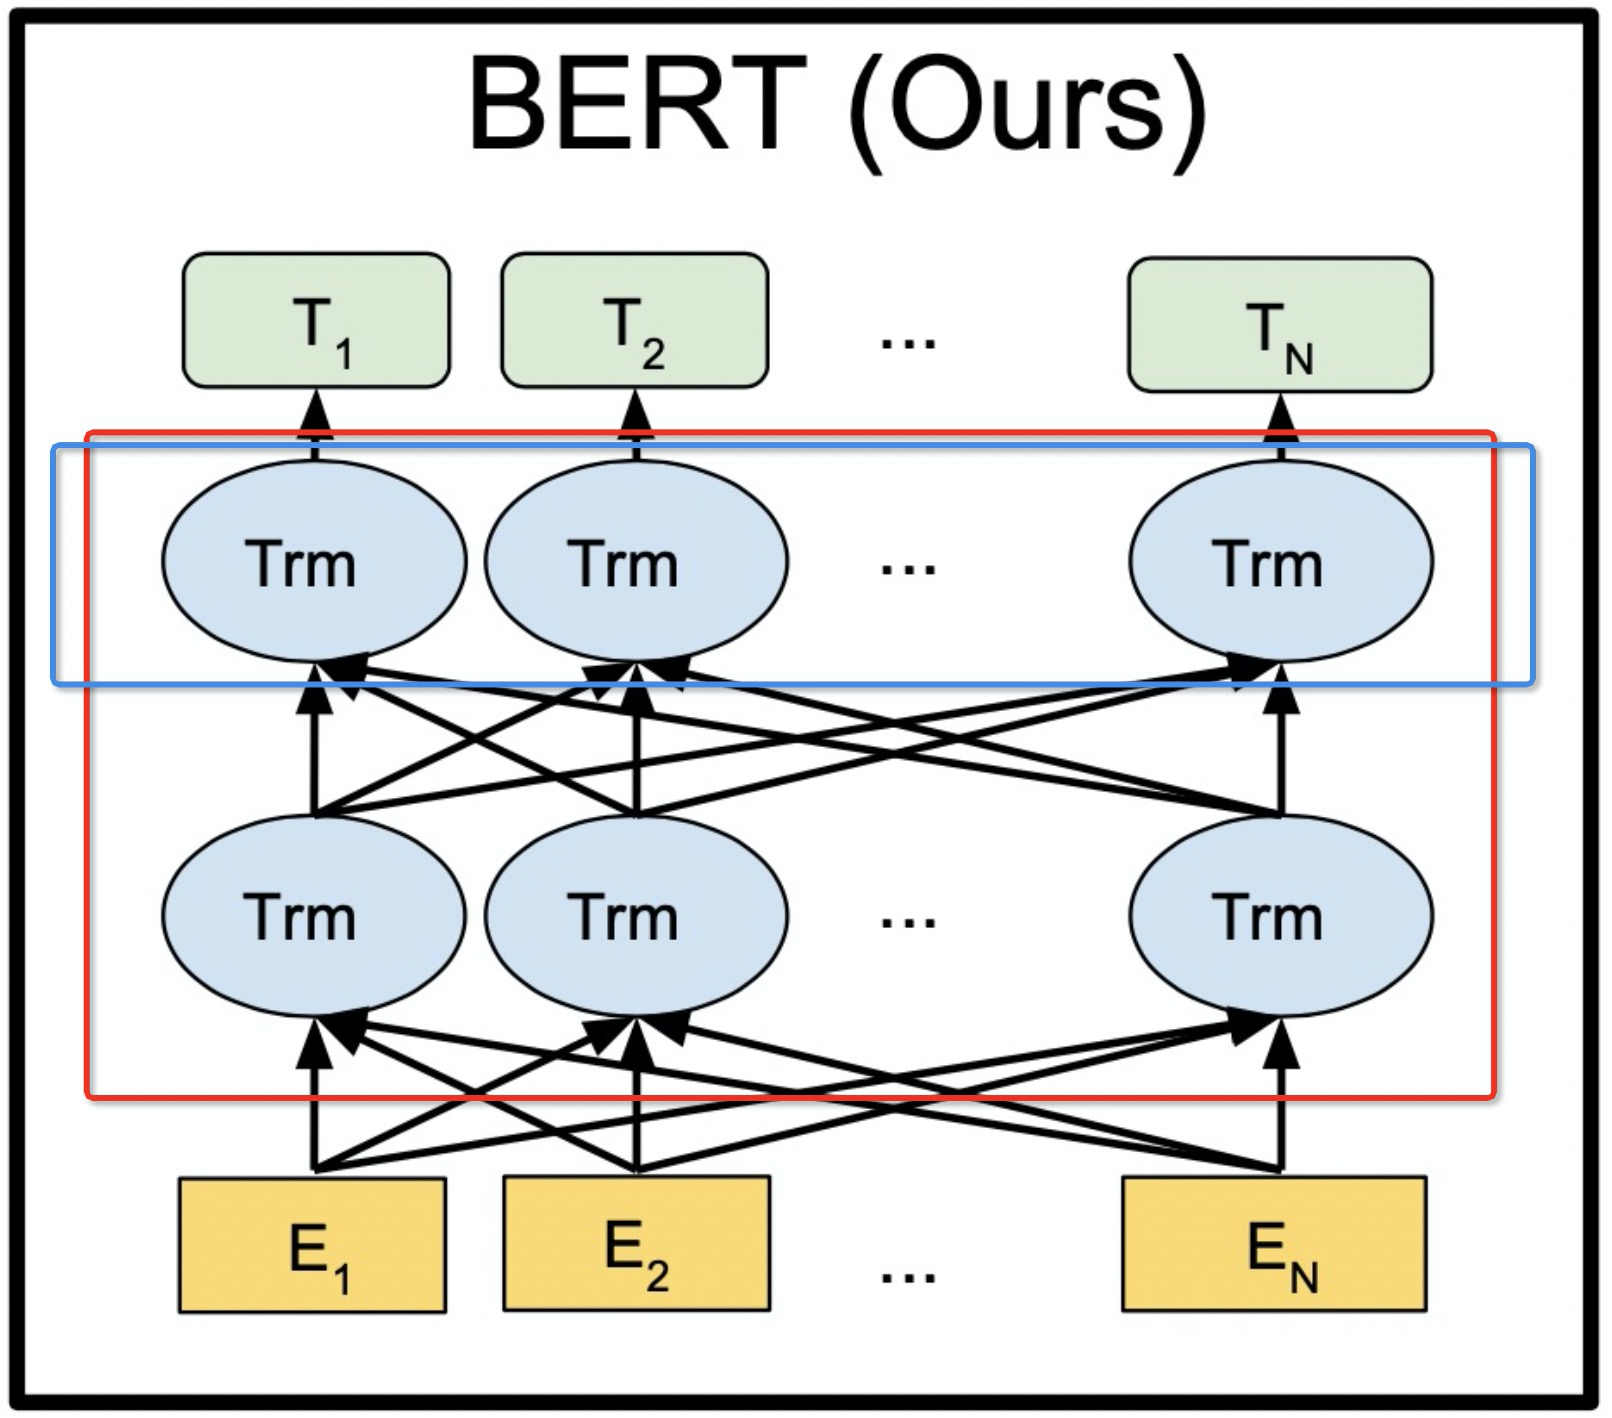
下面我们看看整个的BERT模型是什么样的,大体结构如下图所示。
1.1TransformerEncoder
红色框圈出的部分就是BERT的整个核心网络结构,我们管他叫做TransformerEncoder,该部分代码见TransformerEncoder,其初始化参数代码如下。
class TransformerEncoder(Layer):
    def __init__(self, encoder_layer, num_layers, norm=None):
        super(TransformerEncoder, self).__init__()
        # 由多层encoder_layer组成,论文中给出,bert-base是12层,bert-large是24层,一层结构就如上图中蓝色框里的结构
        # num_layers = 12 or 24
        # LayerList称之为容器,使用方法和python里的list类似
        self.layers = LayerList([(encoder_layer if i == 0 else type(encoder_layer)(**encoder_layer._config)) for i in range(num_layers)])
        self.num_layers = num_layers
可以看出TransformerEncoder是由多层encoder_layer堆叠而成,那encoder_layer长什么样,见下面内容。
1.2TransformerEncoderLayer
TransformerEncoderLayer就是1.1里提到的encoder_layer,也是下图中的BertLayer,指的是一层encoder的网络。
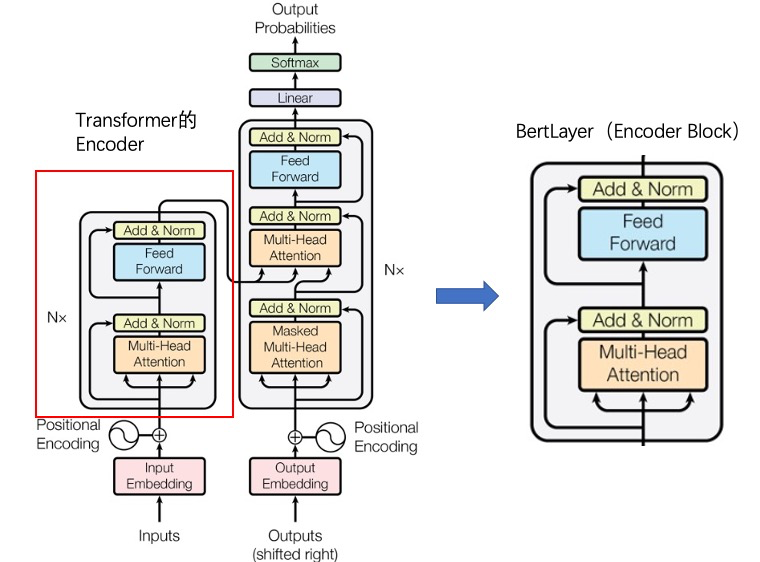
通过上面的代码能够看出,TransformerEncoder是由多层TransformerEncoderLayer叠加而成,我们把TransformerEncoderLayer这个结构单独拿出来,如上图中右半部分所示,它的代码结构如下。
class TransformerEncoderLayer(Layer):
    def __init__(self,
                 d_model, # 模型输入与输出的特征维度,对于bert base来说,此处d_model=768
                 nhead, # MultiHeadAttention总共有多少个head
                 dim_feedforward, # 在Feed Forward层中隐藏层的维度
                 dropout=0.1, # dropout层的参数
                 activation="relu", # Feed Forward层中应用的激活函数
                 attn_dropout=None, # MultiHeadAttention层中的dropout
                 act_dropout=None, # Feed Forward层中dropout
                 normalize_before=False, # 在MultiHeadAttention层与Feed Forward层之前是否加layer normalization
                 weight_attr=None, # 如果指定权重参数属性的对象是tuple,需要做处理
                 bias_attr=None): # 如果指定权重参数属性的对象是tuple,需要做处理
        self._config = locals()
        self._config.pop("self")
        self._config.pop("__class__", None)  # py3

        super(TransformerEncoderLayer, self).__init__()
        # MultiHeadAttention层中的dropout
        attn_dropout = dropout if attn_dropout is None else attn_dropout
        # Feed Forward层中dropout
        act_dropout = dropout if act_dropout is None else act_dropout
        # 在MultiHeadAttention层与Feed Forward层之前是否加layer normalization
        self.normalize_before = normalize_before

        weight_attrs = _convert_param_attr_to_list(weight_attr, 2)
        bias_attrs = _convert_param_attr_to_list(bias_attr, 2)

        # MultiHeadAttention结构
        self.self_attn = MultiHeadAttention(
            d_model,
            nhead,
            dropout=attn_dropout,
            weight_attr=weight_attrs[0],
            bias_attr=bias_attrs[0])
        self.linear1 = Linear(
            d_model, dim_feedforward, weight_attrs[1], bias_attr=bias_attrs[1])
        self.dropout = Dropout(act_dropout, mode="upscale_in_train")
        self.linear2 = Linear(
            dim_feedforward, d_model, weight_attrs[1], bias_attr=bias_attrs[1])
        self.norm1 = LayerNorm(d_model)
        self.norm2 = LayerNorm(d_model)
        self.dropout1 = Dropout(dropout, mode="upscale_in_train")
        self.dropout2 = Dropout(dropout, mode="upscale_in_train")
        self.activation = getattr(F, activation)

    def forward(self, src, src_mask=None, cache=None):
        # 执行顺序参照上图右侧BertLayer,从下至上
        # 转化mask的类型,src_mask用于padding位置的掩码,相当于计算注意力时忽略需要掩码位置的信息
        src_mask = _convert_attention_mask(src_mask, src.dtype)

        residual = src
        # 如果需要提前做LN操作的话
        if self.normalize_before:
            src = self.norm1(src)
        # 在使用encoder-decoder结构时,需要记录每层encoder的k、v传给decoder,如果只是bert不需要,默认cache is None
        if cache is None:
            # MultiHeadAttention层
            src = self.self_attn(src, src, src, src_mask)
        else:
            src, incremental_cache = self.self_attn(src, src, src, src_mask, cache)
        # MultiHeadAttention层上面的add & LN层
        src = residual + self.dropout1(src)

        if not self.normalize_before:
            src = self.norm1(src)
        residual = src
        if self.normalize_before:
            src = self.norm2(src)
        # 图中的Feed Forward结构
        src = self.linear2(self.dropout(self.activation(self.linear1(src))))
        # Feed Forward结构上面的add & LN层
        src = residual + self.dropout2(src)

        if not self.normalize_before:
            src = self.norm2(src)
        return src if cache is None else (src, incremental_cache)
# 测试用例
import paddle
from paddle.nn import TransformerEncoderLayer
# encoder input: [batch_size, src_len, d_model]
enc_input = paddle.rand((2, 4, 128))
# self attention mask: [batch_size, n_head, src_len, src_len]
attn_mask = paddle.rand((2, 2, 4, 4))
encoder_layer = TransformerEncoderLayer(128, 2, 512)
enc_output = encoder_layer(enc_input, attn_mask)  # [2, 4, 128]
print(enc_output)
Tensor(shape=[2, 4, 128], dtype=float32, place=CPUPlace, stop_gradient=False,
       [[[-0.01885348, -1.30800807, -0.70270163, ...,  0.79312891,  0.33819282,  0.19694661],
         [ 0.52890050, -0.61628824, -0.64580423, ...,  1.05399466,  1.09255672,  0.14162192],
         [ 0.27889296, -1.57920074, -2.08900905, ...,  0.26241666, -0.15296505,  0.53869343],
         [ 0.33795080, -1.79824638, -0.33102193, ...,  0.32754421, -0.07408077,  0.91790003]],

        [[ 0.83724362, -0.92376280, -0.01133144, ...,  0.64499539,  0.07638282, -0.01816335],
         [ 0.03356192,  0.17823277,  1.06846511, ...,  0.63622093,  0.33647195,  0.19414687],
         [ 1.09238434, -0.64086211, -0.87214398, ...,  1.36157310,  0.09693875,  0.63558912],
         [ 1.37034786, -0.22375001,  0.49112001, ...,  0.21485107, -0.26337901, -0.31443754]]])
那上述代码里的MultiHeadAttention结构是什么样的呢?
好的,到这位置,最为重要的self attention(自注意力)结构终于出现了,大家要仔细阅读啊,我们先看看自注意力的原理图。
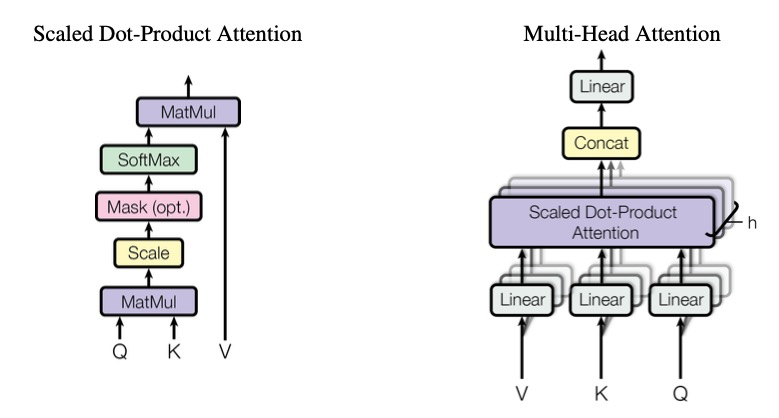
Self-Attention在整个Transformer结构中是最重要的基本结构单元,整个计算过程围绕着一个公式展开。
A t t e n t i o n ( Q , K , V ) = s o f t m a x ( Q K T d k ) V Attention(Q,K,V) = softmax(\frac{QK^T}{\sqrt{d_k}})V Attention(Q,K,V)=softmax(dkQKT)V
K、Q、V三个向量是在训练过程中通过token的embedding与三个不同的权重矩阵分别相乘得到的,通过Self-Attention的计算过程后完成上图左半边的结构。
下图拿Thinking Machines一个句子展示了整个的自注意力计算过程。
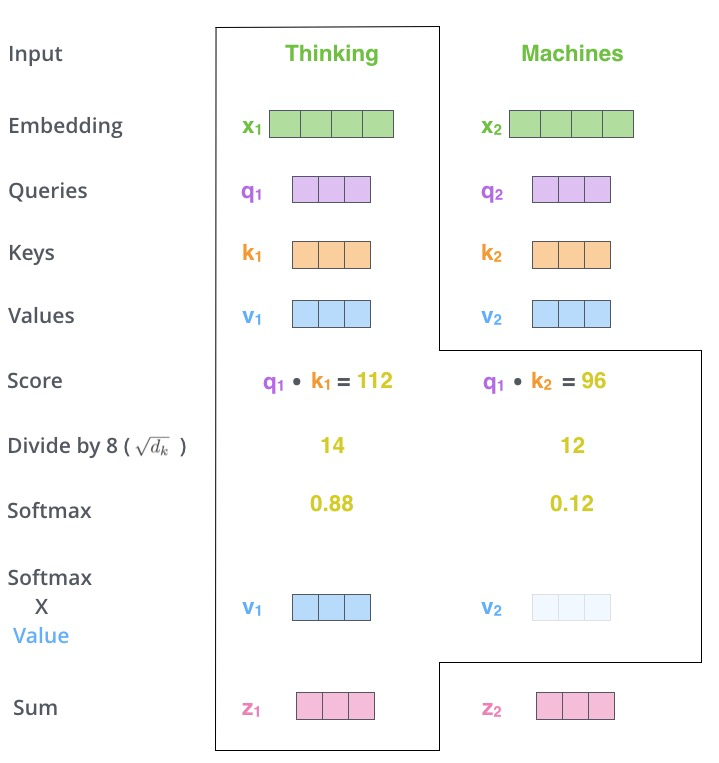
上图出处:http://jalammar.github.io/illustrated-transformer/,因为上图只是一步计算的展示,整个自注意力计算是需要对每个token都进行一遍。关于整个过程的形象展示,大家直接精读这篇博客就可以了。
理论应该看的差不多了,具体看看MultiHeadAttention代码,代码如下。
class MultiHeadAttention(Layer):
    # 用于保存每层encoder中k、v值,如果有decoder结构会用到,bert用不到
    Cache = collections.namedtuple("Cache", ["k", "v"])
    StaticCache = collections.namedtuple("StaticCache", ["k", "v"])

    def __init__(self,
                 embed_dim,
                 num_heads,
                 dropout=0.,
                 kdim=None,
                 vdim=None,
                 need_weights=False,
                 weight_attr=None,
                 bias_attr=None):
        super(MultiHeadAttention, self).__init__()
        self.embed_dim = embed_dim
        self.kdim = kdim if kdim is not None else embed_dim
        self.vdim = vdim if vdim is not None else embed_dim
        self.num_heads = num_heads
        self.dropout = dropout
        self.need_weights = need_weights
        # 将输入到768维的embedding,按多头注意力的num_heads切分
        self.head_dim = embed_dim // num_heads
        assert self.head_dim * num_heads == self.embed_dim, "embed_dim must be divisible by num_heads"
        # 定义Wq、Wk、Wv三个矩阵,便于后续计算得到k、q、v
        self.q_proj = Linear(embed_dim, embed_dim, weight_attr, bias_attr=bias_attr)
        self.k_proj = Linear(self.kdim, embed_dim, weight_attr, bias_attr=bias_attr)
        self.v_proj = Linear(self.vdim, embed_dim, weight_attr, bias_attr=bias_attr)
        self.out_proj = Linear(embed_dim, embed_dim, weight_attr, bias_attr=bias_attr)

    def _prepare_qkv(self, query, key, value, cache=None):
        # query的shape为[batch_size, query_length, embed_dim]
        q = self.q_proj(query)
        # 将embed_dim按head数切分
        q = tensor.reshape(x=q, shape=[0, 0, self.num_heads, self.head_dim])
        # 调整维度,q的shape为[batch_size, num_heads, query_length, embed_dim/num_heads]
        q = tensor.transpose(x=q, perm=[0, 2, 1, 3])
        # encoder-decoder结构时采用,bert不采用
        if isinstance(cache, self.StaticCache):
            # for encoder-decoder attention in inference and has cached
            k, v = cache.k, cache.v
        # bert采用,self.compute_kv是调整k、v的shape,参考q
        else:
            k, v = self.compute_kv(key, value)
        # encoder-decoder结构时采用,bert不采用
        if isinstance(cache, self.Cache):
            # for decoder self-attention in inference
            k = tensor.concat([cache.k, k], axis=2)
            v = tensor.concat([cache.v, v], axis=2)
            cache = self.Cache(k, v)

        return (q, k, v) if cache is None else (q, k, v, cache)

    def compute_kv(self, key, value):
        # 调整k、v的shape
        k = self.k_proj(key)
        v = self.v_proj(value)
        k = tensor.reshape(x=k, shape=[0, 0, self.num_heads, self.head_dim])
        k = tensor.transpose(x=k, perm=[0, 2, 1, 3])
        v = tensor.reshape(x=v, shape=[0, 0, self.num_heads, self.head_dim])
        v = tensor.transpose(x=v, perm=[0, 2, 1, 3])
        return k, v

    # # encoder-decoder结构会用,bert不用
    # def gen_cache(self, key, value=None, type=Cache):
    #     if type == MultiHeadAttention.StaticCache:  # static_kv
    #         k, v = self.compute_kv(key, value)
    #         return self.StaticCache(k, v)
    #     elif value is None:  # incremental_state
    #         k = layers.fill_constant_batch_size_like(
    #             input=key,
    #             shape=[-1, self.num_heads, 0, self.head_dim],
    #             dtype=key.dtype,
    #             value=0)
    #         v = layers.fill_constant_batch_size_like(
    #             input=key,
    #             shape=[-1, self.num_heads, 0, self.head_dim],
    #             dtype=key.dtype,
    #             value=0)
    #         return self.Cache(k, v)
    #     else:
    #         # incremental_state with initial value, mainly for usage like UniLM
    #         return self.Cache(key, value)

    def forward(self, query, key=None, value=None, attn_mask=None, cache=None):
        # 如果不传k、v时,query就是整个传进多头注意力结构的embedding输入,通过self._prepare_qkv计算后得到不相等的q、k、v
        key = query if key is None else key
        value = query if value is None else value
        # 计算q ,k ,v
        if cache is None:
            q, k, v = self._prepare_qkv(query, key, value, cache)
        else:
            q, k, v, cache = self._prepare_qkv(query, key, value, cache)

        # scale dot product attention,完成q与k的点乘
        product = layers.matmul(x=q, y=k, transpose_y=True, alpha=self.head_dim**-0.5)
        if attn_mask is not None:
            # Support bool or int mask
            # 通过_convert_attention_mask完成mask的类型转换
            attn_mask = _convert_attention_mask(attn_mask, product.dtype)
            # 上一步转换后的attn_mask是一个负无穷的值,计算后的product也是负无穷,后续softmax后的概率接近0
            product = product + attn_mask

        weights = F.softmax(product)
        if self.dropout:
            weights = F.dropout(weights, self.dropout, training=self.training, mode="upscale_in_train")
        # 完成单个头的Attention(Q,K,V)计算
        out = tensor.matmul(weights, v)

        # 将分开的heads计算结果合并拼接
        out = tensor.transpose(out, perm=[0, 2, 1, 3])
        out = tensor.reshape(x=out, shape=[0, 0, out.shape[2] * out.shape[3]])

        # 得到最终的output,过一层全连接
        out = self.out_proj(out)

        outs = [out]
        if self.need_weights:
            outs.append(weights)
        if cache is not None:
            outs.append(cache)
        return out if len(outs) == 1 else tuple(outs)
# 测试用例
import paddle
# encoder input: [batch_size, sequence_length, d_model]
query = paddle.rand((2, 4, 128))
# self attention mask: [batch_size, num_heads, query_len, query_len]
attn_mask = paddle.rand((2, 2, 4, 4))
multi_head_attn = paddle.nn.MultiHeadAttention(128, 2)
output = multi_head_attn(query, None, None, attn_mask=attn_mask)  # [2, 4, 128]
print(output)
Tensor(shape=[2, 4, 128], dtype=float32, place=CPUPlace, stop_gradient=False,
       [[[ 0.15913625,  0.48435420,  0.36024624, ..., -0.02013489, -1.39701915, -0.72993135],
         [ 0.14341626,  0.42603672,  0.31935588, ...,  0.01534047, -1.45129204, -0.63580924],
         [ 0.06227031,  0.37429795,  0.30951205, ...,  0.01954058, -1.40034354, -0.57919472],
         [ 0.03168199,  0.41356549,  0.31438100, ..., -0.00306860, -1.36178029, -0.59309602]],

        [[ 0.12432611,  0.59671801, -0.00718581, ..., -0.05837817, -1.70574033, -0.51188135],
         [ 0.10350037,  0.61755306,  0.05259240, ..., -0.06629009, -1.71980357, -0.47333026],
         [ 0.15563737,  0.56989133, -0.07205121, ..., -0.08474617, -1.75300312, -0.53682876],
         [ 0.09579521,  0.56360888,  0.02821233, ..., -0.07712881, -1.68547392, -0.45447496]]])
扩展阅读:Transformer中multi-head的每个head到底在干嘛?如果有打酱油的head是否可以直接丢掉?具体可以延伸阅读Are Sixteen Heads Really Better than One?。

BERT中最重要的模型细节,我们就拆解完了,其他的代码就比较好理解了,大家稍微回顾下上图的过程,就可以继续了。
在整个TransformerEncoderLayer结构中有一些值得深度研究的结构,比如Add & Norm层,它是采用了残差结构并进行层级归一化的操作。
关于残差结构,它主要是解决神经网络梯度消失的现象,可以参考cv领域中的一些解释,如为什么ResNet和DenseNet可以这么深?一文详解残差块为何有助于解决梯度弥散问题。具体的操作如下面代码。
src = residual + self.dropout1(src)
if not self.normalize_before:
    src = self.norm1(src)
residual = src
if self.normalize_before:
    src = self.norm2(src)
除了残差结构,同时增加了一个LayerNorm实现层级归一化操作,关于LayerNorm,可以研究下详解深度学习中的Normalization,BN/LN/WN。
1.3Feed-Forward Network
Encoder中存在的另一个结构是前馈神经网络,也就是Feed-Forward Network,它的作用是加深我们的网络结构。FFN层包括两个线性操作,中间有一个 ReLU 激活函数,对应到公式的形式为:
F F N ( x ) = max ( 0 , x W 1 + b 1 ) W 2 + b 2 FFN(x) = \max(0, xW_1+b_1)W_2 + b2 FFN(x)=max(0,xW1+b1)W2+b2
其实,FFN的加入引入了非线性(ReLu等激活函数),变换了attention output的空间, 从而增加了模型的表现能力。把FFN去掉模型也是可以用的,但是效果差了很多。
src = self.linear2(self.dropout(self.activation(self.linear1(src))))
1.4Mask
除了Encoder的整体代码之外,贯穿始终的还有一个细节,就是代码中有很多的Mask操作,那他们都是做什么的呢?
Mask表示掩码,它是对某些值进行掩盖,让其不参加计算。Transformer模型中涉及到两种mask,一种是padding mask,一种是sequence mask只存在decoder中。。padding mask是在encoder和decoder中都存在的,而sequence mask只存在decoder中。
padding mask,在nlp任务中由于一个batch数据中句子长短不一,所以需要对一些句子进行padding,而这些padding的数据在后面自注意力计算上是没有意义的,所以在计算中要忽略padding的影响。
对于这两种mask是怎么计算的,可见_convert_attention_mask,如下:
def _convert_attention_mask(attn_mask, dtype):
    if attn_mask is not None and attn_mask.dtype != dtype:
        attn_mask_dtype = convert_dtype(attn_mask.dtype)
        if attn_mask_dtype == 'bool' or 'int' in attn_mask_dtype:
            attn_mask = (paddle.cast(attn_mask, dtype) - 1.0) * 1e9
        else:
            attn_mask = paddle.cast(attn_mask, dtype)
    return attn_mask
具体实现是见源码中这段
attn_mask = (paddle.cast(attn_mask, dtype) - 1.0) * 1e9
把padding位置上的值加上一个非常大的负数,这样经过softmax计算后这个位置的概论无限接近零。
sequence mask,在做生成问题时,为了不让模型看到后面的标准答案,所以在预测t位置词的时候,把t后面所有的词都mask掉,具体实现是通过一个对角矩阵实现的,此处就不细讲了。注意由于decoder过程中padding mask和sequence mask都存在,所以上面源码有两个mask想加的过程。
好的,整个BERT核心源码已经讲完了,如果同学们在理论的细节上还是有一些模糊,可以补充阅读Transformer模型深度解读,该博客从Transformer的角度详细做了解释,看完后,回头在看看BERT的源码,我相信理解会进一步加深。
2.模型输入之Embedding层
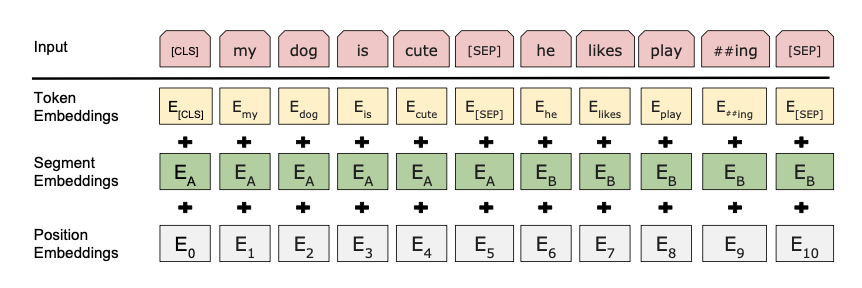
BERT模型的输入不管是单个句子还是多个句子,都会将句子中的Token转化成Embedding之后传到模型里,那BERT的Embedding是怎么做的呢?它是由Token Embeddings、Segment Embeddings和Position Embeddings想加组成,如下图。
其中:
1)Token Embeddings是词向量,是将Token嵌入到一个维度的空间,BERT随着结构层数的变化,分别选取了768维和1024维。在Token的输入上,BERT也做了特殊的处理,第一个Token是一个CLS的特殊字符,可以用于下游的任务。句子和句子的中间,以及句子的末尾会有一个特殊的符号SEP;
2)Segment Embeddings用来区别两种句子,因为预训练不光做LM还要做以两个句子为输入的分类任务;
3)Position Embeddings和上一章的Transformer不一样,不是三角函数而是一个跟着训练学出来的向量。
class BertEmbeddings(Layer):
    """Construct the embeddings from word, position and token_type embeddings."""
    def __init__(self,
                 vocab_size,
                 hidden_size=768,
                 hidden_dropout_prob=0.1,
                 max_position_embeddings=512,
                 type_vocab_size=16):
        super(BertEmbeddings, self).__init__()
        # 上图中的Token Embedding
        self.word_embeddings = nn.Embedding(vocab_size, hidden_size)
        # 上图中的Position Embedding
        self.position_embeddings = nn.Embedding(max_position_embeddings, hidden_size)
        # 上图中的Segment Embedding
        self.token_type_embeddings = nn.Embedding(type_vocab_size, hidden_size)
        self.layer_norm = nn.LayerNorm(hidden_size)
        self.dropout = nn.Dropout(hidden_dropout_prob)

    def forward(self, input_ids, token_type_ids=None, position_ids=None):
        # 不传position ids时,默认从0以此开始编码位置
        if position_ids is None:
            ones = paddle.ones_like(input_ids, dtype="int64")
            seq_length = paddle.cumsum(ones, axis=-1)

            position_ids = seq_length - ones
            position_ids.stop_gradient = True
        # 如果没有两个以上token type,默认编码都是0
        if token_type_ids is None:
            token_type_ids = paddle.zeros_like(input_ids, dtype="int64")

        input_embedings = self.word_embeddings(input_ids)
        position_embeddings = self.position_embeddings(position_ids)
        token_type_embeddings = self.token_type_embeddings(token_type_ids)

        # 将三种embedding直接相加
        embeddings = input_embedings + position_embeddings + token_type_embeddings
        embeddings = self.layer_norm(embeddings)
        embeddings = self.dropout(embeddings)
        return embeddings
以上代码就是BERT Embedding层的一些定义,最终会将三种Embedding想加。
embeddings = input_embedings + position_embeddings + token_type_embeddings
同学们是不是还会有一些疑惑,为什么BERT的位置编码这么简单粗暴,关于一些相关探讨,可以阅读如何优雅地编码文本中的位置信息?三种positional encoding方法简述。
3.模型输出层与CLS
关于模型的输出层,大家可以参照一下源码。具体的使用,以及其中的一些特殊符号都会在后续文章中详解。
class BertPooler(Layer):
    # Pooler拿的是第一个token的最终输出,也就是CLS特殊符号的输出
    def __init__(self, hidden_size):
        super(BertPooler, self).__init__()
        self.dense = nn.Linear(hidden_size, hidden_size)
        self.activation = nn.Tanh()

    def forward(self, hidden_states):
        # We "pool" the model by simply taking the hidden state corresponding
        # to the first token.
        first_token_tensor = hidden_states[:, 0]
        pooled_output = self.dense(first_token_tensor)
        pooled_output = self.activation(pooled_output)
        return pooled_output
4.回顾
本篇文章主要集中在BERT最为核心的理论源码上,大家可以先从transformer的角度去理解,再分析下BERT用了transformer中的那些结构,没用哪些结构。
当然再使用BERT的时候,这些源码是不需要呈现的,但如果想改一些细节,或调用一些接口,还是很考验大家对源码的理解程度。
5.后续计划
本节课内容就这些,喜欢的同学可以关注后续内容。
往期:
计划:
《BERT如何完成预训练》
《BERT微调细节详解》
《使用BERT完成任务》
《。。。》

学大模型,用大模型上飞桨星河社区!每天8点V100G算力免费领!免费领取ERNIE 4.0 100w Token >>>
更多推荐


 2
2 0
0- 0


 已为社区贡献1436条内容

所有评论(0)