
PaddleDetection:手部关键点检测模型训练与Top-Down联合部署
本项目通过将手部关键点检测数据集转换为MPII格式,实现了基于PaddleDetection的Top-Down联合检测方案的手部关键点检测模型训练、推理和部署,模型在基本聚焦于手掌的测试集图片上,表现效果相当不错。...
0 项目背景
在之前的【PaddlePaddle+OpenVINO】打造一个指哪读哪的AI“点读机”项目中,尝试使用了PaddleHub提供的手势关键点检测模型,实现“指哪读哪”的场景。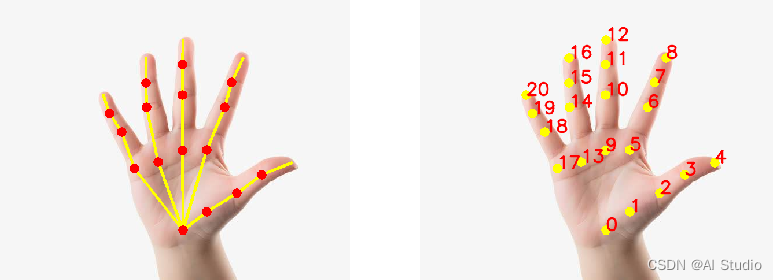
但是这个场景在应用中,发现了一个非常大的问题:卡!
一旦在点读任务中串入关键点检测,预测速度就从5-6 FPS断崖下跌到了 0.1-0.2 FPS……
分析后我们发现有几方面的原因:
- 一是预测速度慢,因为PaddleHub的模型
backbone是ResNet50,如果是轻量级模型,效果应该能好不少; - 二是预测不准,正因为预测不准确,要传入很多帧才能识别到足够数量的手势关键点,这就进一步导致了点读效率的低下;
- 三是代码逻辑结构需要优化,比如变离线语音为流式语音,变单线程为多线程等等。
其中第一、二点的优化,意味着我们需要对手势关键点检测数据集进行重新训练。显然,如果利用PaddleDetection模型库的关键点检测系列模型,这项工作的选择范围、开发效率、部署流程都能够大幅提升。
因此,本项目的主要目的就是,将手势关键点检测模型迁移到PaddleDetction上进行训练并完成部署。
只需1~2个小时,我们就能训练一个效果不错的“初始版”:

0.1 参考资料:点读全系列
- 【PaddlePaddle+OpenVINO】AI“朗读机”诞生记
- 【PaddlePaddle+OpenVINO】电表检测识别模型的部署
- 【PaddlePaddle+OpenVINO】打造一个指哪读哪的AI“点读机”
- 手把手教你快速打造一个AI识物点读机
- PaddleSpeech:基于流式语音合成的电表点读系统
0.2 引用说明
特别说明:本项目使用数据集出处 “https://codechina.csdn.net/EricLee/handposex”
# 拉取PaddleDetection
!git clone https://gitee.com/paddlepaddle/PaddleDetection.git
# 拉取原手势识别项目(查看标注文件)
# !git clone https://gitcode.net/EricLee/handpose_x.git
1 数据集准备
1.1 手部关键点检测数据集介绍
本项目使用的数据集来自于Eric.Lee的:https://gitcode.net/EricLee/handpose_x 项目。作者制作的handpose_datasets_v2在兼容handpose_datasets_v1数据集的基础上,增加了左右手属性"handType": “Left” or “Right”。handpose_datasets_v2数据总量为 38w+。
注:
handpose_datasets_v1数据集包括网络图片及数据集<<Large-scale Multiview 3D Hand Pose Dataset>>筛选动作重复度低的部分图片,进行制作(如有侵权请联系删除),共49062个样本。
<<Large-scale Multiview 3D Hand Pose Dataset>>数据集,其官网地址 http://www.rovit.ua.es/dataset/mhpdataset/
感谢《Large-scale Multiview 3D Hand Pose Dataset》数据集贡献者:Francisco Gomez-Donoso, Sergio Orts-Escolano, and Miguel Cazorla. “Large-scale Multiview 3D Hand Pose Dataset”. ArXiv e-prints 1707.03742, July 2017.
具体标注关键点可视化效果如下:
[外链图片转存失败,源站可能有防盗链机制,建议将图片保存下来直接上传(img-Ccc9tF6v-1659960455328)(https://codechina.csdn.net/EricLee/handpose_x/-/raw/master/samples/label.png)]
手部关键点检测数据集的标注格式是一张图对应一个标注文件,我们先抽取其中一张图片的标注,看看具体内容:
{
 "maker": "Eric.Lee",

    "date": "2022-04",
 "info": [
  {
   "handType": "Left",
   "bbox": [
    0,
    0,
    0,
    0
   ],
   "pts": {
    "0": {
     "x": 132,
     "y": 123
    },
    "1": {
     "x": 122,
     "y": 99
    },
    "2": {
     "x": 107,
     "y": 83
    },
    "3": {
     "x": 93,
     "y": 76
    },
    "4": {
     "x": 77,
     "y": 74
    },
    "5": {
     "x": 103,
     "y": 72
    },
    "6": {
     "x": 81,
     "y": 55
    },
    "7": {
     "x": 69,
     "y": 45
    },
    "8": {
     "x": 56,
     "y": 34
    },
    "9": {
     "x": 98,
     "y": 78
    },
    "10": {
     "x": 72,
     "y": 60
    },
    "11": {
     "x": 57,
     "y": 49
    },
    "12": {
     "x": 42,
     "y": 38
    },
    "13": {
     "x": 93,
     "y": 87
    },
    "14": {
     "x": 66,
     "y": 72
    },
    "15": {
     "x": 51,
     "y": 64
    },
    "16": {
     "x": 36,
     "y": 53
    },
    "17": {
     "x": 88,
     "y": 100
    },
    "18": {
     "x": 66,
     "y": 95
    },
    "19": {
     "x": 52,
     "y": 92
    },
    "20": {
     "x": 36,
     "y": 90
    }
   }
  }
 ]
}
1.2 MPII数据集介绍
MPII Human Pose Dataset数据集的标注文件可以采用mpii_annotations,在PaddleDetection中已对应转换为json格式,完成后的目录结构为:
mpii
|── annotations
|   |── mpii_gt_val.mat
|   |── mpii_test.json
|   |── mpii_train.json
|   |── mpii_trainval.json
|   `── mpii_val.json
`── images
    |── 000001163.jpg
    |── 000003072.jpg
在MPII中,关键点序号与部位的对应关系为:
MPII keypoint indexes:
        0: 'right_ankle',
        1: 'right_knee',
        2: 'right_hip',
        3: 'left_hip',
        4: 'left_knee',
        5: 'left_ankle',
        6: 'pelvis',
        7: 'thorax',
        8: 'upper_neck',
        9: 'head_top',
        10: 'right_wrist',
        11: 'right_elbow',
        12: 'right_shoulder',
        13: 'left_shoulder',
        14: 'left_elbow',
        15: 'left_wrist',
下面以一个解析后的标注信息为例,说明标注的内容,其中每条标注信息标注了一个人物实例:
{
    'joints_vis': [0, 0, 0, 0, 0, 0, 0, 1, 1, 1, 1, 1, 1, 1, 1, 1],
    'joints': [
        [-1.0, -1.0],
        [-1.0, -1.0],
        [-1.0, -1.0],
        [-1.0, -1.0],
        [-1.0, -1.0],
        [-1.0, -1.0],
        [-1.0, -1.0],
        [1232.0, 288.0],
        [1236.1271, 311.7755],
        [1181.8729, -0.77553],
        [692.0, 464.0],
        [902.0, 417.0],
        [1059.0, 247.0],
        [1405.0, 329.0],
        [1498.0, 613.0],
        [1303.0, 562.0]
    ],
    'image': '077096718.jpg',
    'scale': 9.516749,
    'center': [1257.0, 297.0]
}
joints_vis:分别表示16个关键点是否标注,若为0,则对应序号的坐标也为[-1.0, -1.0]。joints:分别表示16个关键点的坐标。image:表示对应的图片文件。center:表示人物的大致坐标,用于定位人物在图像中的位置。scale:表示人物的比例,对应200px。
MPII
1.3 手部关键点检测数据格式对齐MPII数据集
遵循从易到难的开发路线,可以先将问题进行拆解,首先,看看基于handpose_datasets_v2的标注文件内容,是否可以拼装出MPII数据集需要的全部字段。
如果仅从内容上看,joints_vis joints image center scale 这5个字段的内容在手部关键点检测的数据里都能凑出来,所以MPII数据集转换后的json格式标注文件还是可以匹配的。
但是mpii_gt_val.mat这个文件当中的信息,与MPII keypoint indexes中的人体关键点完全绑定,而目前并没有找到比较好的json格式转mat标注的办法,这就导致后续无法进行验证集的模型指标评估。
当然,因为训练时我们用的是loss,数据集格式不能完全对齐,不影响PaddleDetection下MPII格式手部关键点检测模型的训练——但是需要高度关注过拟合情况。
# 解压手势关键点检测数据集
!unzip data/data162171/handpose_datasets_v2-2022-04-16.zip -d ./data/
# 统计图片和标注文件数量(1:1)
!ls ./data/handpose_datasets_v2| wc -l
770122
# 调用一些需要的第三方库
import numpy as np
import pandas as pd
import shutil
import json
import os
import cv2
import glob
import matplotlib.pyplot as plt
import seaborn as sns
from PIL import Image
import random
# 准备图片目录
%mkdir ./data/handpose_datasets
在手部关键点检测数据集转换的逻辑上,本项目将左右手的关键点进行区分,视为不同的关键点进行训练。单只手掌的关键点共21个,因此转换后的数据标注文件中,关键点共21*2=42个。
path = "./data/handpose_datasets_v2/"
path2 = "./data/handpose_datasets/"
train_json = []
val_json = []
num = 0
for f_ in os.listdir(path):
    if ".jpg" in f_:
        img_path = path + f_
        label_path = img_path.replace('.jpg','.json')
        if not os.path.exists(label_path):
            continue
        with open(label_path, encoding='utf-8') as f:
            hand_dict_ = json.load(f)
            f.close()
            hand_dict_ = hand_dict_["info"]
            # print("len hand_dict :",len(hand_dict_))
            x_max = -65535
            y_max = -65535
            x_min = 65535
            y_min = 65535
            pts_ = []
            joints_vis = [0] * 42
            joints = [[-1.0, -1.0]] * 42
            if len(hand_dict_) > 0:
                for msg in hand_dict_:
                    bbox = msg["bbox"]
                    pts = msg["pts"]
                    handType  = msg["handType"]
                    # 找到外接矩形
                    x1,y1,x2,y2 = int(bbox[0]),int(bbox[1]),int(bbox[2]),int(bbox[3])
                    for i in range(21):
                        x_,y_ = pts[str(i)]["x"],pts[str(i)]["y"]
                        x_ += x1
                        y_ += y1
                        pts_.append([x_,y_])
                        x_min = x_ if x_min > x_ else x_min
                        y_min = y_ if y_min > y_ else y_min
                        x_max = x_ if x_max < x_ else x_max
                        y_max = y_ if y_max < y_ else y_max

                    center = [0.5 * (x_max + x_min), 0.5 * (y_max + y_min)]

                    scale = (y_max - y_min) / 200.

                    for i in range(21):
                        if handType == "Left":
                            joints_vis[i] = 1
                            joints[i] = [pts[str(i)]["x"], pts[str(i)]["y"]]
                        elif handType == "Right":
                            joints_vis[21+i] = 1
                            joints[21+i] = [pts[str(i)]["x"], pts[str(i)]["y"]]
            # MPII数据集会直接将传入图片文件的名称转为image_id,因此如果图片名出现其它字符会报错,故此处需要将训练图片文件重命名
            item = {
                'joints_vis':joints_vis,
                'joints':joints,
                'image': str(num) + '.jpg',
                'scale':scale,
                'center':center
            }

        shutil.copy(img_path, path2 + str(num) + '.jpg')
        # 划分训练集和测试集
        if num % 5 == 0:
            val_json.append(item)
        else:
            train_json.append(item)
    num += 1
# 创建训练集标签
with open("./train_json.json","w") as f:
    json.dump(train_json,f)
# 创建测试集标签
with open("./val_json.json","w") as f:
    json.dump(val_json,f)
2 模型训练
2.1 MPII数据集Top-Down检测方案训练
PaddleDetection关键点检测能力紧跟业内最新最优算法方案,包含Top-Down、Bottom-Up两套方案,Top-Down先检测主体,再检测局部关键点,优点是精度较高,缺点是速度会随着检测对象的个数增加,Bottom-Up先检测关键点再组合到对应的部位上,优点是速度快,与检测对象个数无关,缺点是精度较低。
本项目中,先使用Top-Down方案进行训练和部署。
对于PaddleDetection模型库,最关键的训练配置项就是config 文件,相比于目标检测任务,关键点检测的config文件主要需要关注下面这几个配置项:
num_joints: &num_joints 42                                                                   #关键点数量

pixel_std: &pixel_std 200                                                                      #变换时相对比率像素(无需关注,不动就行)

metric: KeyPointTopDownMPIIEval                                                             #metric评估函数

num_classes: 1                                                                                 #种类数(检测模型用,不需关注)

train_height: &train_height 256                                                                #模型输入尺度高度变量设置

train_width: &train_width 256                                                                  #模型输入尺度宽度变量设置

trainsize: &trainsize [*train_width, *train_height]                                            #模型输入尺寸,使用已定义变量

hmsize: &hmsize [64, 64]                                                                       #输出热力图尺寸(宽,高)

flip_perm: &flip_perm [[0, 21], [1, 22], [2, 23], [3, 24], [4, 25], [5, 26],[6, 27], [7, 28], [8, 29], [9, 30], [10, 31], [11, 32],[12, 33], [13, 34], [14, 35], [15, 36], [16, 37], [17, 38],[18, 39], [19, 40], [20, 41]]

#左右关键点经图像翻转时对应关系,例如:图像翻转后,左手腕变成了右手腕,右手腕变成了左手腕——在手部关键点检测中,就是左右手同一关键点的对应关系
本项目也直接提供了修改好的config文件,读者可以直接覆盖使用。
# 覆盖配置文件
!cp hrnet_w32_256x256_mpii.yml PaddleDetection/configs/keypoint/hrnet/hrnet_w32_256x256_mpii.yml
%cd PaddleDetection/
/home/aistudio/PaddleDetection
!pip install -r ../requirements.txt
由于训练时间较长,建议读者可以使用AI Studio提供的后台任务进行训练。
!python tools/train.py -c configs/keypoint/hrnet/hrnet_w32_256x256_mpii.yml
# 如果需要,可以从断点开始继续训练
# !python tools/train.py -c configs/keypoint/hrnet/hrnet_w32_256x256_mpii.yml -r output/hrnet_w32_256x256_mpii/2
2.2 验证集评估结果导出
由于没有转换.mat格式标注,这里的验证集只能直接导出评估结果,无法进行评估。
另一方面,由于手部关键点检测数据集有38万多张,数据量相对来说足够大,epoch不算太多的情况下,推测过拟合问题应该不算严重,而且测试集上也可以验证效果。
因此,本项目没有继续纠结验证集评估问题,这里只需要进行评估预测的结果保存:通过设置save_prediction_only参数实现,评估预测结果默认保存在output/keypoints_results.json文件中。
!python tools/eval.py -c configs/keypoint/hrnet/hrnet_w32_256x256_mpii.yml -o weights=output/hrnet_w32_256x256_mpii/2.pdparams --save_prediction_only
2.3 推理效果可视化
关于MPII格式数据集,PaddleDetection源码的扩展性支持还有待提高,因此要进行推理效果可视化,这里需要对源码可视化文件PaddleDetection/ppdet/utils/visualizer.py进行一些修改,具体就是在draw_pose()函数中,把自定义的手部关键点检测数据集的关键点相邻连接关系配置到EDGES中,然后把颜色索引设置colors扩展到关键点数量+1。
    if kpt_nums == 17:  #plot coco keypoint
        EDGES = [(0, 1), (0, 2), (1, 3), (2, 4), (3, 5), (4, 6), (5, 7), (6, 8),
                 (7, 9), (8, 10), (5, 11), (6, 12), (11, 13), (12, 14),
                 (13, 15), (14, 16), (11, 12)]
    else:  #plot mpii keypoint
        EDGES = [(0, 1), (1, 2),  (2, 3), (3, 4), (0, 5), (5, 6), (6, 7), (7, 8), (0, 9),
                 (9, 10), (10, 11), (11, 12), (0, 13), (13, 14), (14, 15), (15, 16), (0, 17),
                 (17, 18), (18, 19), (19, 20), (21, 22), (22, 23), (23, 24), (24, 25),
                 (21, 26), (26, 27), (27, 28), (28, 29), (21, 30), (30, 31),
                 (31, 32), (32, 33), (21, 34), (34, 35), (35, 36), (36, 37), (21, 38),
                 (38, 39), (39, 40), (40, 41),
                 ]
    NUM_EDGES = len(EDGES)

    colors = [[255, 0, 0], [255, 85, 0], [255, 170, 0], [255, 255, 0], [170, 255, 0], [85, 255, 0], [0, 255, 0], \
            [0, 255, 85], [0, 255, 170], [0, 255, 255], [0, 170, 255], [0, 85, 255], [0, 0, 255], [85, 0, 255], \
            [255, 0, 0], [255, 85, 0], [255, 170, 0], [255, 255, 0], [170, 255, 0], [85, 255, 0], [0, 255, 0], \
            [255, 0, 0], [255, 85, 0], [255, 170, 0], [255, 255, 0], [170, 255, 0], [85, 255, 0], [0, 255, 0], \
            [255, 0, 0], [255, 85, 0], [255, 170, 0], [255, 255, 0], [170, 255, 0], [85, 255, 0], [0, 255, 0], \
            [255, 0, 0], [255, 85, 0], [255, 170, 0], [255, 255, 0], [170, 255, 0], [85, 255, 0], [0, 255, 0], \
            [255, 0, 0]]
项目提供了修改后的visualizer.py文件,运行时覆盖源代码的对应文件即可。
!cp ../visualizer.py ppdet/utils/visualizer.py
这里先展示训练3个epoch后的手部关键点检测效果。
!python tools/infer.py -c configs/keypoint/hrnet/hrnet_w32_256x256_mpii.yml -o weights=./output/hrnet_w32_256x256_mpii/2.pdparams --infer_img=../handpose_datasets/20.jpg --draw_threshold=0.5
!python tools/infer.py -c configs/keypoint/hrnet/hrnet_w32_256x256_mpii.yml -o weights=./output/hrnet_w32_256x256_mpii/2.pdparams --infer_img=../handpose_datasets/35.jpg --draw_threshold=0.5
# 抽取两张测试集图片查看预测效果
img1 = Image.open('output/20.jpg')
img2 = Image.open('output/35.jpg')
img1
img2

3 模型部署
正如前文所说,Top-Down方案是先检测主体,再检测局部关键点。因此部署时,还需要用到已经训练好的检测模型。
# 准备Top-Down主体检测模型的预训练模型
!wget https://paddledet.bj.bcebos.com/models/ppyolov2_r50vd_dcn_365e_coco.pdparams
# 导出检测模型
!python tools/export_model.py -c configs/ppyolo/ppyolov2_r50vd_dcn_365e_coco.yml -o weights=ppyolov2_r50vd_dcn_365e_coco.pdparams
推理部署时,PaddleDetection代码也需要进行一番修改以避免报错,除了和前文一样的draw_pose()函数EDGES和colors设置外,Top-Down模型联合部署时,对于预测内容为空的帧,需要进行跳过处理,具体在deploy/python/keypoint_postprocess.py文件的translate_to_ori_images()函数上:
def translate_to_ori_images(keypoint_result, batch_records):
    kpts = []
    scores = 0.0
    if len(keypoint_result) > 0:
        kpts = keypoint_result['keypoint']
        scores = keypoint_result['score']
        kpts[..., 0] += batch_records[:, 0:1]
        kpts[..., 1] += batch_records[:, 1:2]
    return kpts, scores
# 覆盖部署代码
!cp ../python/*.py /deploy/python/
# 导出关键点模型
!python tools/export_model.py -c configs/keypoint/hrnet/hrnet_w32_256x256_mpii.yml -o weights=./output/hrnet_w32_256x256_mpii/model_final.pdparams
/opt/conda/envs/python35-paddle120-env/lib/python3.7/site-packages/paddle/tensor/creation.py:130: DeprecationWarning: `np.object` is a deprecated alias for the builtin `object`. To silence this warning, use `object` by itself. Doing this will not modify any behavior and is safe.
Deprecated in NumPy 1.20; for more details and guidance: https://numpy.org/devdocs/release/1.20.0-notes.html#deprecations
  if data.dtype == np.object:
Warning: import ppdet from source directory without installing, run 'python setup.py install' to install ppdet firstly
[08/01 20:15:02] ppdet.utils.checkpoint INFO: Finish loading model weights: ./output/hrnet_w32_256x256_mpii/2.pdparams
[08/01 20:15:02] ppdet.engine INFO: Export inference config file to output_inference/hrnet_w32_256x256_mpii/infer_cfg.yml
W0801 20:15:13.328457  4215 device_context.cc:447] Please NOTE: device: 0, GPU Compute Capability: 7.0, Driver API Version: 11.2, Runtime API Version: 10.1
W0801 20:15:13.328523  4215 device_context.cc:465] device: 0, cuDNN Version: 7.6.
[08/01 20:15:19] ppdet.engine INFO: Export model and saved in output_inference/hrnet_w32_256x256_mpii
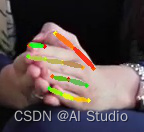
PaddleDetection提供的部署方案中,可以传入视频文件,进行离线推理后,合成输出视频文件查看效果。训练3个epoch后,对于测试视频文件的手部关键点检测效果如下:
# detector 检测 + keypoint top-down模型联合部署(联合推理只支持top-down方式)
!python deploy/python/det_keypoint_unite_infer.py --det_model_dir=output_inference/ppyolov2_r50vd_dcn_365e_coco/ --keypoint_model_dir=output_inference/hrnet_w32_256x256_mpii/ --video_file=../14-51-17_Trim.mp4  --device=gpu

4 主体检测模型替换
在本项目中,提供了两个测试视频,一个内容是上文展现的“手指舞”,另一个内容则来自某个手语新闻的片段。
上面的预测视频中,我们可以发现PaddleDetection提供的默认主体检测模型,对于手指舞的定位效果还不错。但是,对于手语新闻片段,我们就会发现,这个主体检测模型,检测的是人体——然而我们的目标仅仅是手掌……
可想而知,主体检测结果传入关键点检测,预测效果是不会好的——与训练集差异太大了。
不信可以试试看……
# detector 检测 + keypoint top-down模型联合部署(联合推理只支持top-down方式)
!python deploy/python/det_keypoint_unite_infer.py --det_model_dir=output_inference/ppyolov2_r50vd_dcn_365e_coco/ --keypoint_model_dir=output_inference/hrnet_w32_256x256_mpii/ --video_file=../20-11-32_Trim.mp4  --device=gpu
[外链图片转存失败,源站可能有防盗链机制,建议将图片保存下来直接上传(img-5Ehm37WI-1659960455339)(https://ai-studio-static-online.cdn.bcebos.com/0860f4dbbfc24e13a29a639478b24dc392afaeb73a734300a016cad98ec8f013)]
上图是原图?
不,其实它是关键点检测合成视频的预测结果。在5秒的视频中,一个关键点也没测到——因为相比于人体这个主体,手部的位置实在太小了。而我们前面用到手部关键点检测训练集,则完全聚焦于手部图片,差异过大了。
因此,接下来我们需要快速训练一个主体检测模型,这个模型的主体就是人的手掌。
4.1 用PicoDet-S快速训练一个手部检测模型
幸运的是,AI Studio平台上已经有开发者注意到了相关工作,这位@herui2同学整理了用于检测人手的oxford_hands数据集,并且已将原格式转换为VOC格式和yolo训练格式,省去了我们寻找数据集的时间。
另一方面,@糖果屋的奇诺同学基于上面的手部数据集,给出了可以作为benchmark的Paddle训练参考结果,我们可以直接拿来做自己训练模型的评估:
YOLOV3_256mAP: 59.9YOLOV3_512mAP: 70.2
%cd ~
# 解压数据集
!unzip data/data69841/voc_hand.zip -d data/
# 准备数据集
!mkdir MyDataset
!mkdir MyDataset/JPEGImages
!mkdir MyDataset/Annotations
!mv data/voc_hand/images/test/*.jpg MyDataset/JPEGImages/
!mv data/voc_hand/images/train/*.jpg MyDataset/JPEGImages/
!mv data/voc_hand/VOC_test_hand/*.xml MyDataset/Annotations/
!mv data/voc_hand/VOC_train_hand/*.xml MyDataset/Annotations/
# 用PaddleX制作符合PaddleDetection训练要求的VOC格式数据集
!pip install paddlex
!paddlex --split_dataset --format VOC --dataset_dir MyDataset --val_value 0.2 --test_value 0.1
%cd PaddleDetection
PaddleDetection的目标检测模型配置要简单不少,主要的地方就是:
PaddleDetection/configs/datasets/voc.yml文件配置数据集信息
metric: VOC
map_type: 11point
num_classes: 1

TrainDataset:
  !VOCDataSet
    dataset_dir: /home/aistudio/MyDataset
    anno_path: /home/aistudio/MyDataset/train_list.txt
    label_list: /home/aistudio/MyDataset/labels.txt
    data_fields: ['image', 'gt_bbox', 'gt_class', 'difficult']

EvalDataset:
  !VOCDataSet
    dataset_dir: /home/aistudio/MyDataset
    anno_path: /home/aistudio/MyDataset/val_list.txt
    label_list: /home/aistudio/MyDataset/labels.txt
    data_fields: ['image', 'gt_bbox', 'gt_class', 'difficult']

TestDataset:
  !ImageFolder
    anno_path: /home/aistudio/MyDataset/labels.txt
PaddleDetection/configs/picodet/legacy_model/_base_/optimizer_300e.yml文件设置训练epoch数和学习率
epoch: 30

LearningRate:
  base_lr: 0.04
  schedulers:
  - !CosineDecay
    max_epochs: 30
  - !LinearWarmup
    start_factor: 0.1
    steps: 300

OptimizerBuilder:
  optimizer:
    momentum: 0.9
    type: Momentum
  regularizer:
    factor: 0.00004
    type: L2
# 模型训练
!python tools/train.py -c configs/picodet/legacy_model/picodet_s_320_voc.yml --eval
# 模型评估
!python tools/eval.py -c configs/picodet/legacy_model/picodet_s_320_voc.yml -o weights=output/picodet_s_320_voc/best_model.pdparams
完成30个eopch后,验证集效果如下:
Warning: import ppdet from source directory without installing, run 'python setup.py install' to install ppdet firstly
W0802 16:40:32.416255  8586 gpu_resources.cc:61] Please NOTE: device: 0, GPU Compute Capability: 7.0, Driver API Version: 11.2, Runtime API Version: 10.1
W0802 16:40:32.419806  8586 gpu_resources.cc:91] device: 0, cuDNN Version: 7.6.
[08/02 16:40:34] ppdet.utils.checkpoint INFO: Finish loading model weights: output/picodet_s_320_voc/best_model.pdparams
[08/02 16:40:35] ppdet.engine INFO: Eval iter: 0
[08/02 16:40:42] ppdet.engine INFO: Eval iter: 100
[08/02 16:40:44] ppdet.metrics.metrics INFO: Accumulating evaluatation results...
[08/02 16:40:44] ppdet.metrics.metrics INFO: mAP(0.50, 11point) = 57.44%
[08/02 16:40:44] ppdet.engine INFO: Total sample number: 961, averge FPS: 97.18749184573853
测试集效果:
Warning: import ppdet from source directory without installing, run 'python setup.py install' to install ppdet firstly
W0802 16:42:42.461326  9720 gpu_resources.cc:61] Please NOTE: device: 0, GPU Compute Capability: 7.0, Driver API Version: 11.2, Runtime API Version: 10.1
W0802 16:42:42.464957  9720 gpu_resources.cc:91] device: 0, cuDNN Version: 7.6.
[08/02 16:42:44] ppdet.utils.checkpoint INFO: Finish loading model weights: output/picodet_s_320_voc/best_model.pdparams
[08/02 16:42:45] ppdet.engine INFO: Eval iter: 0
[08/02 16:42:49] ppdet.metrics.metrics INFO: Accumulating evaluatation results...
[08/02 16:42:50] ppdet.metrics.metrics INFO: mAP(0.50, 11point) = 55.97%
[08/02 16:42:50] ppdet.engine INFO: Total sample number: 480, averge FPS: 80.46807448145216
因为目标是个初始版的demo,我们并没有训练太长时间,检测模型效果感觉已经不错了,那就可以直接导出了。
# 导出手部主体检测模型
# 导出手部主体检测模型
!python tools/export_model.py -c configs/picodet/legacy_model/picodet_s_320_voc.yml -o weights=./output/picodet_s_320_voc/model_final.pdparams
4.2 替换自定义的主体检测模型并联合部署
由于篇幅关系,本项目直接提供了picodet_s_320_voc训练30个epoch后的导出的部署模型。
!unzip ../picodet_s_320_voc.zip -d output_inference
Archive:  ../picodet_s_320_voc.zip
  inflating: output_inference/picodet_s_320_voc/model.pdiparams.info
  inflating: output_inference/picodet_s_320_voc/model.pdmodel
  inflating: output_inference/picodet_s_320_voc/model.pdiparams
  inflating: output_inference/picodet_s_320_voc/infer_cfg.yml
# 替换主体检测模型后的detector检测 + keypoint top-down模型联合部署(联合推理只支持top-down方式)
!python deploy/python/det_keypoint_unite_infer.py --det_model_dir=output_inference/picodet_s_320_voc/ --keypoint_model_dir=output_inference/hrnet_w32_256x256_mpii/ --video_file=../20-11-32_Trim.mp4  --device=gpu
预测效果如下:
5 小结
本项目通过将手部关键点检测数据集转换为MPII格式,实现了基于PaddleDetection的Top-Down联合检测方案的手部关键点检测模型训练、推理和部署,模型在基本聚焦于手掌的测试集图片上,表现效果相当不错。
通过项目我们也发现,Top-Down联合部署方案中的主体检测模型不宜直接使用模型库提供的预训练模型,其原因在于,预训练模型检测的主体是“人体”,但是在实际使用时,手部关键点检测需要的输入图片更聚焦于“手掌”,主体检测模型输出结果应该与关键点检测的输入模型尽可能一致。
通过PicoDet-S我们快速训练了一个手部主体检测模型,并于关键点检测模型联合部署,在测试视频上取得了较好的效果。
当然,该模型还存在不少改进空间,主要是因为MPII格式自定义数据集不能边训练边评估,影响了对模型效果的量化评价。
因此,后续项目中,将着重研究以下几个方面:
- 将
handpose_datasets_v2数据集标注转为COCO的person_keypoints_train2017.json格式,并训练轻量级关键点检测模型; - 训练Bottom-Up方案的手部关键点检测模型;
- 重写MPII格式数据集的评估函数。
转载自:https://aistudio.baidu.com/aistudio/projectdetail/4377637

学大模型,用大模型上飞桨星河社区!每天8点V100G算力免费领!免费领取ERNIE 4.0 100w Token >>>
更多推荐


 1
1 0
0- 0


 已为社区贡献1436条内容

所有评论(0)