
手机摄影中多摄融合理论详解与代码实战
手机摄影中多摄融合理论详解与代码实战,使用了ORB特征,仿射变换,光流计算,特征金字塔融合等常见图像处理算法,完成手机多摄融合过程模拟。
转载AI Studio项目链接https://aistudio.baidu.com/aistudio/projectdetail/3465839
手机摄影中多摄融合理论详解与代码实战
前言
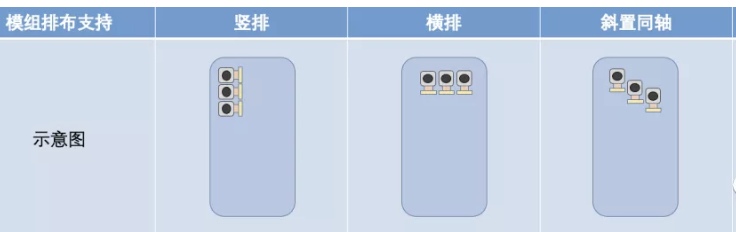
从2014年到现在,整个手机工业界都经历了天翻地覆的发展,不管是摄像头模组,还是手机芯片的算力,还是计算摄影的算法,都跟当年完全不一样了,最终效果也提高了很多。已经有不少手机厂商发布了在特定摄像头之间进行融合提升图像质量的产品。如下图所示:

理论环节
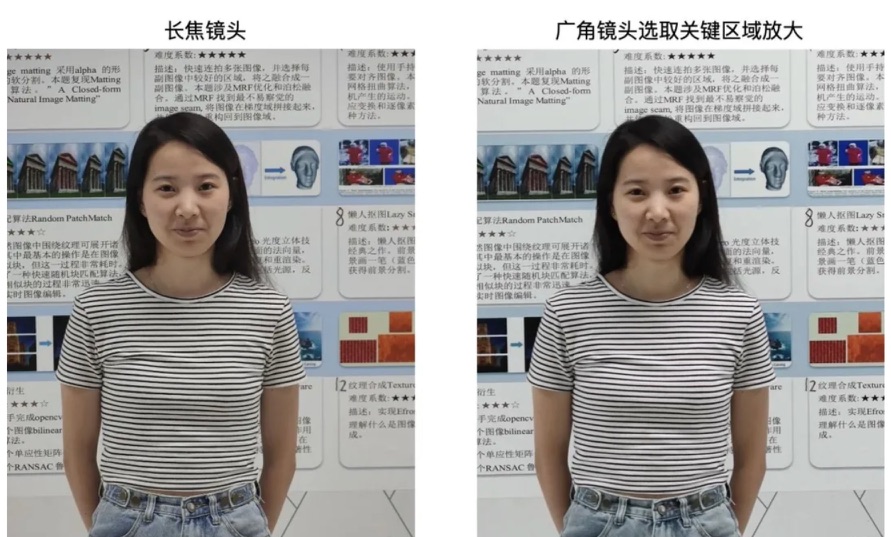
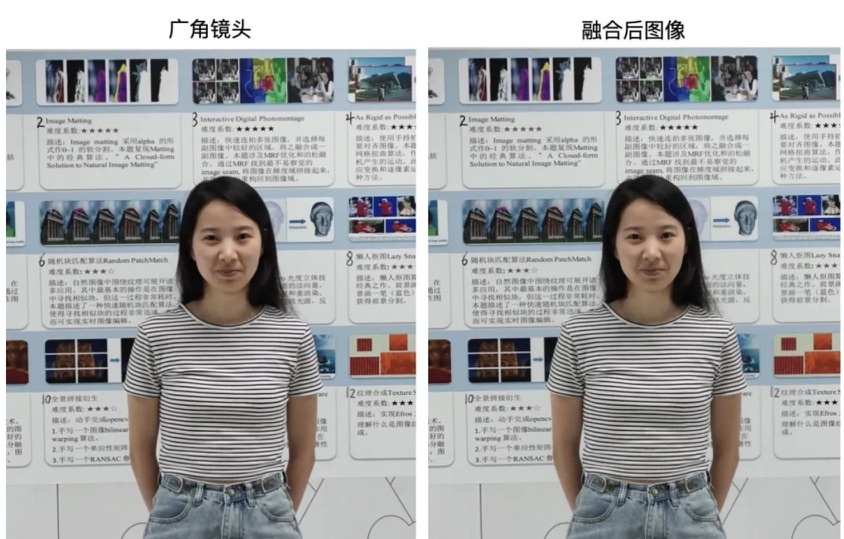
我们本次项目主要来看看一个广角镜头和一个长焦镜头融合时,会发生什么。先来看看原图。你可以明显看到,两个摄像头拍摄的画面在尺度上有明显的区别。如果我们仔细观察,还可以观察到它们不仅仅在尺度上有区别,由于两个摄像头的空间位置不同,所以实际上两个图像之间还有平移和旋转。

事实上,现在的手机模组组装形态多种多样,这就使得不同摄像头拍摄的图像之间空间和尺度差异也是多种多样的
因此,要把不同摄像头拍摄的图像进行融合,就需要分成如下的步骤了:
- 尺度对齐
- 像素对齐
- 图像融合
1. 尺度对齐
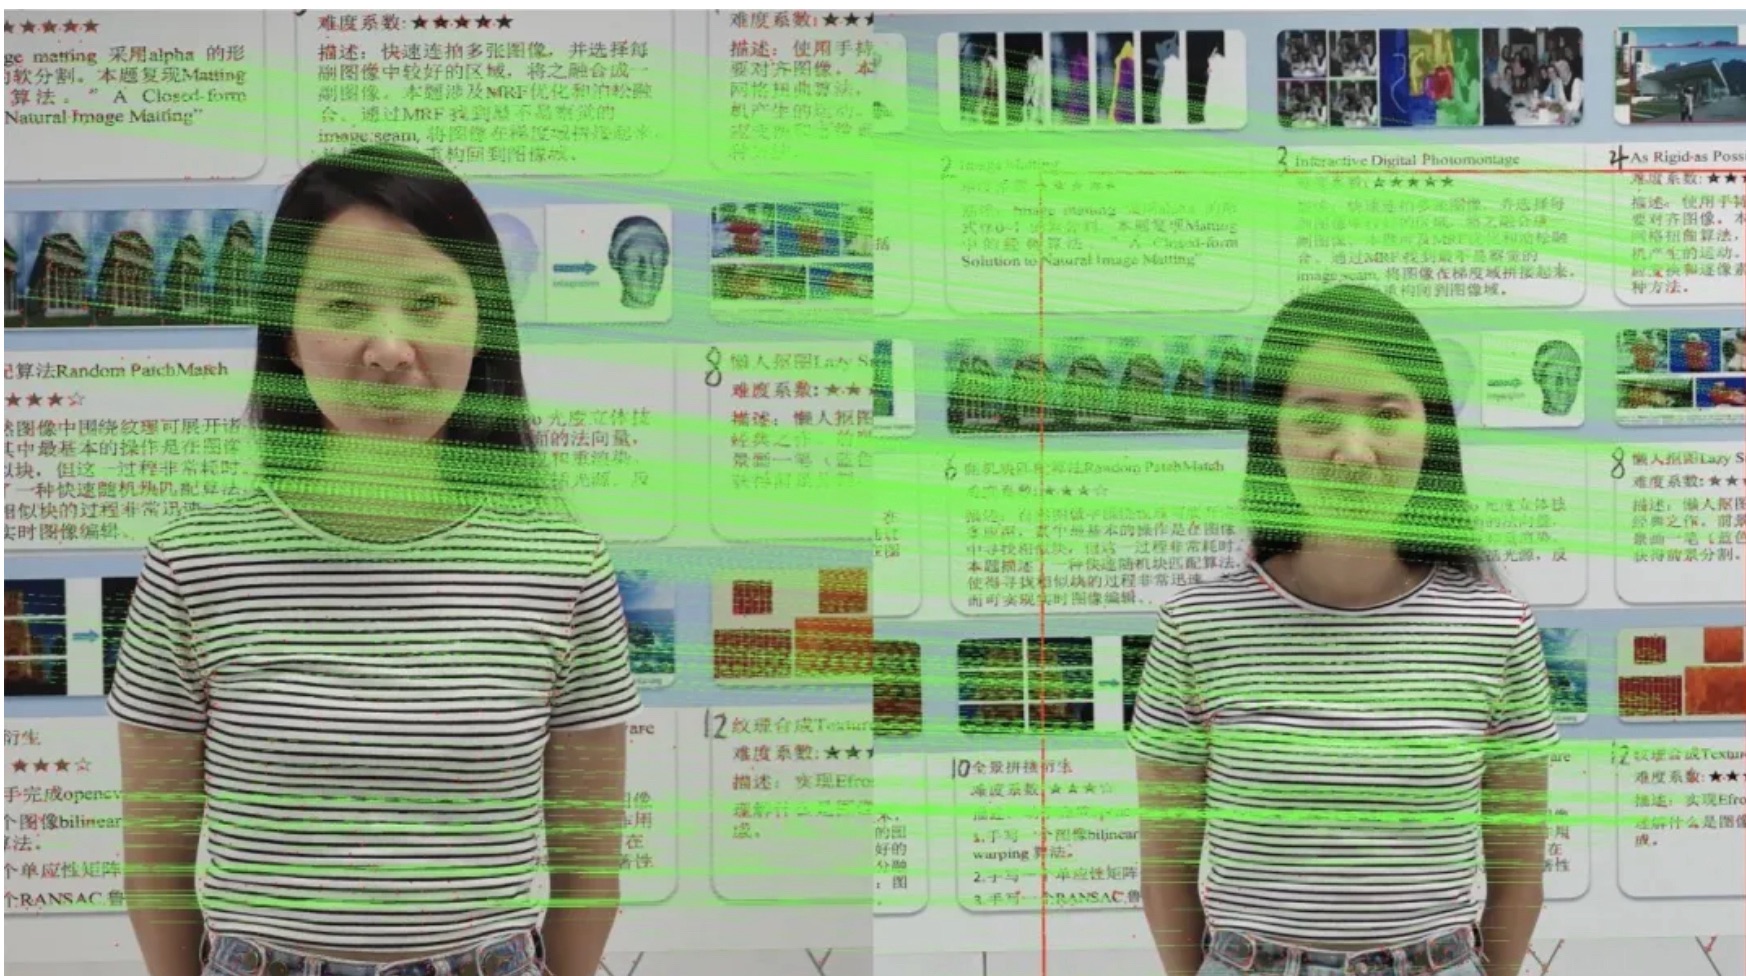
如果我们提前获取到两个摄像头的关键参数,包括焦距、像素尺寸、FOV等信息,那么是能够直接计算出图像的尺度差异的。即便是不知道上述参数,要对齐图像的尺度,也是很容易的一件事情:只需要先对图像做稀疏特征点的对齐,然后对其中一个图像做单应变换即可。如下图所示,两个图像的许多特征点被找到并匹配上,从而可以求取出它们之间的变换矩阵。右图中,红框部分的图像经过裁剪和放大,即可和左图保持尺度对齐了,当然也可以将左图缩小到右图红框的尺寸,具体是怎么做,实际上在产品执行中不同场景下会有不同的考量。
from __future__ import print_function
import cv2
import numpy as np


MAX_FEATURES = 500
GOOD_MATCH_PERCENT = 0.15


def alignImages(im1, im2):

  # Convert images to grayscale
  im1Gray = cv2.cvtColor(im1, cv2.COLOR_BGR2GRAY)
  im2Gray = cv2.cvtColor(im2, cv2.COLOR_BGR2GRAY)

  # Detect ORB features and compute descriptors.
  orb = cv2.ORB_create(MAX_FEATURES)
  keypoints1, descriptors1 = orb.detectAndCompute(im1Gray, None)
  keypoints2, descriptors2 = orb.detectAndCompute(im2Gray, None)

  # Match features.
  matcher = cv2.DescriptorMatcher_create(cv2.DESCRIPTOR_MATCHER_BRUTEFORCE_HAMMING)
  matches = matcher.match(descriptors1, descriptors2, None)

  # Sort matches by score
  matches.sort(key=lambda x: x.distance, reverse=False)

  # Remove not so good matches
  numGoodMatches = int(len(matches) * GOOD_MATCH_PERCENT)
  matches = matches[:numGoodMatches]

  # Draw top matches
  imMatches = cv2.drawMatches(im1, keypoints1, im2, keypoints2, matches, None)
  cv2.imwrite("matches.jpg", imMatches)

  # Extract location of good matches
  points1 = np.zeros((len(matches), 2), dtype=np.float32)
  points2 = np.zeros((len(matches), 2), dtype=np.float32)

  for i, match in enumerate(matches):
    points1[i, :] = keypoints1[match.queryIdx].pt
    points2[i, :] = keypoints2[match.trainIdx].pt

  # Find homography
  h, mask = cv2.findHomography(points1, points2, cv2.RANSAC)

  # Use homography
  height, width, channels = im2.shape
  im1Reg = cv2.warpPerspective(im1, h, (width, height))

  return im1Reg, h


if __name__ == '__main__':

  # Read reference image
  refFilename = "scanned-form.jpg"
  print("Reading reference image : ", refFilename)
  imReference = cv2.imread(refFilename, cv2.IMREAD_COLOR)

  # Read image to be aligned
  imFilename = "form.jpg"
  print("Reading image to align : ", imFilename);
  im = cv2.imread(imFilename, cv2.IMREAD_COLOR)

  print("Aligning images ...")
  # Registered image will be resotred in imReg.
  # The estimated homography will be stored in h.
  imReg, h = alignImages(im, imReference)

  # Write aligned image to disk.
  outFilename = "aligned.jpg"
  print("Saving aligned image : ", outFilename);
  cv2.imwrite(outFilename, imReg)

  # Print estimated homography
  print("Estimated homography : \n",  h)
Reading reference image :  scanned-form.jpg
Reading image to align :  form.jpg
Aligning images ...
Saving aligned image :  aligned.jpg
Estimated homography :
 [[ 7.86177358e-01 -9.40060110e-04  1.21650046e+02]
 [-9.13082345e-03  7.89343398e-01  1.22528487e+02]
 [-7.22002042e-06 -8.42426852e-06  1.00000000e+00]]
经过这些操作,我们就得到了一对图,你如果仔细观察的话,会发现虽然这对图片里面物体的尺寸是一致的,但很明显有旋转和平移的关系,所以接下来还需要对它们进行像素对齐。
2. 像素对齐
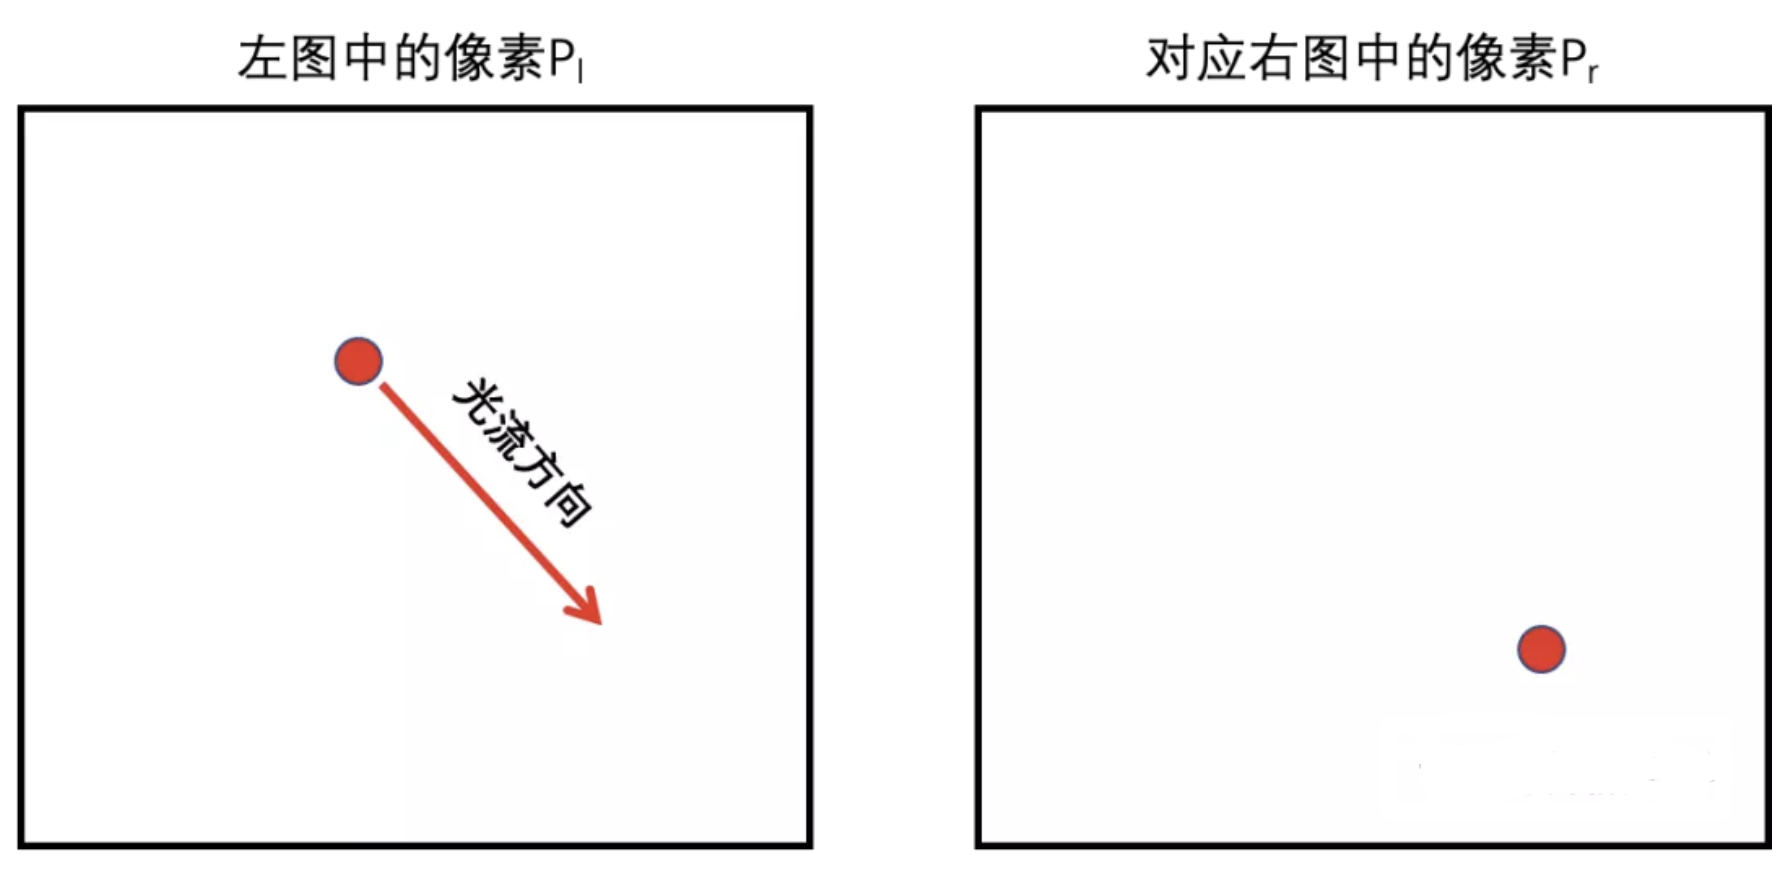
由于手机上两个摄像头之间的空间位置差异不会太大,因此图像之间的运动也不会很大。那么就比较适合计算它们之间的光流,并用光流信息来对齐每个像素。光流算法回答一个问题:左图中每个像素点Pl在右图的对应点Pr的坐标是什么?或者说Pl经过什么方向和大小的运动,才能和右图中的对应像素Pr对齐。总之,当计算了光流后,就可以很容易的对图像做变换,从而对齐像素。
!pip install scikit-image
Looking in indexes: https://pypi.tuna.tsinghua.edu.cn/simple
Collecting scikit-image
  Downloading https://pypi.tuna.tsinghua.edu.cn/packages/9a/44/8f8c7f9c9de7fde70587a656d7df7d056e6f05192a74491f7bc074a724d0/scikit_image-0.19.1-cp37-cp37m-manylinux_2_12_x86_64.manylinux2010_x86_64.whl (13.3 MB)
     |████████████████████████████████| 13.3 MB 2.1 MB/s
[?25hRequirement already satisfied: scipy>=1.4.1 in /opt/conda/envs/python35-paddle120-env/lib/python3.7/site-packages (from scikit-image) (1.6.3)
Collecting tifffile>=2019.7.26
  Downloading https://pypi.tuna.tsinghua.edu.cn/packages/d8/38/85ae5ed77598ca90558c17a2f79ddaba33173b31cf8d8f545d34d9134f0d/tifffile-2021.11.2-py3-none-any.whl (178 kB)
     |████████████████████████████████| 178 kB 3.3 MB/s
[?25hRequirement already satisfied: packaging>=20.0 in /opt/conda/envs/python35-paddle120-env/lib/python3.7/site-packages (from scikit-image) (21.3)
Collecting PyWavelets>=1.1.1
  Downloading https://pypi.tuna.tsinghua.edu.cn/packages/a1/9c/564511b6e1c4e1d835ed2d146670436036960d09339a8fa2921fe42dad08/PyWavelets-1.2.0-cp37-cp37m-manylinux_2_5_x86_64.manylinux1_x86_64.whl (6.1 MB)
     |████████████████████████████████| 6.1 MB 3.7 MB/s
[?25hRequirement already satisfied: networkx>=2.2 in /opt/conda/envs/python35-paddle120-env/lib/python3.7/site-packages (from scikit-image) (2.4)
Requirement already satisfied: numpy>=1.17.0 in /opt/conda/envs/python35-paddle120-env/lib/python3.7/site-packages (from scikit-image) (1.19.5)
Requirement already satisfied: imageio>=2.4.1 in /opt/conda/envs/python35-paddle120-env/lib/python3.7/site-packages (from scikit-image) (2.6.1)
Requirement already satisfied: pillow!=7.1.0,!=7.1.1,!=8.3.0,>=6.1.0 in /opt/conda/envs/python35-paddle120-env/lib/python3.7/site-packages (from scikit-image) (8.2.0)
Requirement already satisfied: decorator>=4.3.0 in /opt/conda/envs/python35-paddle120-env/lib/python3.7/site-packages (from networkx>=2.2->scikit-image) (4.4.2)
Requirement already satisfied: pyparsing!=3.0.5,>=2.0.2 in /opt/conda/envs/python35-paddle120-env/lib/python3.7/site-packages (from packaging>=20.0->scikit-image) (3.0.7)
Installing collected packages: tifffile, PyWavelets, scikit-image
Successfully installed PyWavelets-1.2.0 scikit-image-0.19.1 tifffile-2021.11.2
[33mWARNING: You are using pip version 21.3.1; however, version 22.0.3 is available.
You should consider upgrading via the '/opt/conda/envs/python35-paddle120-env/bin/python -m pip install --upgrade pip' command.[0m
import numpy as np
from matplotlib import pyplot as plt
# from skimage.color import rgb2gray
from skimage.data import stereo_motorcycle, vortex
from skimage.transform import warp, resize
from skimage.registration import optical_flow_tvl1, optical_flow_ilk
import skimage
from skimage import io, color

#, as_gray=True
# skimage提供了io模块,顾名思义,这个模块是用来图片输入输出操作的。
image00 = io.imread("form.jpg")
print(image00.shape)
image11 = io.imread("aligned.jpg")
image11 = resize(image11, (776,622))
print(image11.shape)

# convert rgb (224,224,3 ) to gray (224,224) image
def rgb2gray(rgb):
        return np.dot(rgb[..., :3], [0.299, 0.587, 0.114]) #分别对应通道 R G B
# --- Convert the images to gray level: color is not supported.
image0 = rgb2gray(image00)
image1 = rgb2gray(image11)

# --- Compute the optical flow
v, u = optical_flow_tvl1(image0, image1)

# --- Use the estimated optical flow for registration

nr, nc = image0.shape

row_coords, col_coords = np.meshgrid(np.arange(nr), np.arange(nc),
                                     indexing='ij')

image1_warp = warp(image1, np.array([row_coords + v, col_coords + u]),
                   mode='edge')

# build an RGB image with the unregistered sequence
seq_im = np.zeros((nr, nc, 3))
seq_im[..., 0] = image1
seq_im[..., 1] = image0
seq_im[..., 2] = image0

# build an RGB image with the registered sequence
reg_im = np.zeros((nr, nc, 3))
reg_im[..., 0] = image1_warp
reg_im[..., 1] = image0
reg_im[..., 2] = image0

# build an RGB image with the registered sequence
target_im = np.zeros((nr, nc, 3))
target_im[..., 0] = image0
target_im[..., 1] = image0
target_im[..., 2] = image0


skimage.io.imsave('seq_im.jpg', seq_im)
skimage.io.imsave('reg_im.jpg', reg_im)
skimage.io.imsave('target_im.jpg', target_im)
(776, 622, 3)
(776, 622, 3)


Lossy conversion from float64 to uint8. Range [0.0, 228.131]. Convert image to uint8 prior to saving to suppress this warning.
Lossy conversion from float64 to uint8. Range [0.0, 228.131]. Convert image to uint8 prior to saving to suppress this warning.
Lossy conversion from float64 to uint8. Range [7.153, 228.131]. Convert image to uint8 prior to saving to suppress this warning.
3.图像融合
当对齐了图像后,就可以对图像进行融合了。传统上表现的比较好的是金字塔融合,在这里我们选择该算法进行图像融合。
import cv2 as cv
import numpy as np

def Pyramid(A,B):
    # 构建苹果和橘子高斯金字塔
    G = A.copy()
    G1 = B.copy()
    gpA = [G]
    gpB = [G1]
    for i in range(6):
        G = cv.pyrDown(G)
        # print(G.shape)
        G1 = cv.pyrDown(G1)
        # print(G.shape)
        gpA.append(G)
        gpB.append(G1)

    # 构建苹果的拉普拉斯金字塔
    LA = [gpA[5]]
    for i in range(5, 0, -1):
        LA.append(cv.subtract(gpA[i-1],cv.pyrUp(gpA[i])))
    # 构建橘子的拉普拉斯金字塔
    LB = [gpB[5]]
    for i in range(5, 0, -1):
        LB.append(cv.subtract(gpB[i - 1], cv.pyrUp(gpB[i])))

    # 将苹果的左边和橘子的右边无缝融合
    LeftA = []
    RightA = []
    Merge = []
    for level in LA:
        LeftA.append(level[:, :int(level.shape[1])] )
    for level in LB:
        RightA.append(level[:, int(level.shape[1]) :])
    for i in range(6):
        Merge.append(np.hstack((LeftA[i], RightA[i])))

    result = Merge[0]
    for i in range(1, 6):
        result = cv.pyrUp(result)
        result = cv.add(result, Merge[i])
    return  result


if __name__ == "__main__":
    img1 = cv.imread("form.jpg")
    img1 = cv.resize(img1, (640,960))
    img2 = cv.imread("reg_im.jpg")
    img2 = cv.resize(img2, (640,960))
    rows, cols, dpt = img1.shape

    im_fusion = Pyramid(img1, img2)
    cv.imwrite('im_fusion.jpg', im_fusion)
总结
实际上,有如下一些原因,导致简单的融合算法并不能完全解决真实问题:经过光流变换后的图像,可能会产生局部的扭曲,尤其是在视差边缘;某些时候,长焦距的图像质量并非在每一个局部区域都优于短焦距图像;简单的融合,会导致融合区域和非融合区域产生明显的突变。
所以这里面有很多复杂的技术问题需要解决。其中,像素级别的对齐,以及图像的融合,是整个算法成功的关键。在这个过程中会遇到各种各样的问题,例如:
- 如何尽可能在有限的算力需求内进行尽可能准确的融合
- 如何处理融合区域和非融合区域的突变
- 如何判断哪些像素需要融合
- 在融合图像时两个输入图像的权重各自为多少
- 如何利用底层系统硬件支持,做到高效运算
- 如何和相机系统的其他功能紧密配合
等等,这些问题的解决需要工程师付出大量的时间和精力,大家在手机发布会上看到的惊艳一刻,或者拿着心爱的手机拍出满意的照片,这背后都有无数工程师的辛苦付出。
- 注意
本项目中部分实现为模拟实现,与实际应用中的手机多摄图像融合效果相差较多,与展示的效果也有差别,大家需要注意,大家应该注意的是本项目中的多摄融合思路。

学大模型,用大模型上飞桨星河社区!每天8点V100G算力免费领!免费领取ERNIE 4.0 100w Token >>>
更多推荐


 0
0 0
0- 0


 已为社区贡献1437条内容

所有评论(0)