
快速InsightFace和InsightFace Paddle学习与实践
快速InsightFace和InsightFace Paddle学习与实践本文档为大家提供在AIStudio环境下的InsightFace和InsightFace Paddle的安装和使用样例,目标为开箱即用!fork之后就能跑通例程,便于学习和理解大规模人脸识别和检测算法。InsightFace介绍InsightFace是一个开源的 2D&3D 深度人脸分析工具箱,基于各流行AI框架。在
快速InsightFace和InsightFace Paddle学习与实践
本文档为大家提供在AIStudio环境下的InsightFace和InsightFace Paddle的安装和使用样例,目标为开箱即用!fork之后就能跑通例程,便于学习和理解大规模人脸识别和检测算法。
InsightFace介绍
InsightFace是一个开源的 2D&3D 深度人脸分析工具箱,基于各流行AI框架。在github获得10.5k 星。
InsightFace 高效地实现了丰富多样的人脸识别、人脸检测和人脸对齐的最先进算法,针对训练和部署进行了优化。
InsightFace在2021.1月被paperswithcode网站评比为2020年度十大最流行AI项目第四名。InsightFace在2021.10月获得NIST-FRVT竞赛VISA赛道第一名。
InsightFace Paddle是InsightFace的飞桨实现版本。更加本地化,比如模型文件直接从北京百度服务器调取,速度飞快,使用起来更加柔顺丝滑!
ArcFace 视频演示
请点击图片观看B站效果视频。
也可观看本项目内嵌的B站效果视频
InsightFace地址
- 官网地址
https://github.com/deepinsight/insightface - 镜像地址
https://hub.fastgit.org/deepinsight/insightface
InsightFacePaddle 飞桨实现版本地址
- 官网地址
https://github.com/littletomatodonkey/insight-face-paddle/ - 镜像地址
https://hub.fastgit.org/littletomatodonkey/insight-face-paddle/
InsightFace人脸识别
介绍
在这个模块中,提供了深度人脸识别的训练数据、网络设置和损失设计。
支持的方法如下:
- ArcFace_mxnet (CVPR’2019)
- ArcFace_torch (CVPR’2019)
- [ SubCenter ArcFace (ECCV’2020) ](https://hub.fastgit.org/deepinsight/insightface/blob/master/recognition/ subcenter_arcface )
- PartialFC_mxnet (Arxiv’2020)
- PartialFC_torch (Arxiv’2020)
- VPL (CVPR’2021)
- [ OneFlow_face ](https://hub.fastgit.org/deepinsight/insightface/blob/master/recognition/oneflow_face)
- ArcFace_Paddle (CVPR’2019)
大多数方法中都包含了常用的网络骨干网,如IResNet、MobilefaceNet、MobileNet、InceptionResNet_v2、DenseNet等。
数据集
训练数据包括但不限于经过清理的 MS1M、VGG2 和 CASIA-Webface 数据集,这些数据集已经以 MXNet 二进制格式打包。请在数据集页面了解详细信息。
评估
在评估中提供标准的IJB和Megaface评估流水线。
预训练模型
请查看 Model-Zoo 了解更多预训练模型。
若github官网太慢,可以使用hub.fastgit.org镜像网站。
第三方重新实现ArcFace
- TensorFlow: InsightFace_TF
- TensorFlow: tf-insightface
- TensorFlow: insightface
- PyTorch: InsightFace_Pytorch
- PyTorch: arcface-pytorch
- Caffe: arcface-caffe
- Caffe: CombinedMargin-caffe
- Tensorflow: InsightFace-tensorflow
- TensorRT: wang-xinyu/tensorrtx
关于飞桨的实现在后面飞桨版本会有介绍。
InsightFace人脸检测
介绍
在这个模块中,为人脸检测训练、评估和推理提供数据标注、网络设置和损失函数设计等功能。
支持的方法如下:
RetinaFace 是一个实用的单级人脸检测器,被 CVPR 2020 接受。我们提供训练代码、训练数据集、预训练模型和评估脚本。
SCRFD 是一种高效的高精度人脸检测方法,最初在 Arxiv 中进行了描述。我们提供了一个易于使用的管道来训练具有 NAS 支持的高效人脸检测器。
InsightFace人脸对齐
介绍
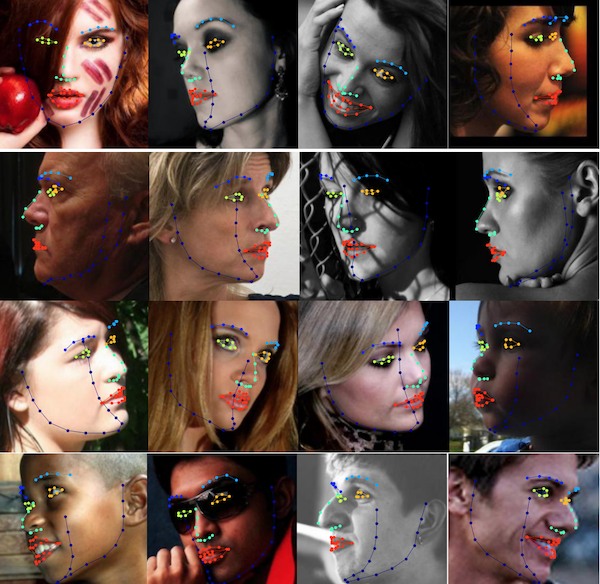
在此模块中,提供用于面部对齐的数据集和训练/推理的流水线。
支持的方法:
- [ SDUNets (BMVC’2018) ](https://hub.fastgit.org/deepinsight/insightface/blob/master/alignment/heatmap)
- SimpleRegression
[ SDUNets ](https://hub.fastgit.org/deepinsight/insightface/blob/master/alignment/ heatmap ) 是一种基于热图的方法,在 BMVC 上被接受。
SimpleRegression 提供具有快速坐标回归的非常轻量级的面部标志模型。这些模型的输入是松散裁剪的人脸图像,而输出是直接地标坐标。
InsightFace快速实践
使用 InsightFace的python包,可以快速实现人脸图像的检测、识别和对齐。
安装方法一
正常情况下,只需要pip安装pip install insightface即可。
修改一
但是很遗憾,目前在AIStudio项目里还不能这样简便安装。因为pip安装的里面需要opencv-python==4.4.0.46 ,有固定版本限制,尽管AIStudio项目里自带了4.1版本,还是需要重新安装opencv并且需要编译安装,opencv编译安装在AIStudio环境下耗时非常长且容易出错(反正我是没有等到过编译安装完成,所以我也不知道要等多久),间接导致在AIStudio环境下无法pip安装InsightFace。解决的方法是下载源文件编译安装(根据需要修改requirements.txt文件,去掉opencv的版本限制,以便能够在AIStudio项目里顺利完成InsightFace安装等)。
具体方法就是修改insightface模块的setup.py文件,将opencv的需求版本去掉。结果进去一看,文件中~/work/insightface/python-package/setup.py竟然是这样的:
requirements = [
    'numpy',
    'onnx',
    'tqdm',
    'requests',
    'matplotlib',
    'Pillow',
    'scipy',
    #'opencv-python',
    'scikit-learn',
    'scikit-image',
    'easydict',
    'cython',
    'albumentations',
    'prettytable',
]
也就是setup.py安装文件并没有限定诸如opencv scikit-learn等软件的版本,这样直接编译安装就行了,都不需要修改setup.py文件。真奇怪为什么InsightFace的pip安装中,却有版本限制(不清楚是InsightFace限定了版本号还是其它依赖库限定了版本)。依赖库中注意,尽管其中opencv-python被注释了,其它软件还会依赖opencv,所以最终还是会需要安装opencv库。
综上所述,下载代码后不需要修改setup.py文件,直接到源代码根目录setup编译然后pip安装即可。
python setup.py bdist_wheel
pip install dist/*
修改二
运行例程时发现下载模型文件非常慢(偶尔比如清晨比较快):
download_path: /home/aistudio/.insightface/models/buffalo_l
Downloading /home/aistudio/.insightface/models/buffalo_l.zip from http://storage.insightface.ai/files/models/buffalo_l.zip
解决的方法是在清晨执行下载,并修改源代码,将模型的存盘目录改为/home/aistudio/work/.insightface/models/,这样work目录可以持久化,我这边下载一次大家就不用再费力下载了。
具体方法为修改文件work/insightface/python-package/insightface/app/face_analysis.py:
class FaceAnalysis:
    def __init__(self, name=DEFAULT_MP_NAME, root='~/work/.insightface', allowed_modules=None, **kwargs):
将原来的root=’/.insightface’修改成root=’/work/.insightface
还要修改同目录下的mask_renderer.py文件。
修改代码需要在编译安装之前处理。
如果已经pip安装好InsightFace库未改代码版本,也可以直接去修改库文件,在AIStudio高端版项目中,安装好之后的库文件位置/opt/conda/envs/python35-paddle120-env/lib/python3.7/site-packages/insightface/app/face_analysis.py 和 /opt/conda/envs/python35-paddle120-env/lib/python3.7/site-packages/insightface/app/mask_renderer.py
另外还有第三个文件可能也要修改:
work/insightface/python-package/insightface/model_zoo/model_zoo.py
在库里面的位置是:
/opt/conda/envs/python35-paddle120-env/lib/python3.7/site-packages/insightface/model_zoo/model_zoo.py
修改第54句,加上work目录root = kwargs.get('root', '~/work/.insightface') # '~/.insightface'
本项目已经修改源代码的这三处,大家不用再费心思修改了,直接运行本项目,就能享受InsightFace带给我们的视觉盛宴啦!
安装方法二
还是使用pip安装,针对pip安装时在AIStudio环境下opencv安装卡住的问题,只需要在安装InsightFace前先pip安装好onnxruntime库,就能使opencv在AIStudio下正常安装了。安装命令步骤如下:
# 先升级pip
!pip install pip -U
# 再提前安装相关库,尤其是onnxruntime
!pip install albumentations prettytable scikit-image onnxruntime
# pip安装InsightFace
!pip install insightface -U
但是这个方法安装后,还是可能会碰到下载模型文件很慢的情况(到已经安装好的库文件里改代码相比方法一更麻烦一点),所以本项目示例里面默认还是使用源码编译安装的方式。
大家可以看到InsightFace的安装确实有点小坑,不过请不要放在心上,它起到抛砖引玉的作用,并且大家后面可以对比一下 InsightFace Paddle 飞桨框架下人脸识别的表现,不管是安装还是使用都顺滑很多。
# 提前安装依赖库,省的后面python setup安装的时候速度太慢
!pip install pip -U
!pip install albumentations prettytable scikit-image onnxruntime -q
# 因为AIStudio项目中安装opencv很慢,所以不能直接用pip安装
# !pip install insightface -U
# 采用git clone下载源代码,手动修改依赖文件和模型存储位置,然后编译安装的方法。本项目已经下载并修改好代码。
# !cd work && git clone https://hub.fastgit.org/deepinsight/insightface
# 手工编译安装包,代码已经修改过
!cd ~/work/insightface/python-package && python setup.py bdist_wheel
# 手工安装本地编译好的包
!cd ~/work/insightface/python-package && pip install dist/*
# 检查一下时候已经安装好InsightFace
!pip list |grep insightface
insightface 0.5
执行测试
import insightface
from insightface.app import FaceAnalysis
from insightface.data import get_image as ins_get_image
app = FaceAnalysis()
app.prepare(ctx_id=0, det_size=(640, 640))
img = ins_get_image('t1')
faces = app.get(img)
list ((face.embedding, face.bbox, face.kps) for face in faces)
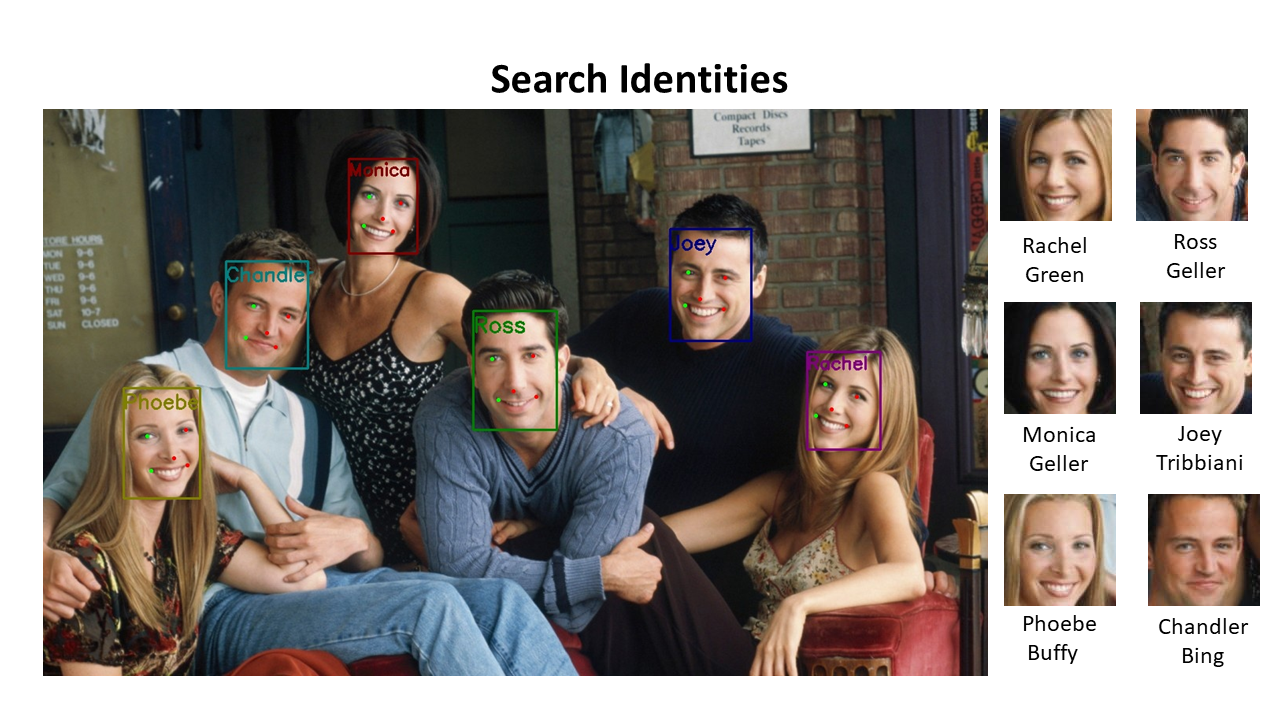
让我们来看看人脸检测输出:
可以看到不光人脸检测出来了,而且还分别标记了左右眼,鼻子和左右嘴角。
我们再用飞桨PPDE们的一个照片展示页面测试一下
import cv2
img = cv2.imread("work/ppdepic.png")
faces = app.get(img)
rimg = app.draw_on(img, faces)
cv2.imwrite("./ppdepic_output.jpg", rimg)
True
# 查看一下检测效果,真不错!
from IPython.display import display, Image
path = "./ppdepic_output.jpg"
img = Image(path)
display(img)

总结下
InsightFace的效果相当棒啊!真乃神器也!
当然前面弄那么复杂是为了在AIStudio项目中体验才会这么费功夫。在本机装可能就没有这么麻烦了,直接pip安装即可(大约本机装opencv比AIStudio中顺利些)。
InsightFace Paddle飞桨版本人脸识别实践
简介
InsightFacePaddle是基于PaddlePaddle实现的,开源深度人脸检测、识别工具。InsightFacePaddle目前提供了三个预训练模型,包括用于人脸检测的 BlazeFace、用于人脸识别的 ArcFace 和 MobileFace。
模型基准指标
在人脸检测任务中,在WiderFace数据集上,BlazeFace的速度与精度指标信息如下。
| 模型结构 | 模型大小 | WiderFace精度 | CPU 耗时 | GPU 耗时 |
|---|---|---|---|---|
| BlazeFace-FPN-SSH-Paddle | 0.65MB | 0.9187/0.8979/0.8168 | 31.7ms | 5.6ms |
| RetinaFace | 1.68MB | -/-/0.825 | 182.0ms | 17.4ms |
在人脸识别任务中,基于MS1M训练集,模型指标在lfw、cfp_fp、agedb30上的精度指标以及CPU、GPU的预测耗时如下。
| 模型结构 | lfw | cfp_fp | agedb30 | CPU 耗时 | GPU 耗时 |
|---|---|---|---|---|---|
| MobileFaceNet-Paddle | 0.9945 | 0.9343 | 0.9613 | 4.3ms | 2.3ms |
| MobileFaceNet-mxnet | 0.9950 | 0.8894 | 0.9591 | 7.3ms | 4.7ms |
测试环境:
- CPU: Intel® Xeon® Gold 6184 CPU @ 2.40GHz
- GPU: a single NVIDIA Tesla V100
注: RetinaFace的性能数据是使用脚本test.py测试得到,这里将RetinaFace的image shape修改为640x480进行测试。MobileFaceNet-mxnet的性能数据是使用脚本:verification.py测试得到。
安装
同样可以在 Python 中使用 InsightFacePaddle。首先导入 InsightFacePaddle,因为 InsightFacePaddle 使用 logging 控制日志输入,因此需要导入 logging。
InsightFacePaddle InsightFace的飞桨实现版本
- 官网地址
https://github.com/littletomatodonkey/insight-face-paddle/ - 镜像地址
https://hub.fastgit.org/littletomatodonkey/insight-face-paddle/
使用的版本
安装方法一
编译安装,先下载源代码,然后编译安装
# 提前安装依赖库,省的后面python setup安装的时候速度太慢
!pip install pip -U
!pip install scikit-learn prettytable onnxruntime -q
# 为了测试,还需要下载源代码
!cd work && git clone https://hub.fastgit.org/littletomatodonkey/insight-face-paddle/
# 本地编译并pip安装
# !cd work/insight-face-paddle && python setup.py bdist_wheel
# !cd work/insight-face-paddle && pip install dist/*
此种方法安装的是最新版本,版本号显示为0.0.0,其实是>=2.0.0。
此编译安装版本对不在索引库的人脸,标记为unknown。这是最新版增加的功能。
安装方法二
使用pip安装,更加便捷
# 提前安装依赖库,省的后面python setup安装的时候速度太慢
!pip install pip -U
!pip install scikit-learn prettytable onnxruntime -q
# 在提前安装了onnxruntime库之后,pip安装就不会卡在opencv处了。
!pip install --upgrade insightface-paddle
此方法安装的版本号为2.0.0,对不在索引库的人脸,不会标记为unknown。预计在pypi发布新版本库后会增加这个功能。
命令行使用方法
InsightFacePaddle 的参数及其解释如下:
| 参数名(args) | 类型(type) | 默认值(default) | 说明(help) |
|---|---|---|---|
| det_model | str | BlazeFace | 检测模型名称,或本地模型文件所在目录,该目录下需包含 inference.pdmodel、inference.pdiparams 和 inference.pdiparams.info 三个文件。 |
| rec_model | str | MobileFace | 识别模型名称,或本地模型文件所在目录,该目录下需包含 inference.pdmodel、inference.pdiparams 和 inference.pdiparams.info 三个文件。 |
| use_gpu | bool | True | 是否使用 GPU 进行预测,默认为 True。 |
| enable_mkldnn | bool | False | 是否开启 MKLDNN 进行预测,当 --use_gpu 为 False 且 --enable_mkldnn 为 True 时该参数有效,默认值为 False。 |
| cpu_threads | int | 1 | CPU 预测时开启的线程数量,当 --use_gpu 为 False 时该参数有效,默认值为 1。 |
| input | str | - | 要预测的视频文件或图像文件的路径,或包含图像文件的目录。 |
| output | str | - | 保存预测结果的目录。 |
| det | bool | False | 是否进行检测。 |
| det_thresh | float | 0.8 | 检测后处理的阈值,默认值为0.8。 |
| rec | bool | False | 是否进行识别。 |
| index | str | - | 索引文件的路径。 |
| cdd_num | int | 5 | 识别中检索阶段的候选数量,默认值为5。 |
| rec_thresh | float | 0.45 | 识别中的检索阈值,由于剔除相似度过低的候选项。默认值为0.45。 |
| max_batch_size | int | 1 | 识别中 batch_size 上限,默认值为1。 |
| build_index | str | - | 要构建的索引文件路径。 |
| img_dir | str | - | 用于构建索引的图像文件目录。 |
| label | str | - | 用于构建索引的标签文件路径。 |
使用步骤为:
- 1 创建索引
insightfacepaddle --build_index ./demo/friends/index.bin --img_dir ./demo/friends/gallery --label ./demo/friends/gallery/label.txt
- 2 人脸检测
检测命令如下:
insightfacepaddle --det --input ./demo/friends/query/friends1.jpg --output ./output
- 3 人脸识别
命令如下:
insightfacepaddle --rec --index ./demo/friends/index.bin --input ./demo/friends/query/Rachel.png
检测和识别可以串联使用
命令如下:
insightfacepaddle --det --rec --index ./demo/friends/index.bin --input ./demo/friends/query/friends2.jpg --output ./output
对视频人脸检测和识别
insightfacepaddle --det --rec --index ./demo/friends/index.bin --input ./demo/friends/query/friends.mp4 --output ./output
开始实践InsightFacePaddle
安装InsightFacePaddle
# 提前安装依赖库,省的后面python setup安装的时候速度太慢
!pip install pip -U
# !pip install albumentations prettytable scikit-image onnxruntime -q
!pip install scikit-learn prettytable onnxruntime -q
# 在提前安装了onnxruntime库之后,pip安装就不会卡在opencv处了。
!pip install --upgrade insightface-paddle -q
# 为了使用例子代码,还需要下载源代码
!cd work && git clone https://hub.fastgit.org/littletomatodonkey/insight-face-paddle/
# 本地编译并pip安装
# !cd work/insight-face-paddle && python setup.py bdist_wheel
# !cd work/insight-face-paddle && pip install dist/*
# 确认下InsightFace Paddle安装成功,版本号为2.0.0 ,如果是编译安装,版本号显示为0.0.0,其实是>=2.0.0
!pip list |grep insightface-paddle
insightface-paddle 2.0.0
0
在 Python 中使用 InsightFacePaddle
源代码见下面cell,使用github库中自带的图片进行测试。
%%writefile work/insight-face-paddle/testinsightface-paddle.py
import insightface_paddle as face
import logging
logging.basicConfig(level=logging.INFO)

# 获取参数信息
parser = face.parser()
# parser.print_help()

# 构建索引
parser = face.parser()
args = parser.parse_args()
args.build_index = "./demo/friends/index.bin"
args.img_dir = "./demo/friends/gallery"
args.label = "./demo/friends/gallery/label.txt"
predictor = face.InsightFace(args)
predictor.build_index()

# 检测+识别系统串联

parser = face.parser()
args = parser.parse_args()

args.det = True
args.rec = True
args.index = "./demo/friends/index.bin"
args.output = "./output"
input_path = "./demo/friends/query/friends2.jpg"

predictor = face.InsightFace(args)
res = predictor.predict(input_path, print_info=True)
next(res)
Overwriting work/insight-face-paddle/testinsightface-paddle.py
!cd work/insight-face-paddle && python testinsightface-paddle.py
# 查看一下检测效果,真不错!
from IPython.display import display, Image
path = "work/insight-face-paddle/output/friends2.jpg"
img = Image(path)
display(img)
InsightFacePaddle命令行自定义图片实践
现在我们使用命令行模式,用自己的图片进行测试,让我们来试试PPDE展示榜里图片的识别效果吧!
收集PPDE们的照片并建立索引
大谷老师共收集6张头像,前5张为B站视频截取的头像,第6张为ppde展榜照片中截取的头像。第6张照片不参与学习建索引,从结果可以看到,能正确检测出大谷老师的头像
王肖老师的头像收集了一张ppde展榜照片中截取的头像。可能因为头像尺寸太小,人脸检测阶段就没有检测出来。
肖培楷老师的头像共有两张参与创建索引,可以检测出头像,但没有识别出来。估计是头像尺寸太小的缘故。
# 将头像图片放入work目录,cp到索引库目录,并加入到标注文件中
!cp ~/work/dagu*  ~/work/insight-face-paddle/demo/friends/gallery/
!cp ~/work/wangxiao*  ~/work/insight-face-paddle/demo/friends/gallery/
!cp ~/work/xiaopeikai*  ~/work/insight-face-paddle/demo/friends/gallery/

!echo "./dagu1.png	大谷" >> ~/work/insight-face-paddle/demo/friends/gallery/label.txt
!echo "./dagu2.png	大谷" >> ~/work/insight-face-paddle/demo/friends/gallery/label.txt
!echo "./dagu3.png	大谷" >> ~/work/insight-face-paddle/demo/friends/gallery/label.txt
!echo "./dagu4.png	大谷" >> ~/work/insight-face-paddle/demo/friends/gallery/label.txt
!echo "./dagu5.png	大谷" >> ~/work/insight-face-paddle/demo/friends/gallery/label.txt
!echo "./wangxiao1.png	王肖" >> ~/work/insight-face-paddle/demo/friends/gallery/label.txt
!echo "./xiaopeikai1.png	肖培楷" >> ~/work/insight-face-paddle/demo/friends/gallery/label.txt
!echo "./xiaopeikai2.png	肖培楷" >> ~/work/insight-face-paddle/demo/friends/gallery/label.txt
!tail ~/work/insight-face-paddle/demo/friends/gallery/label.txt
创建索引
# 创建索引
!cd work/insight-face-paddle && insightfacepaddle --build_index ./demo/friends/index.bin --img_dir ./demo/friends/gallery --label ./demo/friends/gallery/label.txt
对ppde榜单照片进行检测和识别
# 对ppde榜单照片进行检测和识别
!cd work/insight-face-paddle && insightfacepaddle --det --rec --index ./demo/friends/index.bin --input ~/work/ppdepic.png --output ./output
# 检测效果
from IPython.display import display, Image
path = "work/insight-face-paddle/output/ppdepic.png"
img = Image(path)
display(img)

# 对索引图像进行识别,肖培楷老师的头像识别不出来,难道是太帅了?
!cd work/insight-face-paddle && insightfacepaddle --det --rec --index ./demo/friends/index.bin --input ~/work/肖培楷1.png --output ./output --rec_thresh 0.45
# 对索引图像进行检测和识别,能识别出来王肖老师,证明图像已经进入索引库
!cd work/insight-face-paddle && insightfacepaddle --det --rec --index ./demo/friends/index.bin --input ~/work/王肖.png --output ./output
InsightFace Paddle对视频进行处理
# 视频 用时3分29秒
!cd work/insight-face-paddle && insightfacepaddle --det --rec --index ./demo/friends/index.bin --input ~/work/老友记片头曲.mp4 --output ./output
看看视频检测和识别的效果
生成的视频在AIStudio的notebook下有时放不出来,下载到本机是可以放的。我把它下载到本机,转成mov格式,然后再上传到项目的work目录,就可以在cell里面播放了。大家可以看下效果!
# ########## display
from IPython.display import display, HTML

html_str = '''
<video controls width=\"760\" height=\"560\" src=\"{}\">animation</video>
'''.format("./work/老友记片头曲-识别.mov")
# print(html_str)
display(HTML(html_str))
animation
总结
InsightFace效果杠杠的!而且全流程都打通了,模型也训好了,自己用的时候准备一些图片,建立一个索引就行了,非常简单方便!
我想可能很多人会对人脸识别有过疑惑,因为我们普通的图像分类,每次有新的类别加入,都需要重新训练。而且训练时每类基本要保证200张图片效果才会比较好。针对人脸识别场景,来一个人(或一批新人)就要重训一次,不管是时间、金钱还是精力,都不允许。
自从学了InsightFace人脸识别和PPShiTu之后,终于明白了,原来只需要重新建立索引就行了,而且索引只需要相对少量的图片就可以了。重建索引相当快,比重新训练快多了。
本次碰到的问题:
- 1 在AIStudio安装不顺利的问题,已解决。可以使用源码安装,或者先pip安装onnxruntime的方法解决。
- 2 InsightFacePaddle默认参数检测精度不如InsightFace,比如PPDE榜单照片中王肖老师的头像InsightFace能检测到,InsightFacePaddle没有检测到。通过调整参数det_thresh=0.6可以解决。
- 3 肖培楷老师的头像已经放入索引库,但是对一张半身照照片还是无法识别出“他就是他”。
这个问题还要继续查找原因。
结束语
让我们荡起双桨,在AI的海洋乘风破浪!
飞桨官网:https://www.paddlepaddle.org.cn
因为水平有限,难免有不足之处,还请大家多多帮助。
作者:段春华, 网名skywalk 或 天马行空,济宁市极快软件科技有限公司的AI架构师,百度飞桨PPDE。
我在AI Studio上获得至尊等级,点亮10个徽章,来互关呀~ https://aistudio.baidu.com/aistudio/personalcenter/thirdview/141218

学大模型,用大模型上飞桨星河社区!每天8点V100G算力免费领!免费领取ERNIE 4.0 100w Token >>>
更多推荐


 3
3 1
1- 0


 已为社区贡献1436条内容

所有评论(0)