
[PaddleOCR]基于PaddleX字体分类的OCR输出优化
转自AI Studio,原文链接:[PaddleOCR]基于PaddleX字体分类的OCR输出优化 - 飞桨AI Studio字体分类本项目是PaddleOCR的其中一个环节。目的是达到对PaddleOCR数据中图片的文字字体类别的识别。0 汉字图片数据获取(可选)需要增加字体类别时候再看此大步骤本项目中以及放置了生成好的图片文件,不需要再执行此步骤,但下面的解压还是需要的,会用到里面
·
转自AI Studio,原文链接:[PaddleOCR]基于PaddleX字体分类的OCR输出优化 - 飞桨AI Studio
0 汉字图片数据获取(可选)
需要增加字体类别时候再看此大步骤
本项目中以及放置了生成好的图片文件,不需要再执行此步骤,但下面的解压还是需要的,会用到里面的字体库
In [ ]
!unzip /home/aistudio/data/data122617/Createfont.zip -d work记得自行修改两个文件中涉及到路径的内容,解压前的数据集的路径并不是正确的。
在work/Createfont/Word_Font_pre/下:
# -*- coding: utf-8 -*-
# 获取字体文件名,字体文件可以在百度下载或者电脑字体目录下寻找
import os

def Word_Font():
    Word_Font_Path = 'work/Createfont/Word_Font_pre'
    dirs = os.listdir(Word_Font_Path)
    Word_Font_List = []
    for dir in dirs:
        Word_Font_List.append(dir)
    return Word_Font_List
在work/Createfont/下:
import re

f = open("work/Createfont/9004个常用汉字列表.txt", "r")
lines = f.readlines()  # 读取全部内容 ,并以列表方式返回
Library = []
for line in lines:
    line = line.split('\n')
    line = re.sub(r'\n', "", line[0])
    line = re.sub(':', "", line)
    line = line.replace(" ", "")
    line = line.lstrip(':')
    line = line[:0] + line[13:]
    for i in line:
        Library.append(i)
size_L = len(Library)

# 主程序目录
from PIL import Image, ImageDraw, ImageFont, ImageOps
import os
import re
import Word_Font_pre.word_font as wf

# 读取字体文件
Word_Font_List = wf.Word_Font()


# 选择字体以及图片参数的初始值
class LetterImage():
    def __init__(self, imgSize=(0, 0), imgMode='RGB', bg_color=(255, 255, 255), fg_color=(0, 0, 0),
                 fontsize=10, Word_Font=Word_Font_List[1]):
        self.imgSize = imgSize
        self.imgMode = imgMode
        self.fontsize = fontsize
        self.bg_color = bg_color
        self.fg_color = fg_color
        if(Word_Font.endswith("ttc")):
            self.font = ImageFont.truetype(Word_Font, fontsize, index=1)
        else:
            self.font = ImageFont.truetype(Word_Font, fontsize)

    # 设定生成图片大小
    def GenLetterImage(self, letters):
        self.letters = letters
        (self.letterWidth, self.letterHeight) = self.font.getsize(letters)
        if self.imgSize == (0, 0):
            self.imgSize = (self.letterWidth - 0, self.letterHeight + 15)  # 底边边距
        self.imgWidth, self.imgHeight = self.imgSize
        self.img = Image.new(self.imgMode, self.imgSize, self.bg_color)
        self.drawBrush = ImageDraw.Draw(self.img)
        textY0 = (self.imgHeight - self.letterHeight - 2)
        textY0 = int(textY0)
        textX0 = int((self.imgWidth - self.letterWidth - 2))  # 显示窗口坐标
        self.drawBrush.text((textX0, textY0), self.letters, fill=self.fg_color, font=self.font)


if __name__ == '__main__':
    f = open("work/Createfont/9004个常用汉字列表.txt", "r")
    lines = f.readlines()  # 读取全部内容 ,并以列表方式返回
    Library = []
    for line in lines:
        line = line.split('\n')
        line = re.sub(r'\n', "", line[0])
        line = re.sub(':', "", line)
        line = line.replace(" ", "")
        line = line.lstrip(':')
        # line = line[:0] + line[13:]
        for i in line:
            Library.append(i)
    letterList = []
    # ---------------将图片参数追加到列表以便后期调用--------------------
    for j in range(0, len(Word_Font_List), 1):
        try:
            letterList.append(LetterImage(bg_color=(255, 255, 255), fontsize=100, Word_Font=Word_Font_List[j]))
        finally:
            print(Word_Font_List[j])
        num_letter = len(Library)  # 字体数量
        # ---------------------------创建文件夹------------------------------
        File_name = re.sub(r'\.', '_', Word_Font_List[j])
        paths = os.getcwd()[:-4] + 'Images\\' + File_name  # 获取此py文件路径,在此路径选创建文件夹
        if not os.path.exists(paths):
            os.makedirs(paths)
        paths = paths + "\\"
        # -----------------在某一种字体下,对字库遍历,生成相应字体图片------------------------
        for i in range(num_letter - 1):
            letterList[j].GenLetterImage(Library[i])
            grayImg = ImageOps.grayscale(letterList[j].img)
            grayImg.save(paths + str(i) + ".png")
In [ ]
# 若你想添加其他的类型字体
# 将字体的ttf或者ttc放入work/Createfont/Word_Font_pre下,直接执行下行代码即可
# !python work/Createfont/main.py
1 数据处理
- 制作标签文件label_list.txt
- 制作总的训练文件all_list.txt
- 打乱并划分为训练集合验证集
In [1]
!unzip -oq data/data122969/CreatenewImages.zip -d work
In [2]
# 当然不可避免的第一步,导入库
from sklearn.utils import shuffle
import os
from PIL import Image
import paddle
import random
In [3]
# -*- coding: utf-8 -*-
# 根据官方paddleclas的提示,我们需要把图像变为两个txt文件
# train_list.txt(训练集)
# val_list.txt(验证集)

# 根据左侧生成的文件夹名字来写根目录
# 训练数据只需要用到训练的,其他两个文件夹不需要读
dirpath = "work/CreatenewImages"
# 先得到总的txt后续再进行划分,因为要划分出验证集,所以要先打乱,因为原本是有序的
def get_all_txt():
    all_list = []
    label_list = []
    i = 0 # 标记总文件数量
    j = 0 # 标记文件类别
    for root,dirs,files in os.walk(dirpath): # 分别代表根目录、文件夹、文件
        # 遍历每个文件去生成all_list集合
        for file in files:
            # 文件中每行格式: 图像相对路径      图像的label_id(数字类别)(注意:中间有空格)。
            imgpath = os.path.join(root,file)
            # 有坏图,解决掉
            try:
                img = Image.open(imgpath)
            except :
                os.remove(imgpath)
            else :
                img = Image.open(imgpath)
                img.convert('RGB')
                i = i + 1
                all_list.append(imgpath+" "+str(j-1)+"\n")
        # 遍历每个dir去生成后续需要的label_list集合
        m = 0
        for d in dirs:
            dpath = os.path.join(root,d)
            d = dpath.split("/")[2]
            label_list.append(d+"\n")
            m = m+1
        j = j + 1

    # 生成all_list.txt
    allstr = ''.join(all_list)
    f = open('all_list.txt','w',encoding='utf-8')
    f.write(allstr)
    f.close

    # 生成label_list.txt
    labellist = ''.join(label_list)
    f = open('label_list.txt','w',encoding='utf-8')
    f.write(labellist)
    f.close

    return all_list , i
all_list,all_lenth = get_all_txt()
print(all_lenth)
<span style="color:rgba(0, 0, 0, 0.85)"><span style="background-color:#ffffff">216072
</span></span>
In [4]
# 把数据打乱
all_list = shuffle(all_list)
allstr = ''.join(all_list)
f = open('all_list.txt','w',encoding='utf-8')
f.write(allstr)
f.close()
print("打乱成功,并重新写入文本")
<span style="color:rgba(0, 0, 0, 0.85)"><span style="background-color:#ffffff">打乱成功,并重新写入文本
</span></span>
In [5]
# 按照比例划分数据集 数据有216072张图片,我这里采用9:1划分
train_size = int(all_lenth * 0.9)
train_list = all_list[:train_size]
val_list = all_list[train_size:]

print(len(train_list))
print(len(val_list))
<span style="color:rgba(0, 0, 0, 0.85)"><span style="background-color:#ffffff">194464
21608
</span></span>
In [6]
# 运行cell,生成训练集txt
train_txt = ''.join(train_list)
f_train = open('train_list.txt','w',encoding='utf-8')
f_train.write(train_txt)
f_train.close()
print("train_list.txt 生成成功!")

# 运行cell,生成验证集txt
val_txt = ''.join(val_list)
f_val = open('val_list.txt','w',encoding='utf-8')
f_val.write(val_txt)
f_val.close()
print("val_list.txt 生成成功!")
<span style="color:rgba(0, 0, 0, 0.85)"><span style="background-color:#ffffff">train_list.txt 生成成功!
val_list.txt 生成成功!
</span></span>此时,如果正确,左侧有如图所示的文件

2 环境搭建
In [1]
! pip install paddlex
In [2]
import warnings
warnings.filterwarnings("ignore")

import paddlex as pdx
3 数据预处理
In [64]
from paddlex import transforms as T

train_transforms = T.Compose([
    T.ResizeByShort(short_size=232, max_size=-1, interp='LINEAR'),
    T.CenterCrop(crop_size=224),
    T.RandomHorizontalFlip(),
    T.RandomVerticalFlip(),
    T.RandomBlur(prob=0.1),
    T.Normalize()
])

eval_transforms = T.Compose([
    T.ResizeByShort(),
    T.CenterCrop(crop_size=224),
    T.RandomHorizontalFlip(),
    T.RandomVerticalFlip(),
    T.RandomBlur(prob=0.1),
    T.Normalize()
])
4 定义数据集dataset
In [10]
train_dataset = pdx.datasets.ImageNet(
    data_dir='',
    file_list='train_list.txt',
    label_list='label_list.txt',
    transforms=train_transforms,
    shuffle=True)

eval_dataset = pdx.datasets.ImageNet(
    data_dir='',
    file_list='val_list.txt',
    label_list='label_list.txt',
    transforms=eval_transforms)
<span style="color:rgba(0, 0, 0, 0.85)"><span style="background-color:#ffffff">2021-12-23 17:46:38 [INFO] Starting to read file list from dataset...
2021-12-23 17:46:40 [INFO] 194464 samples in file train_list.txt
2021-12-23 17:46:40 [INFO] Starting to read file list from dataset...
2021-12-23 17:46:41 [INFO] 21608 samples in file val_list.txt
</span></span>5 训练并验证
In [11]
num_classes = len(train_dataset.labels)
print(num_classes)
model = pdx.cls.ResNet50_vd_ssld(num_classes=num_classes)
model.train(num_epochs=5,
            train_dataset=train_dataset,
            train_batch_size=128,
            eval_dataset=eval_dataset,
            lr_decay_epochs=[6, 8],
            save_interval_epochs=1,
            learning_rate=0.00625,
            save_dir='output/ResNet50_vd_ssld_bs128',
            pretrain_weights=None,
            use_vdl=True)
In [12]
model.evaluate(eval_dataset, batch_size=64, return_details=False)<span style="color:rgba(0, 0, 0, 0.85)"><span style="background-color:#ffffff">2021-12-23 18:42:21 [INFO] Start to evaluate(total_samples=21608, total_steps=338)...
</span></span><span style="color:rgba(0, 0, 0, 0.85)"><span style="background-color:#ffffff">OrderedDict([('acc1', 0.9433432), ('acc5', 0.9998613)])</span></span>6 简单测试
In [3]
import paddlex as pdx
model = pdx.load_model('output/ResNet50_vd_ssld_bs128/best_model')
# 这张图片是华文琥珀的杨字
image_name = 'yang.png'
result = model.predict(image_name)
print("Predict Result:", result)
print(result[0]['category'])
<span style="color:rgba(0, 0, 0, 0.85)"><span style="background-color:#ffffff">W1230 19:41:37.423154 101 device_context.cc:447] Please NOTE: device: 0, GPU Compute Capability: 7.0, Driver API Version: 10.1, Runtime API Version: 10.1
W1230 19:41:37.428342 101 device_context.cc:465] device: 0, cuDNN Version: 7.6.
</span></span><span style="color:rgba(0, 0, 0, 0.85)"><span style="background-color:#ffffff">2021-12-30 19:41:40 [INFO] Model[ResNet50_vd_ssld] loaded.
Predict Result: [{'category_id': 1, 'category': 'STHUPO_TTF', 'score': 0.9962198}]
STHUPO_TTF
</span></span>7.1 安装并测试demo
In [4]
!pip install "paddleocr>=2.0.1" --no-deps<span style="color:rgba(0, 0, 0, 0.85)"><span style="background-color:#ffffff">Looking in indexes: https://pypi.tuna.tsinghua.edu.cn/simple
Collecting paddleocr>=2.0.1
Downloading https://pypi.tuna.tsinghua.edu.cn/packages/e1/b6/5486e674ce096667dff247b58bf0fb789c2ce17a10e546c2686a2bb07aec/paddleocr-2.3.0.2-py3-none-any.whl (250kB)
|████████████████████████████████| 256kB 6.3MB/s eta 0:00:01
Installing collected packages: paddleocr
Successfully installed paddleocr-2.3.0.2
</span></span>
In [5]
!pip install shapely fasttext==0.9.1 imgaug==0.4.0 lmdb lxml premailer pyclipper python-Levenshtein scikit-image
In [6]
from paddleocr import PaddleOCR, draw_ocr

# Paddleocr目前支持中英文、英文、法语、德语、韩语、日语,可以通过修改lang参数进行切换
# 参数依次为`ch`, `en`, `french`, `german`, `korean`, `japan`。
ocr = PaddleOCR(use_angle_cls=True, lang="ch")  # need to run only once to download and load model into memory
img_path = 'test.png'
result = ocr.ocr(img_path, cls=True)
for line in result:
    print(line)


# 显示结果
from matplotlib import pyplot as plt
from PIL import Image
%matplotlib inline

image = Image.open(img_path).convert('RGB')
boxes = [line[0] for line in result]
txts = [line[1][0] for line in result]
scores = [line[1][1] for line in result]
im_show = draw_ocr(image, boxes, txts, scores, font_path='work/Createfont/Word_Font_pre/simfang.ttf')
im_show = Image.fromarray(im_show)
im_show.save('result.jpg')

plt.figure(figsize=(20,20))
plt.imshow(im_show)
<span style="color:rgba(0, 0, 0, 0.85)"><span style="background-color:#ffffff">[2021/12/30 19:43:00] root WARNING: version PP-OCRv2 not support cls models, auto switch to version PP-OCR
download https://paddleocr.bj.bcebos.com/PP-OCRv2/chinese/ch_PP-OCRv2_det_infer.tar to /home/aistudio/.paddleocr/2.3.0.2/ocr/det/ch/ch_PP-OCRv2_det_infer/ch_PP-OCRv2_det_infer.tar
</span></span><span style="color:rgba(0, 0, 0, 0.85)"><span style="background-color:#ffffff"> 0%| | 0.00/3.19M [00:00<?, ?iB/s]</span></span><span style="color:rgba(0, 0, 0, 0.85)"><span style="background-color:#ffffff">100%|██████████| 3.19M/3.19M [00:00<00:00, 8.46MiB/s]
</span></span><span style="color:rgba(0, 0, 0, 0.85)"><span style="background-color:#ffffff">download https://paddleocr.bj.bcebos.com/PP-OCRv2/chinese/ch_PP-OCRv2_rec_infer.tar to /home/aistudio/.paddleocr/2.3.0.2/ocr/rec/ch/ch_PP-OCRv2_rec_infer/ch_PP-OCRv2_rec_infer.tar
</span></span><span style="color:rgba(0, 0, 0, 0.85)"><span style="background-color:#ffffff"> 0%| | 0.00/8.88M [00:00<?, ?iB/s]</span></span><span style="color:rgba(0, 0, 0, 0.85)"><span style="background-color:#ffffff">100%|██████████| 8.88M/8.88M [00:01<00:00, 7.90MiB/s]
</span></span><span style="color:rgba(0, 0, 0, 0.85)"><span style="background-color:#ffffff">download https://paddleocr.bj.bcebos.com/dygraph_v2.0/ch/ch_ppocr_mobile_v2.0_cls_infer.tar to /home/aistudio/.paddleocr/2.3.0.2/ocr/cls/ch_ppocr_mobile_v2.0_cls_infer/ch_ppocr_mobile_v2.0_cls_infer.tar
</span></span><span style="color:rgba(0, 0, 0, 0.85)"><span style="background-color:#ffffff"> 0%| | 0.00/1.45M [00:00<?, ?iB/s]</span></span><span style="color:rgba(0, 0, 0, 0.85)"><span style="background-color:#ffffff">100%|██████████| 1.45M/1.45M [00:00<00:00, 4.33MiB/s]
</span></span><span style="color:rgba(0, 0, 0, 0.85)"><span style="background-color:#ffffff">Namespace(benchmark=False, cls_batch_num=6, cls_image_shape='3, 48, 192', cls_model_dir='/home/aistudio/.paddleocr/2.3.0.2/ocr/cls/ch_ppocr_mobile_v2.0_cls_infer', cls_thresh=0.9, cpu_threads=10, det=True, det_algorithm='DB', det_db_box_thresh=0.6, det_db_score_mode='fast', det_db_thresh=0.3, det_db_unclip_ratio=1.5, det_east_cover_thresh=0.1, det_east_nms_thresh=0.2, det_east_score_thresh=0.8, det_limit_side_len=960, det_limit_type='max', det_model_dir='/home/aistudio/.paddleocr/2.3.0.2/ocr/det/ch/ch_PP-OCRv2_det_infer', det_pse_box_thresh=0.85, det_pse_box_type='box', det_pse_min_area=16, det_pse_scale=1, det_pse_thresh=0, det_sast_nms_thresh=0.2, det_sast_polygon=False, det_sast_score_thresh=0.5, drop_score=0.5, e2e_algorithm='PGNet', e2e_char_dict_path='./ppocr/utils/ic15_dict.txt', e2e_limit_side_len=768, e2e_limit_type='max', e2e_model_dir=None, e2e_pgnet_mode='fast', e2e_pgnet_polygon=True, e2e_pgnet_score_thresh=0.5, e2e_pgnet_valid_set='totaltext', enable_mkldnn=False, gpu_mem=500, help='==SUPPRESS==', image_dir=None, ir_optim=True, label_list=['0', '180'], lang='ch', layout_path_model='lp://PubLayNet/ppyolov2_r50vd_dcn_365e_publaynet/config', max_batch_size=10, max_text_length=25, min_subgraph_size=15, ocr_version='PP-OCRv2', output='./output/table', precision='fp32', process_id=0, rec=True, rec_algorithm='CRNN', rec_batch_num=6, rec_char_dict_path='/opt/conda/envs/python35-paddle120-env/lib/python3.7/site-packages/paddleocr/ppocr/utils/ppocr_keys_v1.txt', rec_image_shape='3, 32, 320', rec_model_dir='/home/aistudio/.paddleocr/2.3.0.2/ocr/rec/ch/ch_PP-OCRv2_rec_infer', save_log_path='./log_output/', show_log=True, structure_version='STRUCTURE', table_char_dict_path=None, table_char_type='en', table_max_len=488, table_model_dir=None, total_process_num=1, type='ocr', use_angle_cls=True, use_dilation=False, use_gpu=True, use_mp=False, use_onnx=False, use_pdserving=False, use_space_char=True, use_tensorrt=False, vis_font_path='./doc/fonts/simfang.ttf', warmup=True)
[2021/12/30 19:43:04] root DEBUG: dt_boxes num : 2, elapse : 0.023739099502563477
[2021/12/30 19:43:04] root DEBUG: cls num : 2, elapse : 0.009242057800292969
[2021/12/30 19:43:04] root DEBUG: rec_res num : 2, elapse : 0.008728265762329102
[[[84.0, 66.0], [463.0, 54.0], [465.0, 125.0], [87.0, 137.0]], ('幸福通道', 0.9984914)]
[[[247.0, 491.0], [395.0, 493.0], [394.0, 530.0], [246.0, 527.0]], ('禁止入内', 0.9945936)]
</span></span><span style="color:rgba(0, 0, 0, 0.85)"><span style="background-color:#ffffff"><matplotlib.image.AxesImage at 0x7fbc78407c50></span></span>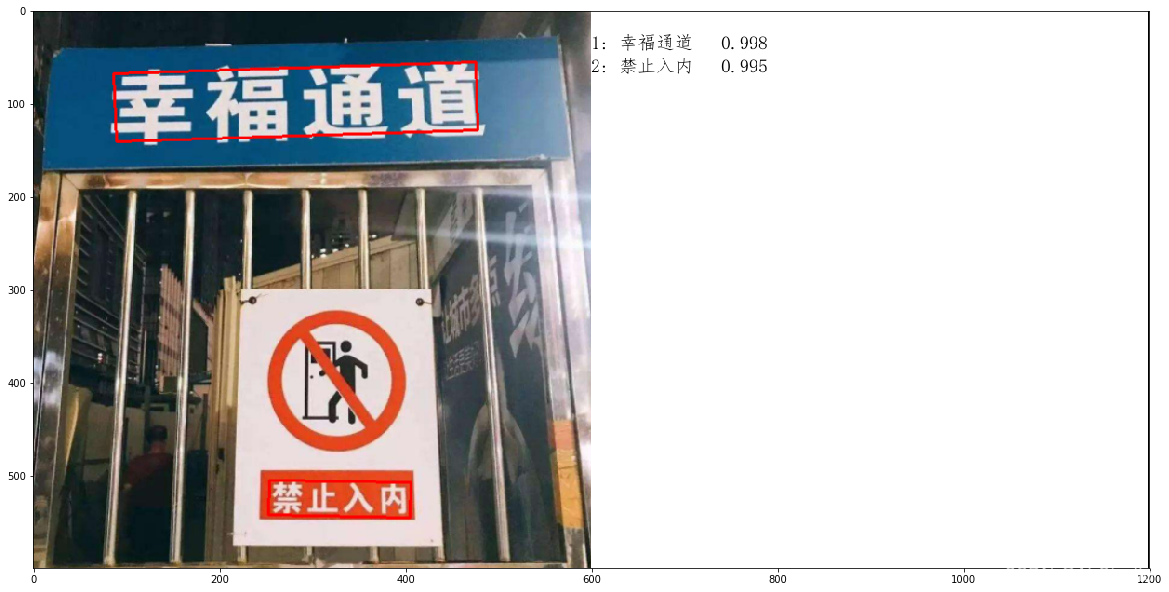
<span style="color:rgba(0, 0, 0, 0.85)"><span style="background-color:#ffffff"><Figure size 1440x1440 with 1 Axes></span></span>7.3 导入训练好的模型
In [7]
import paddlex as pdx
model = pdx.load_model('output/ResNet50_vd_ssld_bs128/best_model')
<span style="color:rgba(0, 0, 0, 0.85)"><span style="background-color:#ffffff">2021-12-30 19:43:15 [INFO] Model[ResNet50_vd_ssld] loaded.
</span></span>7.4 ☆ 处理输出
截取片段,然后识别
In [17]
import os
# 显示结果
from matplotlib import pyplot as plt
from PIL import Image
%matplotlib inline

def jietu_smallpart(imgSrc,result):
    IMG = imgSrc  # 图片地址
    im = Image.open(IMG)  # 用PIL打开一个图片
    im = im.convert("RGB")
    ziti_list=[]
    zitip_list=[]
    i = 0
    for line in result:
        # print(line[0][0][0], line[0][0][1], line[0][2][0], line[0][2][1])
        # box = (line[0][0][0]-2, line[0][0][1]-2, line[0][2][0]+2, line[0][2][1]+2)
        # box = (line[0][0][0]-2, line[0][0][1]-2, line[0][0][0] + line[0][2][1] - line[0][0][1], line[0][2][1])
        box = (line[0][0][0]-10, line[0][0][1]-10, line[0][2][0]+10, line[0][2][1]+10)
        # box代表需要剪切图片的位置格式为:xmin ymin xmax ymax
        ng = im.crop(box)  # 对im进行裁剪 保存为ng(这里im保持不变)

        # ng = ng.resize((58,58))

        image_name = str(i) + '_copy.jpg'
        i = i+1
        print(image_name)
        ng.save(image_name)
        # 拿到这张图
        result = model.predict(image_name)
        ziti_list.append(result[0]['category'])
        zitip_list.append(result[0]['score'])
    return ziti_list,zitip_list

test,testp = jietu_smallpart("test.png",result)
print(test)
print(testp)
<span style="color:rgba(0, 0, 0, 0.85)"><span style="background-color:#ffffff">0_copy.jpg
1_copy.jpg
['simsun_ttc', 'simsun_ttc']
[0.999925, 0.8224375]
</span></span>

总结
- 训练字体的分类,但是目前来看虽然验证集精度很高,在实际的场景中运用,问题还是存在的。
- 还没有进行模块化函数式的编程
- 后续需要再想办法提升模型的鲁棒性
个人介绍
全网同名:
iterhui
我在AI Studio上获得至尊等级,点亮10个徽章,来互关呀~
https://aistudio.baidu.com/aistudio/personalcenter/thirdview/643467

学大模型,用大模型上飞桨星河社区!每天8点V100G算力免费领!免费领取ERNIE 4.0 100w Token >>>
更多推荐


 0
0 0
0- 0


 已为社区贡献1438条内容

所有评论(0)