
opencv、paddleocr、翻译api实现拍照翻译
1)opencv将拍照的图片提取我们关注的主要部分(项目主体部分);2)ocr提取图片文本;3)调用百度翻译api将英文翻译为中文;4)考虑到图片太大导致拍摄不全,添加图片拼接
·
拍照翻译
0 项目描述
- 1 将拍照的图片提取我们关注的主要部分(下图提取前-提取后)

- 2 OCR获取图片中的文本信息

- 3 调用翻译api将英文-》中文

- 4 考虑到图片太大导致拍摄不全,添加图片拼接
1 opencv 对照片预处理,提识别主图片
# 导入所需环境
import cv2
import numpy as np
import matplotlib.pylab as plt
import operator
import os
import random
import pickle
!pip install paddleocr
# 使用matplotlib显示(rgb)图像,(注意,cv2读取的图片为bgr格式)
def img_show(image):
    image=image.astype(np.uint8)  #python类型转换
    if len(image.shape) == 2:
        plt.imshow(image, cmap='gray')          #根据数组绘制图像
        plt.show()
    else:
        image = cv2.cvtColor(image,cv2.COLOR_BGR2RGB) #将BGR格式转换为RGB格式
        plt.imshow(image)          #根据数组绘制图像
        plt.show()               #显示图像
# 使用matplotlib显示(rgb)图像,(注意,cv2读取的图片为bgr格式)
img_bgr = cv2.imread('image/page.jpg')
print(img_bgr.shape)
img_show(img_bgr)
(3264, 2448, 3)

# 图像等比例放缩
def image_resize(image, image_h=None, image_w=None):
    new_image = image.copy()
    (h, w) = new_image.shape[:2]
    if image_h is None and image_w is None:
        return new_image
    if image_h:
        ratio = image_h/float(h)
        dim = (int(ratio*w), image_h)
    if image_w:
        ratio = image_w/float(w)
        dim = (image_w, int(ratio*h))
    new_image = cv2.resize(new_image, dim, interpolation=cv2.INTER_AREA)
    print('image_resize: 图像等比例放缩')
    img_show(new_image)
    return new_image, ratio
# 灰度图,高斯滤波去噪声,边缘检测,轮廓检测
def image_pro(image):
    new_image = image.copy()
    new_image = cv2.cvtColor(new_image, cv2.COLOR_BGR2GRAY)  # 转灰度
    new_image = cv2.GaussianBlur(new_image, (5, 5), 0)  # 高斯滤波
    new_image = cv2.Canny(new_image, 75, 200)  # 边缘检测
    print('image_pro: 灰度图,高斯滤波去噪声,边缘检测')
    img_show(new_image)
    return new_image
# 轮廓检测
def image_outline(image, source_image):
    new_image = image.copy()
    # cv2.RETR_LIST:以列表形式输出轮廓信息,各轮廓之间无等级关系
    # cv2.CHAIN_APPROX_SIMPLE:压缩水平方向,垂直方向,对角线方向的元素,只保留该方向的终点坐标
    # 函数返回contours:list结构,列表中每个元素代表一个边沿信息;hierarchy:返回类型是(x,4)的二维ndarray。
    outline_list = cv2.findContours(new_image, cv2.RETR_LIST, cv2.CHAIN_APPROX_SIMPLE)[0]  # 轮廓列表
    outline_list = sorted(outline_list, key=cv2.contourArea, reverse=True)[:5]  # 排序,输出前5个轮廓
    for line_list in outline_list:
        peir = cv2.arcLength(line_list, True)  # 计算闭合周长

        # cv2.approxPolyDP第二个参数,距离大于此阈值则舍弃,小于此阈值则保留,epsilon越小,折线的形状越“接近”曲线
        approx = cv2.approxPolyDP(line_list, 0.02*peir, True)  # 多边形逼近,把一个连续光滑曲线折线化

        # 四个点的时候拿出
        if len(approx) == 4:
            screenCnt = approx
            break
    cv2.drawContours(source_image, [screenCnt], -1, (0, 255, 0), 2)
    print('image_outline: 轮廓检测')
    img_show(source_image)
    return screenCnt
# 坐标对应,按顺序找到对应坐标0123分别是 左上,右上,右下,左下
def order_points(pts):
	# 一共4个坐标点
	rect = np.zeros((4, 2), dtype = "float32")

	# 计算左上,右下
	s = pts.sum(axis = 1)
	rect[0] = pts[np.argmin(s)]
	rect[2] = pts[np.argmax(s)]

	# 计算右上和左下
	diff = np.diff(pts, axis = 1)
	rect[1] = pts[np.argmin(diff)]
	rect[3] = pts[np.argmax(diff)]
	return rect
# 透视变换
def four_point_transform(image, resize_screenCnt):
    order_points_out = order_points(resize_screenCnt)
    (top_l, top_r, bot_r, bot_l) = order_points_out

    width_top = np.sqrt((top_r[0]-top_l[0])**2 + (top_r[1]-top_l[1])**2)
    width_bot = np.sqrt((bot_r[0]-bot_l[0])**2 + (bot_r[1]-bot_l[1])**2)
    width_max = max(int(width_top), int(width_bot))

    hight_l = np.sqrt((top_l[0]-bot_l[0])**2 + (top_l[1]-top_l[1])**2)
    hight_r = np.sqrt((top_r[0]-bot_r[0])**2 + (top_r[1]-bot_r[1])**2)
    hight_max = max(int(hight_l), int(hight_r))

    # 变换后对应坐标位置
    dst = np.array([[0, 0],
                    [width_max - 1, 0],
                    [width_max - 1, hight_max - 1],
                    [0, hight_max - 1]], dtype = "float32")

	# 计算变换矩阵
    matrix = cv2.getPerspectiveTransform(order_points_out, dst)  # 参数(src,sdt)src:源图像中待测矩形的四点坐标;sdt:目标图像中矩形的四点坐标
    warped = cv2.warpPerspective(image, matrix, (width_max, hight_max))  # 参数(输入图像,变换矩阵,目标图像shape)

	# 返回变换后结果
    print('four_point_transform: 透视变换')
    img_show(warped)
    return warped
# 二值化,保存
def binarization(image):
    new_image = image.copy()
    new_image = cv2.cvtColor(new_image, cv2.COLOR_BGR2GRAY)  # 转灰度
    _, new_image = cv2.threshold(new_image, 100, 255, cv2.THRESH_OTSU)  # 二值化
    print('binarization: 二值化')
    img_show(new_image)
    cv2.imwrite('out.jpg', new_image)
# 预处理
def image_pretreatment(image):
new_image = image.copy()
image_resize_out, ratio = image_resize(new_image, image_h=500) # 图像等比例放缩
image_pro_out = image_pro(image_resize_out) # 灰度图,高斯滤波去噪声,边缘检测,轮廓检测
source_image = image_resize_out.copy()
screenCnt = image_outline(image_pro_out, source_image) # 轮廓检测
image_four_point_transform = four_point_transform(image, screenCnt.reshape(4,2)/ratio) # 透视变换
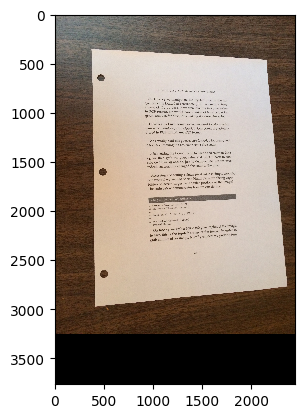
binarization(image_four_point_transform) # 二值化,保存
image_pretreatment(img_bgr)
image_resize: 图像等比例放缩
image_pro: 灰度图,高斯滤波去噪声,边缘检测


image_outline: 轮廓检测

four_point_transform: 透视变换

binarization: 二值化

2 通过PaddleOCR识别图片中的文本,用于后续翻译
- 当然这里也可自己训练模型,例如一些特定的专业方向,训练模型本平台有很多,大家自取
from paddleocr import PaddleOCR, draw_ocr
# Paddleocr目前支持的多语言语种可以通过修改lang参数进行切换
# 例如`ch`, `en`, `fr`, `german`, `korean`, `japan`
ocr = PaddleOCR(use_angle_cls=True, lang="en")  # need to run only once to download and load model into memory
img_path = 'out.jpg'
result = ocr.ocr(img_path, cls=True)
txts = [line[1][0] for line in result]
txt_string = ''
for txt in txts:
    txt_string += txt
print(txt_string)
4.3 Accessing And MAniPulAting PiXelsOn Line 14 we manipulate the top-left pixel in the im-age, which is located at coordinate (0,0) and set it to havea value of (0, 0, 255). If we were reading this pixel valuein RGB format, we would have a value of o for red, o forgreen, and 255 for blue, thus making it a pure blue color.However, as I mentioned above, we need to take specialcare when working with OpenCV. Our pixels are actuallystored in BGR format, not RGB format.We actually read this pixel as 255 for red, o for green, ando for blue, making it a red color, not a blue color.After setting the top-left pixel to have a red color on Line14, we then grab the pixel value and print it back to con-sole on Lines 15 and 16, just to demonstrate that we have indeed successfully changed the color of the pixel.Accessing and setting a single pixel value is simple enough,but what if we wanted to use NumPy's array slicing capa-bilities to access larger rectangular portions of the image?The code below demonstrates how we can do this:Listing +-3: getting_aund seiting.py corner # image[0:100. 0:100]cv2.imshow("Corner", corner)image[0:100, 0:100] = (0, 255, 0) cv2.imshow("Updated", image)23 cv2.waitKey(0)On line 17 we grab a 100 100 pixel region of the image.In fact, this is the top-left corner of the image! In order tograb chunks of an image, NumPy expects we provide four22
3 调用百度翻译的API用于翻译
- 还是那句,可以自己训练机器翻译模型,通用情况下面还是可以的,(选择通用翻译就可以)
import urllib
import hashlib
import random
import requests
import time
# 去百度官网注册一个api,网址https://api.fanyi.baidu.com/
# auto自动识别语言,中文:zh
def translateBaidu(content, fromLang='auto', toLang='zh'):
    apiurl = 'http://api.fanyi.baidu.com/api/trans/vip/translate'
    # 这里输入你注册后获得APP ID和密钥
    appid = 'APP ID'
    secretyKey = '密钥'
    salt = str(random.randint(32768, 65536))
    sign = appid + content + salt + secretyKey
    sign = hashlib.md5(sign.encode('utf-8')).hexdigest()
    apiurl = apiurl + '?appid=' + appid + '&q=' + urllib.parse.quote(content) + '&from=' + fromLang + '&to=' + toLang + '&salt=' + salt + '&sign=' + sign
    try:
        time.sleep(1.5)
        res = requests.get(apiurl)
        json_res = res.json()
        print(json_res)
        dst = str(json_res['trans_result'][0]['dst'])
        return dst
    except Exception as e:
        print('翻译失败:', e)
        return '翻译失败:' + content
res = translateBaidu(txt_string)
On Line 14 we manipulate the top-left pixel in the im-
{'from': 'en', 'to': 'zh', 'trans_result': [{'src': "4.3 Accessing And MAniPulAting PiXelsOn Line 14 we manipulate the top-left pixel in the im-age, which is located at coordinate (0,0) and set it to havea value of (0, 0, 255). If we were reading this pixel valuein RGB format, we would have a value of o for red, o forgreen, and 255 for blue, thus making it a pure blue color.However, as I mentioned above, we need to take specialcare when working with OpenCV. Our pixels are actuallystored in BGR format, not RGB format.We actually read this pixel as 255 for red, o for green, ando for blue, making it a red color, not a blue color.After setting the top-left pixel to have a red color on Line14, we then grab the pixel value and print it back to con-sole on Lines 15 and 16, just to demonstrate that we have indeed successfully changed the color of the pixel.Accessing and setting a single pixel value is simple enough,but what if we wanted to use NumPy's array slicing capa-bilities to access larger rectangular portions of the image?The code below d", 'dst': '4.3访问和MAniPulAting PiXelsOn Line 14,我们操作图像中位于坐标(0,0)处的左上角像素,并将其设置为值(0,0,255)。如果我们以RGB格式读取该像素值,则红色为o,绿色为o,蓝色为255,从而使其成为纯蓝色。然而,正如我前面提到的,在使用OpenCV时,我们需要特别小心。我们的像素实际上是以BGR格式存储的,而不是RGB格式。我们实际上把这个像素读作255代表红色,o代表绿色,ando代表蓝色,使它成为红色,而不是蓝色。在将左上角的像素设置为第14行的红色后,我们抓取像素值并将其打印回第15行和第16行的con-sole,只是为了证明我们确实成功地更改了像素的颜色。访问和设置单个像素值非常简单,但如果我们想使用NumPy的数组切片功能访问图像的较大矩形部分,该怎么办?下面的代码d'}]}
4 图片拼接
- 有时由于图片太大原因导致拍摄不全,所以再补充个图片的拼接
img_left = cv2.imread('image/left.jpg')
img_show(img_left)
img_right = cv2.imread('image/right.jpg')
img_show(img_right)
img_top = cv2.imread('image/top.jpg')
img_show(img_top)
img_bot = cv2.imread('image/bot.jpg')
img_show(img_bot)


def detectAndDescribe(image):
    # 将彩色图片转换成灰度图
    gray = cv2.cvtColor(image, cv2.COLOR_BGR2GRAY)

    # 建立ORB生成器
    descriptor = cv2.ORB_create()
    # 检测ORB特征点,并计算描述子
    (kps, features) = descriptor.detectAndCompute(image, None)

    # 将结果转换成NumPy数组
    kps = np.float32([kp.pt for kp in kps])
    # print(kps.shape) (500, 2) 500个关键点
    # print(features.shape) (500, 32) 每个点周围包含4个区域,每个区域分8块圆切分,故32

    # 返回特征点集,及对应的描述特征
    return (kps, features)
def matchKeypoints(kpsA, kpsB, featuresA, featuresB, ratio, reprojThresh):
    # 建立暴力匹配器,采用汉明距离匹配
    matcher = cv2.BFMatcher()

    # 使用KNN检测来自A、B图的ORB特征匹配对,K=2
    rawMatches = matcher.knnMatch(featuresA, featuresB, 2)

    matches = []
    for m in rawMatches:
        # 当最近距离跟次近距离的比值小于ratio值时,保留此匹配对
        if len(m) == 2 and m[0].distance < m[1].distance * ratio:
        # 存储两个点在featuresA, featuresB中的索引值
            matches.append((m[0].trainIdx, m[0].queryIdx))

    # 当筛选后的匹配对大于4时,计算视角变换矩阵
    if len(matches) > 4:
        # 获取匹配对的点坐标
        ptsA = np.float32([kpsA[i] for (_, i) in matches])
        ptsB = np.float32([kpsB[i] for (i, _) in matches])

        # 计算视角变换矩阵
        (H, status) = cv2.findHomography(ptsA, ptsB, cv2.RANSAC, reprojThresh)

        # 返回结果
        return (matches, H, status)

    # 如果匹配对小于4时,返回None
    return None
def drawMatches(imageA, imageB, kpsA, kpsB, matches, status):
    # 初始化可视化图片,将A、B图左右连接到一起
    (hA, wA) = imageA.shape[:2]
    (hB, wB) = imageB.shape[:2]
    vis = np.zeros((max(hA, hB), wA + wB, 3), dtype="uint8")
    vis[0:hA, 0:wA] = imageA
    vis[0:hB, wA:] = imageB

    # 联合遍历,画出匹配对
    for ((trainIdx, queryIdx), s) in zip(matches, status):
        # 当点对匹配成功时,画到可视化图上
        if s == 1:
            # 画出匹配对
            ptA = (int(kpsA[queryIdx][0]), int(kpsA[queryIdx][1]))
            ptB = (int(kpsB[trainIdx][0]) + wA, int(kpsB[trainIdx][1]))
            cv2.line(vis, ptA, ptB, (0, 255, 0), 1)

    # 返回可视化结果
    return vis
def stitch(images, ratio=0.75, reprojThresh=4.0,showMatches=False, left_right=True):
    #获取输入图片
    (imageB, imageA) = images
    #检测A、B图片的SIFT关键特征点,并计算特征描述子
    (kpsA, featuresA) = detectAndDescribe(imageA)
    (kpsB, featuresB) = detectAndDescribe(imageB)

    # 匹配两张图片的所有特征点,返回匹配结果
    M = matchKeypoints(kpsA, kpsB, featuresA, featuresB, ratio, reprojThresh)

    # 如果返回结果为空,没有匹配成功的特征点,退出算法
    if M is None:
        return None

    # 否则,提取匹配结果
    # H是3x3视角变换矩阵
    (matches, H, status) = M
    # 将图片A进行视角变换,result是变换后图片
    if left_right:
        result = cv2.warpPerspective(imageA, H, (imageA.shape[1] + imageB.shape[1], imageA.shape[0]))
    else:
        result = cv2.warpPerspective(imageA, H, (imageA.shape[1], imageA.shape[0] + imageB.shape[0]))

    # 将图片B传入result图片最左端
    result[0:imageB.shape[0], 0:imageB.shape[1]] = imageB

    # 检测是否需要显示图片匹配
    if showMatches:
        # 生成匹配图片
        vis = drawMatches(imageA, imageB, kpsA, kpsB, matches, status)
        # 返回结果
        return (result, vis)
# 左右拼接
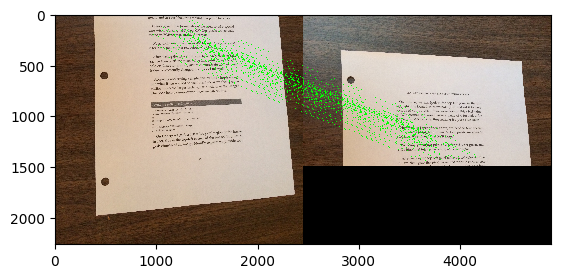
result_lr, vis_lr = stitch([img_left, img_right], showMatches=True, left_right=True)
cv2.imwrite('join_out_lr.jpg', result)
img_show(result_lr)
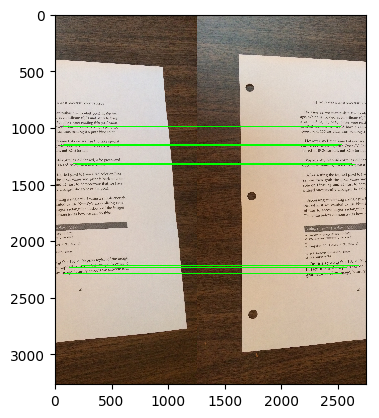
img_show(vis_lr)
# 上下拼接
result_tb, vis_tb = stitch([img_top, img_bot], showMatches=True, left_right=False)
cv2.imwrite('join_out_tb.jpg', result)
img_show(result_tb)
s=True, left_right=True)
cv2.imwrite('join_out_lr.jpg', result)
img_show(result_lr)
img_show(vis_lr)
# 上下拼接
result_tb, vis_tb = stitch([img_top, img_bot], showMatches=True, left_right=False)
cv2.imwrite('join_out_tb.jpg', result)
img_show(result_tb)
img_show(vis_tb)


小结
- 以上是作者平时学习的项目笔记
- 如若存在问题,可在评论区留言,作者会不时为大家讲解
- 作者aistudio主页链接,欢迎各位互粉、提问:aistudio
请点击此处查看本环境基本用法.
Please click here for more detailed instructions.
此文章为搬运
原项目链接

学大模型,用大模型上飞桨星河社区!每天8点V100G算力免费领!免费领取ERNIE 4.0 100w Token >>>
更多推荐


 0
0 1
1- 0


 已为社区贡献1436条内容

所有评论(0)