
基于PP-Human V2的闯入人员检测
基于PaddleDetection实现的人员闯入方案全流程实战,覆盖训练、调优、部署等
1 背景
近年来,以智能安防产业为代表的数字经济的成功实践及诸多新业态的涌现表明,以数字化和智能化为特征的第四次工业革命的发生和发展及其与中国经济转型的共生融合,是中国创新型国家建设的历史机遇。在新的经济发展机遇面前,如何继“世界工厂”之后成长为具有全球影响力的科技创新中心,是新时代中国国家战略的核心取向。[1]
闯入人员检测主要针对出现在视频画面中特定区域的人员进行检测,为已有视频监测赋能,检测高危区域、特定区域的人员误入行为。检测能够有效避免财产损失、安全事故等事件的发生,减小人力监管误差,减少人力监管成本。人员闯入检测大多与流量计数、行为识别和人体属性识别等任务相互集成,通常面向各种复杂场景,PP-Human 是一套综合了目标检测、跟踪、关键点检测等核心能力的产业级开源实时行人分析工具,本次实践将使用PP-Human在服务器端进行推理部署。
PaddleDetection深入探索核心行业的高频场景,提供了行人、车辆场景的开箱即用分析工具,支持图片/单镜头视频/多镜头视频/在线视频流多种输入方式,广泛应用于智慧交通、智慧城市、工业巡检等领域。[2] PP-Human支持四大产业级功能:五大异常行为识别、26种人体属性分析、实时人流计数、跨镜头(ReID)跟踪。
2 方案介绍
本次实践主要使用目标跟踪相关技术,先来看几个基本概念
多目标跟踪(Multi-Object Tracking, MOT)是对给定视频或图片序列,定位出多个感兴趣的目标,并在连续帧之间维持个体的ID信息和记录其轨迹。 当前主流的做法是Tracking By Detecting方式,算法主要由两部分组成:Detection + Embedding。
- Detection部分即针对视频,检测出每一帧中的潜在目标。
- Embedding部分则将检出的目标分配和更新到已有的对应轨迹上(即ReID重识别任务),进行物体间的长时序关联。
根据这两部分实现的不同,又可以划分为SDE系列和JDE系列算法:
SDE(Separate Detection and Embedding)这类算法完全分离Detection和Embedding两个环节,最具代表性的是DeepSORT[7]算法。这样的设计可以使系统无差别的适配各类检测器,可以针对两个部分分别调优,但是流程上由于串联会导致速度慢耗时长。也有算法如ByteTrack[3]算法为了降低耗时,不使用Embedding特征来计算外观相似度,前提是检测器的精度足够高。JDE(Joint Detection and Embedding)这类算法完是在一个共享神经网络中同时学习Detection和Embedding,使用一个多任务学习的思路设置损失函数。代表性的算法有JDE[5]和其升级版本FairMOT[6]。这样的设计兼顾精度和速度,可以实现高精度的实时多目标跟踪。
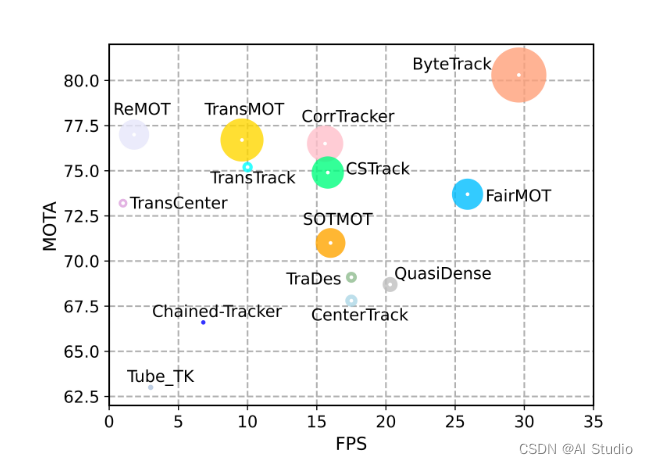
本文即将使用的ByteTrack算法就是SDE类,ByteTrack是发表在 ECCV2022 上的工作,在指标MOTA、FPS和IDF1上均超越了之前的跟踪器,如下图所示,横纵轴分别为FPS 和 MOTA,半径为IDF1.
本次实践方案如下图所示: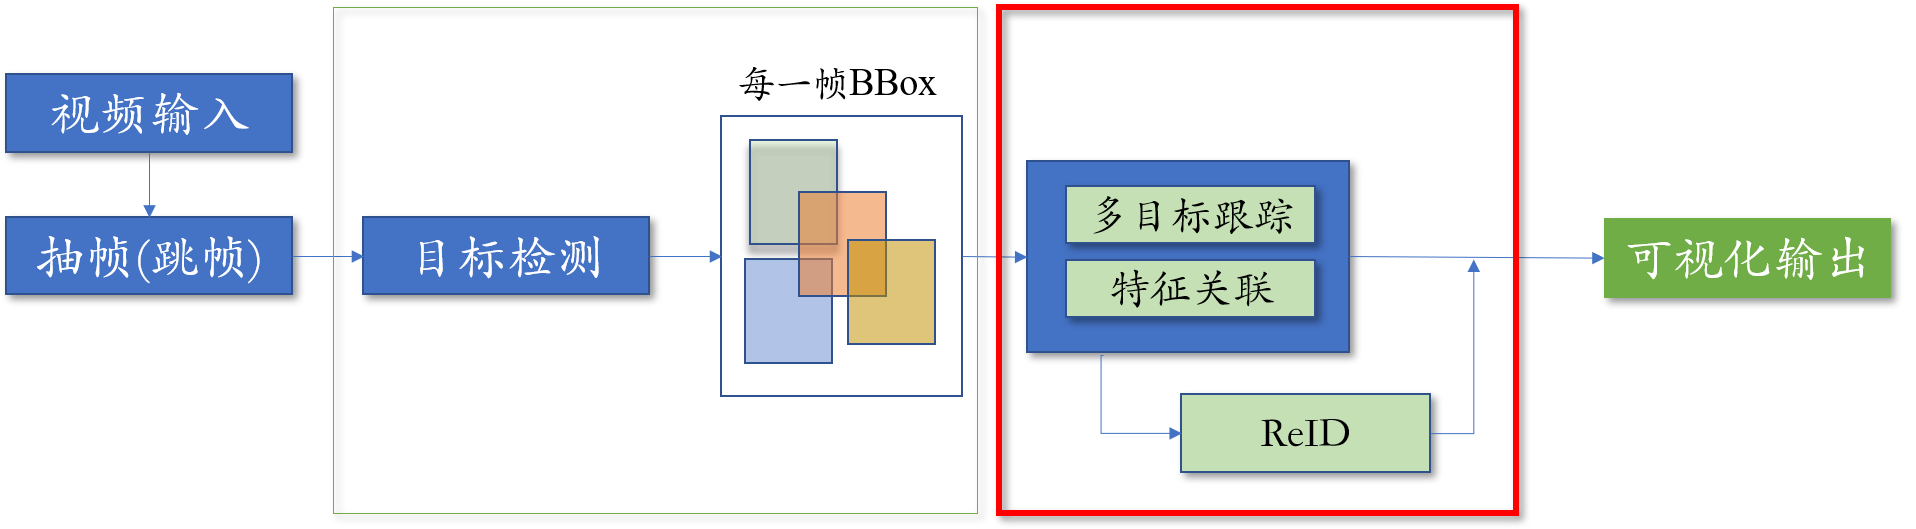
- PPHuman V2 使用目标检测PP-YOLOE模型来获取图片/视频输入中的行人检测框,详细文档参考PP-YOLOE。
- PPHuman V2 多目标跟踪模型方案采用ByteTrack 或 OC-SORT,采用PP-YOLOE替换原文的YOLOX作为检测器,采用BYTETracker 或 OCSORTTracker作为跟踪器,详细文档参考ByteTrack和OC-SORT。
3 实践教程
3.1 环境配置
3.1.1 环境配置环境要求
PaddlePaddle >= 2.2.2
PaddleDetection Develop版本
更多关于Paddle GPU版本的安装内容,请参考:
https://www.paddlepaddle.org.cn/install/quick
3.1.2 代码准备
本案例在work下已存放 Develop版本(commitID: 80b262) PaddleDetection 压缩文件,首先需要解压(需在命令行执行)
%cd /home/aistudio/work
!tar -zxvf PaddleDetection.tar.gz
当然也可自行git下来:
cd work
# git clone https://github.com/PaddlePaddle/PaddleDetection.git
# https://github.91chi.fun/ 是一个github国内加速通道
git clone https://github.91chi.fun/https://github.com/PaddlePaddle/PaddleDetection.git

cd PaddleDetection
git branch -a # 查看远程分支
git branch   # 查看本地分支
git checkout -b develop origin/develop   # 将本地分支切换到 develop 分支
git branch   # 再次查看本地分支验证
关于git的使用,可以查看这篇:https://blog.csdn.net/YJG7D314/article/details/104551896
(当然,这不是本文的重点)
3.1.3 安装依赖
%cd /home/aistudio/work/PaddleDetection
!pip install --upgrade pip           # 更新 pip
!pip install -r requirements.txt -i https://mirror.baidu.com/pypi/simple  # AIStuido上无需添加百度源
3.1.4 PaddleDetection环境配置
这样即可安装ppdet:
%cd /home/aistudio/work/PaddleDetection
!python setup.py install
接下来只需要跳转 3.1.5 PaddleDetection环境验证 即可
而如果你不想安装,只想从源码运行,也可以将 PaddleDetection 添加到环境变量PYTHONPATH 中(这样操作方便单步调试)
export PYTHONPATH=$PYTHONPATH:/home/aistudio/work/PaddleDetection # 在当前终端临时添加环境变量, 每开一个新终端要重新执行一次

# 也可以这样持续添加,之后刷新一下环境变量即可
echo "export PYTHONPATH=$PYTHONPATH:/home/aistudio/work/PaddleDetection" >> ~/.bashrc
source  ~/.bashrc
3.1.5 PaddleDetection环境验证
安装后确认测试通过:
%cd /home/aistudio/work/PaddleDetection
!python ppdet/modeling/tests/test_architectures.py
测试通过后会提示如下信息:
.......
----------------------------------------------------------------------
Ran 7 tests in 1.859s

OK
如果你通过源码运行,则最上方会出现这样一行 warning:
Warning: import ppdet from source directory without installing, run 'python setup.py install' to install ppdet firstly
3.2 推理
3.2.1 推理命令
我们先用 pphuman 训练好的模型看看效果,用/home/aistudio/work 目录下的视频 test_video.mp4 来做实验
将配置文件 /home/aistudio/work/PaddleDetection/deploy/pipeline/config/infer_cfg_pphuman.yml 打开,修改MOT的enable键, 改为 True
这一步很重要,否则输出视频将没有任何标注
MOT:
  model_dir: https://bj.bcebos.com/v1/paddledet/models/pipeline/mot_ppyoloe_l_36e_pipeline.zip
  tracker_config: deploy/pipeline/config/tracker_config.yml
  batch_size: 1
  skip_frame_num: -1 # preferably no more than 3
  enable: True            # <------ 这里改成 True
之后在终端执行:
%cd /home/aistudio/work/PaddleDetection
!python deploy/pipeline/pipeline.py --config deploy/pipeline/config/infer_cfg_pphuman.yml \
                                                   --video_file=../test_video.mp4 \
                                                   --device=gpu \
                                                   --draw_center_traj \
                                                   --do_break_in_counting \
                                                   --region_type=custom \
                                                   --region_polygon 500 200 700 200 700 700 500 700
初次执行,会下载几个权重文件放在 /home/aistudio/.cache/paddle/infer_weights 位置
执行完毕,即可在 /home/aistudio/work/PaddleDetection/output/test_video.mp4 路径看到输出文件
此外,配置文件中的内容可以通过-o命令行参数修改,如修改属性的模型目录,则可通过-o ATTR.model_dir="DIR_PATH"进行设置。
3.2.2 参数含义
接下来简单说说上面命令行参数的含义:
-
--video_file推理视频路径 -
--device指定预测设备是 gpu 还是 cpu -
--draw_center_traj表示是否绘制跟踪轨迹,不设置即默认为False。注意绘制跟踪轨迹的测试视频最好是静止摄像头拍摄的。 -
--do_break_in_counting表示是否进行区域出入后计数,不设置即默认为False。 -
--region_type表示流量计数的区域,当设置--do_break_in_counting时仅可选择custom,默认是custom,表示以用户自定义区域为出入口,同一物体框的下边界中点坐标在相邻两秒内从区域外到区域内,即完成计数加一。 -
--region_polygon表示用户自定义区域的多边形的点坐标序列,每两个为一对点坐标(x,y),按顺时针顺序连成一个封闭区域,至少需要3对点也即6个整数,默认值是[],需要用户自行设置点坐标,如是四边形区域,坐标顺序是左上xy、右上xy、右下xy、左下xy。用户可以运行此段代码获取所测视频的分辨率帧数,以及可以自定义画出自己想要的多边形区域的可视化并自己调整。 自定义多边形区域的可视化代码运行如下:cd ~/work/PaddleDetection/deploy/pipeline/tools python get_video_info.py --video_file=demo.mp4 --region_polygon 200 200 400 200 300 400 100 400 # 执行完毕后,可在该路径看到一张可视化代码图
更多详细内容,可以参考:
https://github.com/PaddlePaddle/PaddleDetection/blob/develop/deploy/pipeline/docs/tutorials/pphuman_mot.md
3.2.3 测试效果
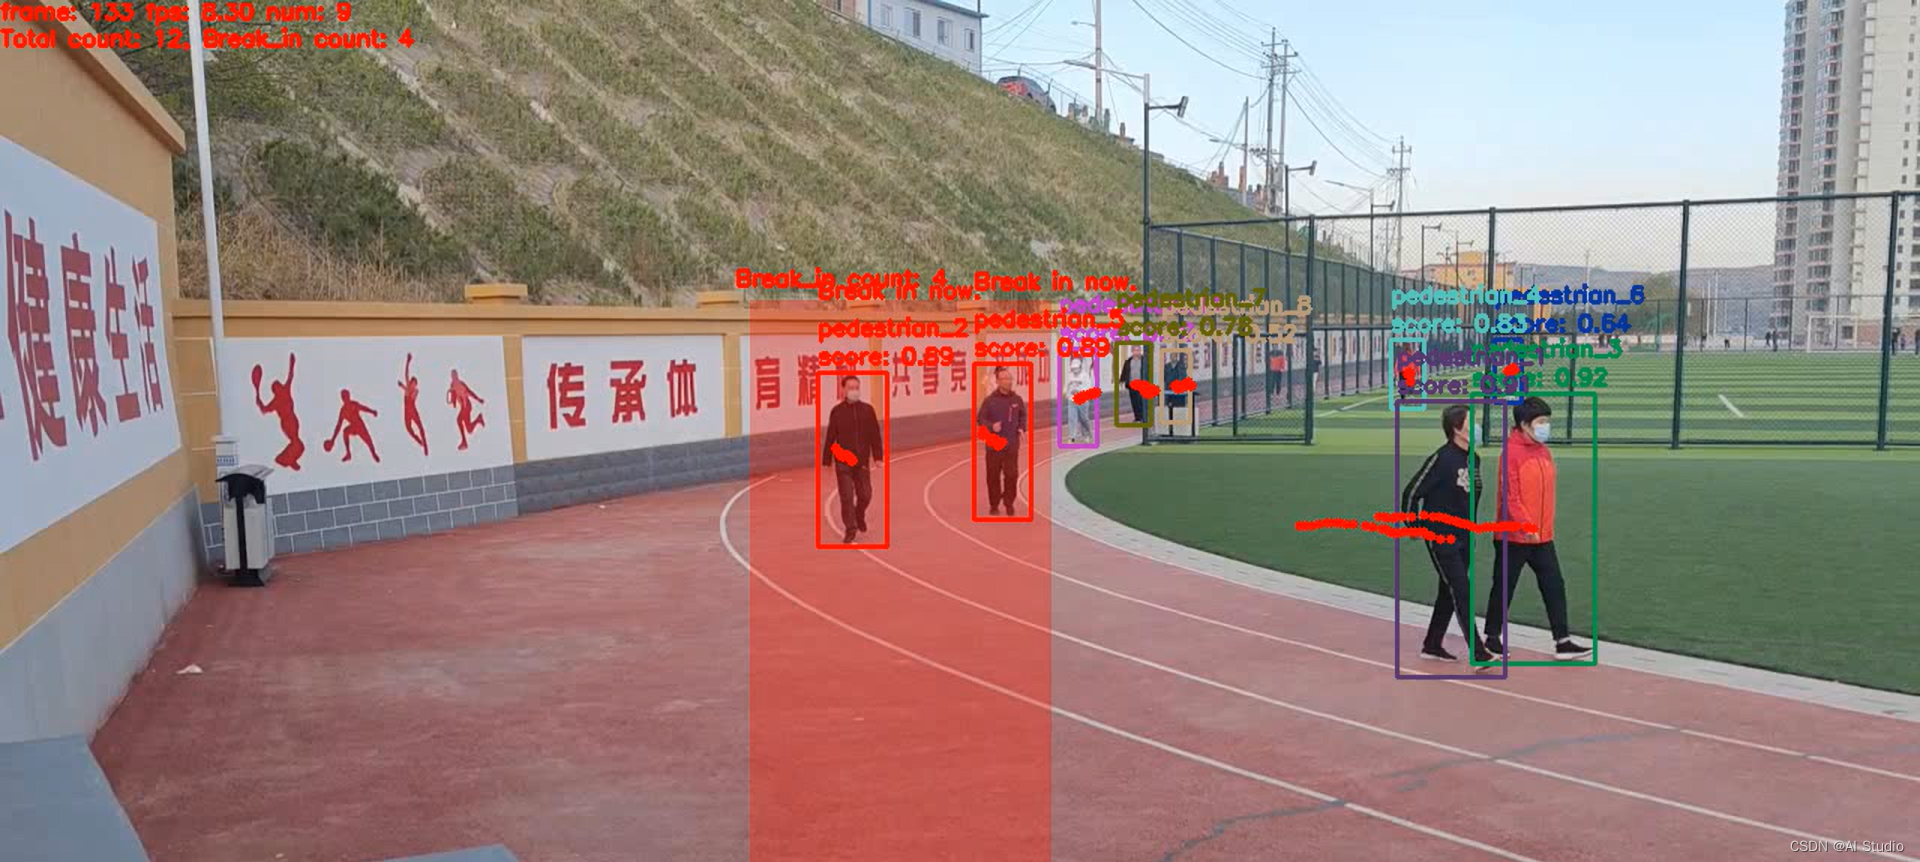
测试效果如下:
- 每个行人 BBox 上方有行人实例标识和置信度score,并使用不同的颜色以区分不同的行人实例
- 红色半透明区域为“闯入区域”,行人若进入,则视为闯入
- 左上角还有帧率,当前帧人数等信息
Break_in count为走进闯入区域的累计总人数
3.2.4 配置文件
我们简单来看看 infer_cfg_pphuman.yml 配置文件
DET:
 # model_dir: https://bj.bcebos.com/v1/paddledet/models/pipeline/mot_ppyoloe_l_36e_pipeline.zip
 model_dir: output_inference
 batch_size: 1

MOT:
 # model_dir: https://bj.bcebos.com/v1/paddledet/models/pipeline/mot_ppyoloe_l_36e_pipeline.zip
 model_dir: output_inference
 tracker_config: deploy/pipeline/config/tracker_config.yml
 batch_size: 1
 skip_frame_num: -1 # preferably no more than 3
 enable: True
默认情况下都是 https://bj.bcebos.com 开头的链接, PaddleDetection套件会自动下载预训练模型,然而当我们自己训练模型并导出为静态图模型时, 该怎么用呢?
对,只需指定 model_dir 参数, PaddleDetection 推荐将静态图模型文件放在 work/PaddleDetection/output_inference 下,实际上放在哪里都可,只要这里指定正确
output_inference 目录下的文件是:
├─output_inference
│      infer_cfg.yml
│      model.pdiparams
│      model.pdiparams.info
│      model.pdmodel
.pdmodel 文件是模型结构文件,.pdiparams 文件是模型参数文件
之后在模型训练完毕之后,也将这样操作,使PaddleDetection用我们自己训练的模型进行推理
再来看看多目标追踪的配置:
MOT:
  tracker_config: deploy/pipeline/config/tracker_config.yml
其配置指向相同目录的 tracker_config.yml 文件,打开看看:
# config of tracker for MOT SDE Detector, use 'JDETracker' as default.
# The tracker of MOT JDE Detector (such as FairMOT) is exported together with the model.
# Here 'min_box_area' and 'vertical_ratio' are set for pedestrian, you can modify for other objects tracking.

type: OCSORTTracker # choose one tracker in ['JDETracker', 'OCSORTTracker']


# BYTETracker
JDETracker:
  use_byte: True
  det_thresh: 0.3
  conf_thres: 0.6
  low_conf_thres: 0.1
  match_thres: 0.9
  min_box_area: 0
  vertical_ratio: 0 # 1.6 for pedestrian


OCSORTTracker:
  det_thresh: 0.4
  max_age: 30
  min_hits: 3
  iou_threshold: 0.3
  delta_t: 3
  inertia: 0.2
  vertical_ratio: 0
  min_box_area: 0
  use_byte: False
之前也介绍过了,PaddleDetecion多目标跟踪模型方案采用ByteTrack 或 OC-SORT,与该文件的 JDETracker 和 OCSORTTracker 对应
在 PPHuman 这里默认使用OC-SORT,只需要将 type 改为 JDETracker, 即可使用 ByteTrack 算法
PPHuman v2的推理功能已经足够满足一些简单的业务需求,更多应用场景与案例,请参阅Github文档:
https://github.com/PaddlePaddle/PaddleDetection/tree/develop/deploy/pipeline
然而,面对各种复杂多变的场景,也有重新训练的需求,下面的小节将继续介绍 PPHuman 人员闯入的训练过程,实际上也是多目标跟踪的训练过程
3.3 数据准备
根据模型选型,MOT数据集可以分为两类:
- 一类纯检测框标注的数据集,仅SDE系列可以使用;
- 另一类是同时有检测和ReID标注的数据集,SDE系列和JDE系列都可以使用。
PaddleDetection团队提供了众多公开数据集或整理后数据集的下载链接,参考数据集下载汇总,用户可以自行下载使用:
https://github.com/PaddlePaddle/PaddleDetection/blob/develop/configs/mot/DataDownload.md
SDE数据集是纯目标检测的数据集,用户自定义数据集可以参照目标检测数据准备文档准备,如常用的VOC 和 COCO 格式等,PaddleDetection也提供了文档,供用户参考:
本文也以SDE数据集为例,JDE系列仅做简单说明
3.3.1 SDE数据集准备
以 MOT17 数据集为例,下载并解压放在PaddleDetection/dataset/mot 目录下(约2.2G):
# 可以自行下载,本次实践为了速度,直接使用已经下载好的 `data/data172969/MOT17.zip` 文件

# !wget -P /home/aistudio/work/PaddleDetection/dataset/mot https://bj.bcebos.com/v1/paddledet/data/mot/MOT17.zip # -P 参数指定输出目录
# %cd /home/aistudio/work/PaddleDetection/dataset/mot
# !unzip -o MOT17.zip

!cp /home/aistudio/data/data172969/MOT17.zip /home/aistudio/work/PaddleDetection/dataset/mot
%cd /home/aistudio/work/PaddleDetection/dataset/mot
!unzip -o MOT17.zip
PaddleDetection已经帮我们将Mot的标注格式转化为COCO格式,数据集目录为:
dataset/mot
        |——————MOT17
                |——————annotations
                |——————images
同时我们config中数据集部分的配置文件修改如下:
(关于哪一个config文件,我们将在之后的小节进行说明, 这里先挖一个坑)
num_classes: 1

TrainDataset:
  !COCODataSet
    dataset_dir: dataset/mot/MOT17
    anno_path: annotations/train_half.json
    image_dir: images/train
    data_fields: ['image', 'gt_bbox', 'gt_class', 'is_crowd']

EvalDataset:
  !COCODataSet
    dataset_dir: dataset/mot/MOT17
    anno_path: annotations/val_half.json
    image_dir: images/train

TestDataset:
  !ImageFolder
    dataset_dir: dataset/mot/MOT17
    anno_path: annotations/val_half.json
此处做一些说明,SDE系列数据集准备与一般目标检测数据集无异,所以VOC格式与COCO格式都可以,只需要准备对应格式的数据集且修改对应的config项即可
关于准备检测数据集,可以参考PaddleDetection的这篇文档:
https://github.com/PaddlePaddle/PaddleDetection/blob/develop/docs/tutorials/data/PrepareDetDataSet.md
关于MOT格式转COCO或VOC格式,可以参考以下链接:
3.3.2 JDE数据集准备
(本小节仅供用户参考,此次范例暂时用不到)
JDE数据集是同时有检测和 ReID 标注 的数据集,首先按照以下命令 image_lists.zip 并解压放在 PaddleDetection/dataset/mot 目录下:
cd PaddleDetection/dataset/mot
wget https://bj.bcebos.com/v1/paddledet/data/mot/image_lists.zip && unzip image_lists.zip
然后按照以下命令可以快速下载各个公开数据集,也解压放在 PaddleDetection/dataset/mot 目录下:
cd PaddleDetection/dataset/mot

# 以下数据也可称作“MIX数据集”,同JDE,FairMOT论文使用的数据集
wget https://bj.bcebos.com/v1/paddledet/data/mot/MOT17.zip       && unzip MOT17.zip
wget https://bj.bcebos.com/v1/paddledet/data/mot/Caltech.zip      && unzip Caltech.zip
wget https://bj.bcebos.com/v1/paddledet/data/mot/CUHKSYSU.zip     && unzip CUHKSYSU.zip
wget https://bj.bcebos.com/v1/paddledet/data/mot/PRW.zip        && unzip PRW.zip
wget https://bj.bcebos.com/v1/paddledet/data/mot/Cityscapes.zip    && unzip Cityscapes.zip
wget https://bj.bcebos.com/v1/paddledet/data/mot/ETHZ.zip        && unzip ETHZ.zip
wget https://bj.bcebos.com/v1/paddledet/data/mot/MOT16.zip       && unzip MOT16.zip
数据集目录为:
dataset/mot
  |——————image_lists
            |——————caltech.all
            |——————citypersons.train
            |——————cuhksysu.train
            |——————eth.train
            |——————mot16.train
            |——————mot17.train
            |——————prw.train
  |——————Caltech
  |——————Cityscapes
  |——————CUHKSYSU
  |——————ETHZ
  |——————MOT16
  |——————MOT17
  |——————PRW
3.3.3 JDE数据集的格式
(本小节仅供用户参考,此次范例暂时用不到)
这几个相关数据集都遵循以下结构:
MOT17
   |——————images
   |        └——————train
   |        └——————test
   └——————labels_with_ids
            └——————train
所有数据集的标注是以统一数据格式提供的。各个数据集中每张图片都有相应的标注文本。给定一个图像路径,可以通过将字符串 images 替换为 labels_with_ids 并将 .jpg 替换为.txt来生成标注文本路径。在标注文本中,每行都描述一个边界框,格式如下:
[class] [identity] [x_center] [y_center] [width] [height]
class为类别id,支持单类别和多类别,从0开始计,单类别即为0。identity是从1到num_identities的整数(num_identities是数据集中所有视频或图片序列的不同物体实例的总数),如果此框没有identity标注,则为-1。[x_center] [y_center] [width] [height]是中心点坐标和宽高,注意他们的值是由图片的宽度/高度标准化的,因此它们是从0到1的浮点数, 也就是YOLO格式
注意:
- MIX数据集是JDE和FairMOT原论文使用的数据集,包括Caltech Pedestrian, CityPersons, CUHK-SYSU, PRW, ETHZ, MOT17和MOT16。使用前6者作为联合数据集参与训练,MOT16作为评测数据集。如果您想使用这些数据集,请遵循他们的License。
- MIX数据集以及其子数据集都是单类别的行人跟踪数据集,可认为相比于行人检测数据集多了id号的标注。
准备好数据集之后,我们只需要这样修改数据配置:
metric: MOT
num_classes: 1

# for MOT training
TrainDataset:
  !MOTDataSet
    dataset_dir: dataset/mot
    image_lists: ['mot17.train', 'caltech.all', 'cuhksysu.train', 'prw.train', 'citypersons.train', 'eth.train']
    data_fields: ['image', 'gt_bbox', 'gt_class', 'gt_ide']

# for MOT evaluation
# If you want to change the MOT evaluation dataset, please modify 'data_root'
EvalMOTDataset:
  !MOTImageFolder
    dataset_dir: dataset/mot
    data_root: MOT16/images/train
    keep_ori_im: False # set True if save visualization images or video, or used in DeepSORT

# for MOT video inference
TestMOTDataset:
  !MOTImageFolder
    dataset_dir: dataset/mot
    keep_ori_im: True # set True if save visualization images or video
事实上,除了以上数据配置的修改,也要修改DataReader的配置,本文不对JDE系列做详细介绍,具体内容可以参考:
- jde: https://github.com/PaddlePaddle/PaddleDetection/blob/develop/configs/mot/jde/README_cn.md
- fairmot: https://github.com/PaddlePaddle/PaddleDetection/blob/develop/configs/mot/fairmot/README_cn.md
- mcfairmot: https://github.com/PaddlePaddle/PaddleDetection/blob/develop/configs/mot/mcfairmot/README_cn.md
3.4 模型训练
3.4.1 修改配置
训练SDE系列跟踪模型,一般情况下是训练其中的目标检测模型,接下来我们仅用纯检测标注数据集来训练PPYOLOE,之后修改对应的 PPHuman 的配置
我们找到 PPYOLOE 的配置configs/ppyoloe/ppyoloe_crn_l_300e_coco.yml, 在最下方添加这几行配置代码,是的,这里回收在数据准备部分的坑
num_classes: 1

TrainDataset:
  !COCODataSet
    dataset_dir: dataset/mot/MOT17
    anno_path: annotations/train_half.json
    image_dir: images/train
    data_fields: ['image', 'gt_bbox', 'gt_class', 'is_crowd']

EvalDataset:
  !COCODataSet
    dataset_dir: dataset/mot/MOT17
    anno_path: annotations/val_half.json
    image_dir: images/train

TestDataset:
  !ImageFolder
    dataset_dir: dataset/mot/MOT17
    anno_path: annotations/val_half.json
这几行配置会覆盖 _base_ 中的数据配置
_BASE_: [
  '../datasets/coco_detection.yml',  # <------ 覆盖原始coco数据集的配置
  '../runtime.yml',
  './_base_/optimizer_300e.yml',
  './_base_/ppyoloe_crn.yml',
  './_base_/ppyoloe_reader.yml',
]
修改完毕保存之后,就可以训练了
3.4.2 开启训练
%cd /home/aistudio/work/PaddleDetection
!python -m paddle.distributed.launch --gpus 0 tools/train.py -c configs/ppyoloe/ppyoloe_crn_l_300e_coco.yml --eval --amp
多卡训练只需要将 --gpus 0 改为--gpus 0,1,2,3,4,5,6,7 --amp 是自动混合精度训练,目前依旧存在不稳定的问题,偶尔会有NaN或Inf,可用可不用
3.4.3 模型导出
训练完毕之后,会在work/PaddleDetection/output/ppyoloe_crn_l_300e_coco目录看到训练保存的文件,一般来说选择 best_model.pdparams 即可
├── ppyoloe_crn_l_300e_coco
│   ├── 9.pdema
│   ├── 9.pdopt
│   ├── 9.pdparams
│   ├── ......
│   ├── best_model.pdema
│   ├── best_model.pdopt
│   └── best_model.pdparams
这样导出即可
%cd /home/aistudio/work/PaddleDetection
!python tools/export_model.py \
        -c configs/ppyoloe/ppyoloe_crn_l_300e_coco.yml  \
        -o weights=output/ppyoloe_crn_l_300e_coco/best_model.pdparams
会在output_inference/ppyoloe_crn_l_300e_coco 路径下看到导出静态图结果:
├── ppyoloe_crn_l_300e_coco
│   ├── infer_cfg.yml
│   ├── model.pdiparams
│   ├── model.pdiparams.info
│   └── model.pdmodel
3.4.4 修改推理配置
打开 yml 配置文件work/PaddleDetection/deploy/pipeline/config/infer_cfg_pphuman.yml
将MOT下的model_dir 改为刚刚的导出静态图模型路径output_inference/ppyoloe_crn_l_300e_coco就好
MOT:
  # model_dir: https://bj.bcebos.com/v1/paddledet/models/pipeline/mot_ppyoloe_l_36e_pipeline.zip
  model_dir: output_inference/ppyoloe_crn_l_300e_coco
  tracker_config: deploy/pipeline/config/tracker_config.yml
  batch_size: 1
  skip_frame_num: -1 # preferably no more than 3
  enable: True
接下来只需要按照 3.2推理 的步骤进行验证即可:
%cd /home/aistudio/PaddleDetection
!python deploy/pipeline/pipeline.py --config deploy/pipeline/config/infer_cfg_pphuman.yml \
                                                   --video_file=../test_video.mp4 \
                                                   --device=gpu \
                                                   --draw_center_traj \
                                                   --do_break_in_counting \
                                                   --region_type=custom \
                                                   --region_polygon 500 200 700 200 700 700 500 700
3.5 更换检测器
3.5.1 模型导出
由于PaddleDetection的便利性,仅通过简单修改配置,就轻松让模型跑起来,诸位开发者一定不过瘾。在本小结,将使用最新的PP-YOLOE+ 代替 PP-YOLOE
来看一下 PP-YOLOE+ 的基本资料
PP-YOLOE+_l在COCO test-dev2017达到了53.3的mAP, 同时其速度在Tesla V100上达到了78.1 FPS。
PP-YOLOE+_s/m/x同样具有卓越的精度速度性价比, 其精度速度可以在模型库中找到。
假设我们已经训练好了模型,并且得到了对应的参数文件,这里我们以PaddleDetection训练好的模型为例子,导出静态图模型:
%cd /home/aistudio/work/PaddleDetection
!python tools/export_model.py \
         -c configs/ppyoloe/ppyoloe_plus_crn_l_80e_coco.yml \
         -o weights=https://paddledet.bj.bcebos.com/models/ppyoloe_plus_crn_l_80e_coco.pdparams
将-c参数改为你训练时的配置文件, -o weights= 参数指向你得到的参数文件即可
之后会在work/PaddleDetection/output_inference 目录下得到你的静态图模型:
output_inference
└── ppyoloe_plus_crn_l_80e_coco
    ├── infer_cfg.yml
    ├── model.pdiparams
    ├── model.pdiparams.info
    └── model.pdmodel
看到这个目录结构之后,是不是很熟悉呢? 接下来只需要将该模型路径写入 PPHuman 的配置文件即可
3.5.2 修改配置
打开 yml 配置文件work/PaddleDetection/deploy/pipeline/config/infer_cfg_pphuman.yml
将MOT下的model_dir 改为刚刚的导出静态图模型路径output_inference/ppyoloe_plus_crn_l_80e_coco就好
MOT:
  # model_dir: https://bj.bcebos.com/v1/paddledet/models/pipeline/mot_ppyoloe_l_36e_pipeline.zip
  model_dir: output_inference/ppyoloe_plus_crn_l_80e_coco
  tracker_config: deploy/pipeline/config/tracker_config.yml
  batch_size: 1
  skip_frame_num: -1 # preferably no more than 3
  enable: True
修改完毕后直接运行推理就好:
python deploy/pipeline/pipeline.py --config deploy/pipeline/config/infer_cfg_pphuman.yml \
                                                   --video_file=../test_video.mp4 \
                                                   --device=gpu \
                                                   --draw_center_traj \
                                                   --do_break_in_counting \
                                                   --region_type=custom \
                                                   --region_polygon 500 200 700 200 700 700 500 700
当然,也可以不修改配置文件,在命令行中添加修改项也可以:
-o MOT.model_dir=output_inference/ppyoloe_plus_crn_l_80e_coco
即:
%cd /home/aistudio/work/PaddleDetection
!python deploy/pipeline/pipeline.py --config deploy/pipeline/config/infer_cfg_pphuman.yml \
                       --video_file=../test_video.mp4 \
                       --device=gpu \
                       --draw_center_traj \
                       --do_break_in_counting \
                       --region_type=custom \
                       --region_polygon 500 200 700 200 700 700 500 700 \
                       -o MOT.model_dir=output_inference/ppyoloe_plus_crn_l_80e_coco
这样又开始了愉快地推理!通过查看结果以及推理log, 可以看到PPYOLOE+的效果更快更好
这里做一个简要的说明,有小伙伴可能会觉得很奇怪,上述ppyoloe+参数文件是使用COCO数据集训练的,共有80类,而我们PPHuman中仅有人一类,为什么这里直接导出静态图模型后,能直接在多目标追踪模型运行呢?
是的,就是因为COCO数据集的第0类,就是人,所以这个模型可以与咱们的多目标跟踪模型无缝衔接,换句话说,一般情况下,若训练用的数据集第0类时人,则可直接对接到这里
4. 总结与展望
- 本案例使用
PPHuman V2进行了人员闯入检测分析,在使用过程中体会到了PaddleDetection的便捷性,仅需简单修改配置就可一键启动。 - 本案例使用SDE系列多目标跟踪算法进行实践,检测模型方案为PP-YOLOE,采用BYTETracker 或 OCSORTTracker作为跟踪器,开发者也可以自己尝试更换其他检测模型和跟踪模型
5. 技术交流 
-
如果你发现任何PaddleDetection存在的问题或者是建议, 欢迎通过GitHub Issues给我们提issues。
-
欢迎加入PaddleDetection 微信用户群(扫码填写问卷即可入群)
-
入群福利 💎:获取PaddleDetection团队整理的重磅学习大礼包🎁
- 📊 福利一:获取飞桨联合业界企业整理的开源数据集
- 👨🏫 福利二:获取PaddleDetection历次发版直播视频与最新直播咨询
- 🗳 福利三:获取垂类场景预训练模型集合,包括工业、安防、交通等5+行业场景
- 🗂 福利四:获取10+全流程产业实操范例,覆盖火灾烟雾检测、人流量计数等产业高频场景
Reference
[1] 张昕蔚,刘刚.人工智能与传统产业融合创新机制研究——基于对中国智能安防产业创新网络的分析[J].科学学研究,2022,40(06):1105-1116.
[2] https://github.com/PaddlePaddle/PaddleDetection/tree/develop/deploy/pipeline
[3] Zhang Y, Sun P, Jiang Y, et al. Bytetrack: Multi-object tracking by associating every detection box[J]. arXiv preprint arXiv:2110.06864, 2021.
[4] Cao J, Weng X, Khirodkar R, et al. Observation-Centric SORT: Rethinking SORT for Robust Multi-Object Tracking[J]. arXiv preprint arXiv:2203.14360, 2022.
[5] Wang Z, Zheng L, Liu Y, et al. Towards real-time multi-object tracking[C]//European Conference on Computer Vision. Springer, Cham, 2020: 107-122.
[6] Zhang Y, Wang C, Wang X, et al. Fairmot: On the fairness of detection and re-identification in multiple object tracking[J]. International Journal of Computer Vision, 2021, 129(11): 3069-3087.
[7] Wojke N, Bewley A, Paulus D. Simple online and realtime tracking with a deep association metric[C]//2017 IEEE international conference on image processing (ICIP). IEEE, 2017: 3645-3649.
此文章为搬运
原项目链接

学大模型,用大模型上飞桨星河社区!每天8点V100G算力免费领!免费领取ERNIE 4.0 100w Token >>>
更多推荐


 1
1 0
0- 0


 已为社区贡献1436条内容

所有评论(0)