
RT-DETR:又快又好的ViT系列模型,拉开ViT实时化的序幕!
针对工业场景下实时化检测的需求,我选用PaddleDetection团队新出的RT-DETR模型,相比之前训练的ViTDet系列模型,速度和精度都有一定的提升。
★★★ 本文源自AlStudio社区精品项目,【点击此处】查看更多精品内容 >>>
<写在最前>
在本项目之前,我发布过一个项目名为[AI达人特训营第三期]PPYOLOE遇上ViT助力铁路工人安全作业,感兴趣的小伙伴可以直接点进该链接去查看。在之前的项目中使用的是以 ViT-base 为 backbone 的 PPYOLOE 模型, mAP(0.50, 11point) 能够达到 87.64%,效果还是不错的,但是众所周知,ViT系列模型存在一个问题就是推理时延高,这极大地影响了ViT系列模型的落地应用,这也是我在该项目中提到的需要改进的点。
最近关注到了PaddleDetection新出的RT-DETR模型,根据论文给出的数据,能够达到实时检测的效果,在速度和精度上都超越了YOLO系列模型,我也是迫不及待地实践了一下。
整体情况如下:
| 模型名称 | mAP(0.50, 11point) | average FPS |
|---|---|---|
| ppyoloe_vit_base_csppan_cae_36e_coco | 87.64% | 13.92 |
| rtdetr_hgnetv2_x_6x_coco | 96.26% | 18.32 |
单从本项目来看,mAP(0.50, 11point) 提升了 8.62 的百分点,average FPS 提升了 4.4 个点,是一个非常喜人的提升。可以看出RT-DETR在精度和速度上都是有着显著的提升,因此大家也可以在自己的项目中尝试使用这个模型,看看是否能够达到更好的效果。
学习本项目过程中,你可能感兴趣的链接地址:
- RT-DETR Github链接:https://github.com/PaddlePaddle/PaddleDetection/tree/develop/configs/rtdetr
- RT-DETR 原论文链接:https://arxiv.org/abs/2304.08069
- PaddleDetection Github链接:https://github.com/PaddlePaddle/PaddleDetection
- 数据集链接:https://aistudio.baidu.com/aistudio/datasetdetail/200816
一、模型简介
RT-DETR由BackBone、混合编码器和带有辅助预测头的Transformer编码器组成。整体结构如下所示(图片来自原论文):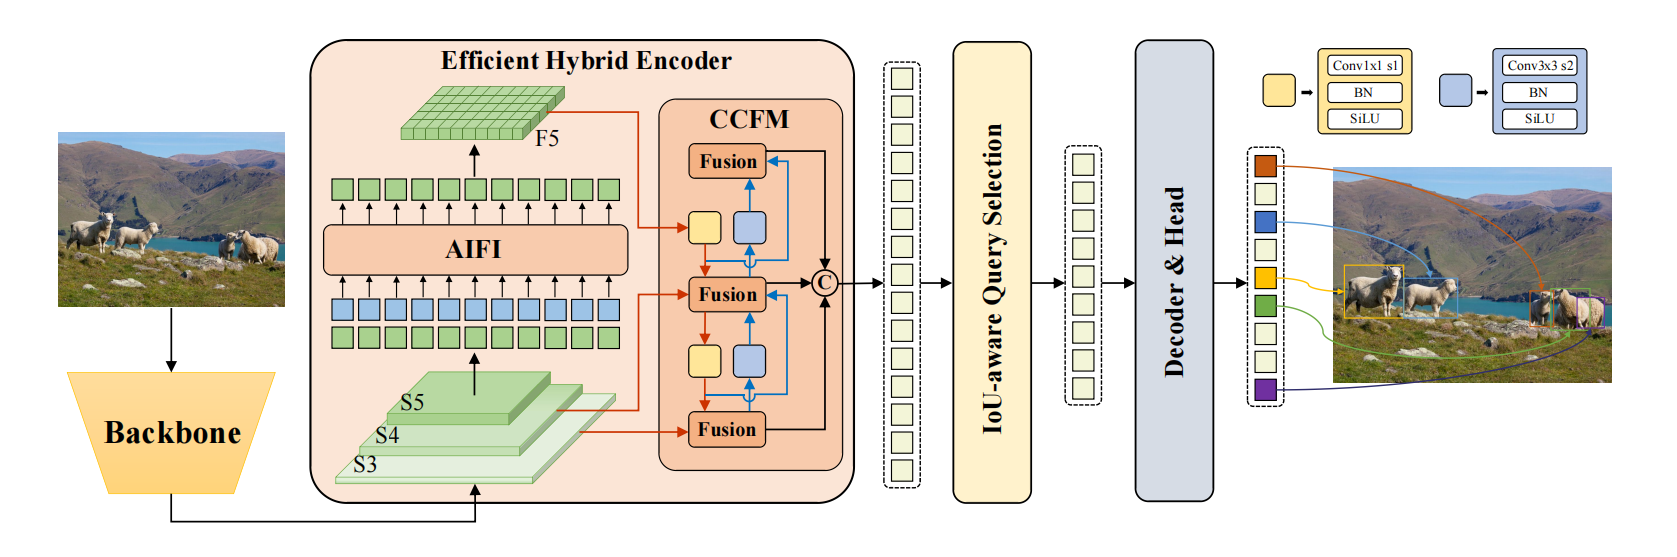
具体来说:
- 利用骨干网络最后三个阶段{ S 3 S_3 S3、 S 4 S_4 S4、 S 5 S_5 S5}的输出特征作为编码器的输入;
- 设计了一个高效的混合编码器通过解耦尺度内交互(AIFI)和跨尺度融合模块(CCFM)来高效处理多尺度特征转换为一系列图像特征;
- 采用IoU感知的查询选择机制来选择固定数量的图像特征以优化解码器查询的初始化;
- 带有辅助预测头的解码器迭代地优化对象查询以生成方框和置信度分数。
官方数据如下:
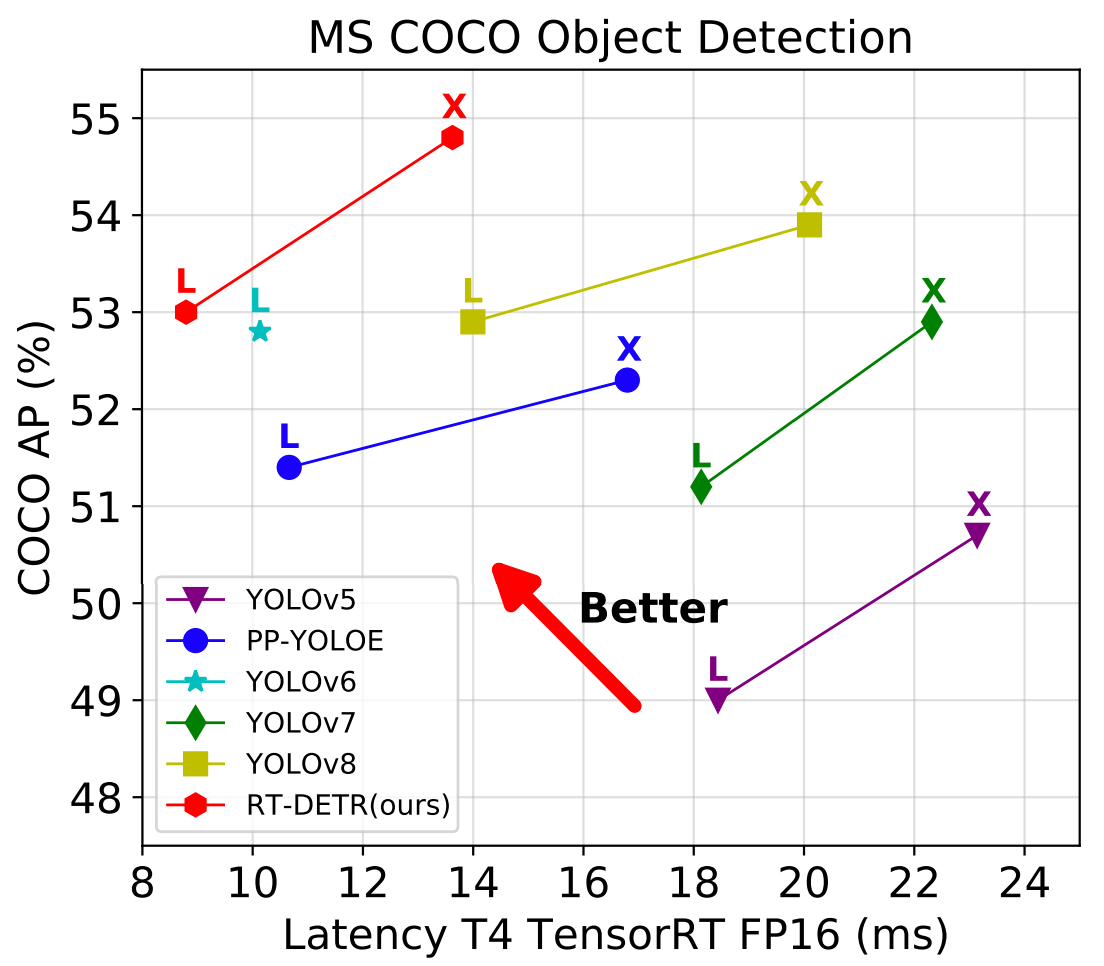
| Model | Epoch | backbone | input shape | A P v a l AP^{val} APval | A P 50 v a l AP^{val}_{50} AP50val | Params(M) | FLOPs(G) | T4 TensorRT FP16(FPS) |
|---|---|---|---|---|---|---|---|---|
| RT-DETR-R50 | 6x | ResNet-50 | 640 | 53.1 | 71.3 | 42 | 136 | 108 |
| RT-DETR-R101 | 6x | ResNet-101 | 640 | 54.3 | 72.7 | 76 | 259 | 74 |
| RT-DETR-L | 6x | HGNetv2 | 640 | 53.0 | 71.6 | 32 | 110 | 114 |
| RT-DETR-X | 6x | HGNetv2 | 640 | 54.8 | 73.1 | 67 | 234 | 74 |
- backbone:飞桨团队采用了经典的 ResNet 和可缩放的 HGNetv2 两种,使用两种 backbone 各训练了两个版本的 RT-DETR ,以 HGNetv2 为 backbone 的 RT-DETR 包括 L 和 X 版本,以 ResNet 为 backbone 的 RT-DETR 则包括 RT-DETR-R50 和 RT-DETR-R101 。 RT-DETR-R50 / 101 方便和现有的 DETR 变体进行对比,而 RT-DETR-L / X 则用来和现有的实时检测器( YOLO 系列模型)进行对比。
- Neck:现有的多尺度 Transformer 编码器在多个尺度的特征之间进行注意力运算,同时进行尺度内和尺度间特征交互,计算消耗较大。为了减少计算消耗,一个简单的办法是直接削减编码器层数。但是飞桨团队认为这并不能从根本上解决问题并且势必会对精度造成较大影响,更本质的方法应该是要解耦这种尺度内和尺度间的同时交互,缩短输入编码器的序列长度。为此,飞桨团队设计了一系列编码器变体来验证解耦尺度内和尺度间特征交互的可行性并最终演化为 HybridEncoder ,其包括两部分:Attention-based Intra-scale Feature Interaction (AIFI) 和 CNN-based Cross-scale Feature-fusion Module (CCFM) 。
- Decoder & Head:DETR 架构有两个关键组件: Query Selection 和 Decoder 。Query Selection 的作用是从 Encoder 输出的特征序列中选择固定数量的特征作为 object queries ,其经过 Decoder 后由预测头映射为置信度和边界框。现有的 DETR 变体都是利用这些特征的分类分数直接选择 top-K 特征。然而,由于分类分数和 IoU 分数的分布存在不一致,分类得分高的预测框并不一定是和 GT 最接近的框,这导致高分类分数低 IoU 的框会被选中,而低分类分数高 IoU 的框会被丢弃,这将会损害检测器的性能。为解决这一问题,飞桨团队提出了 IoU-aware Query Selection ,通过在训练期间约束检测器对高 IoU 的特征产生高分类分数,对低 IoU 的特征产生低分类分数。从而使得模型根据分类分数选择的 top-K 特征对应的预测框同时具有高分类分数和高 IoU 分数。对于 Decoder ,飞桨团队并没有对其结构进行调整,目的是为了方便使用高精度的 DETR 的大检测模型对轻量级 DETR 检测器进行蒸馏。
- 数据增强和训练策略:数据增强采用的是基础的随机颜色抖动、随机翻转、裁剪和 Resize ,并且在验证和推理时图像的输入尺寸统一为 640 ,与 DETR 系列的处理方式有较大的不同,主要是为了满足实时性的要求。训练策略则是和 DETR 系列基本相同,优化器同样采用 AdamW ,默认在 COCO train2017 上训练 6x ,即 72 个 epoch 。
以上段落有部分摘自于官方发布的超越YOLOv8,飞桨推出精度最高的实时检测器RT-DETR!。
二、数据集简介
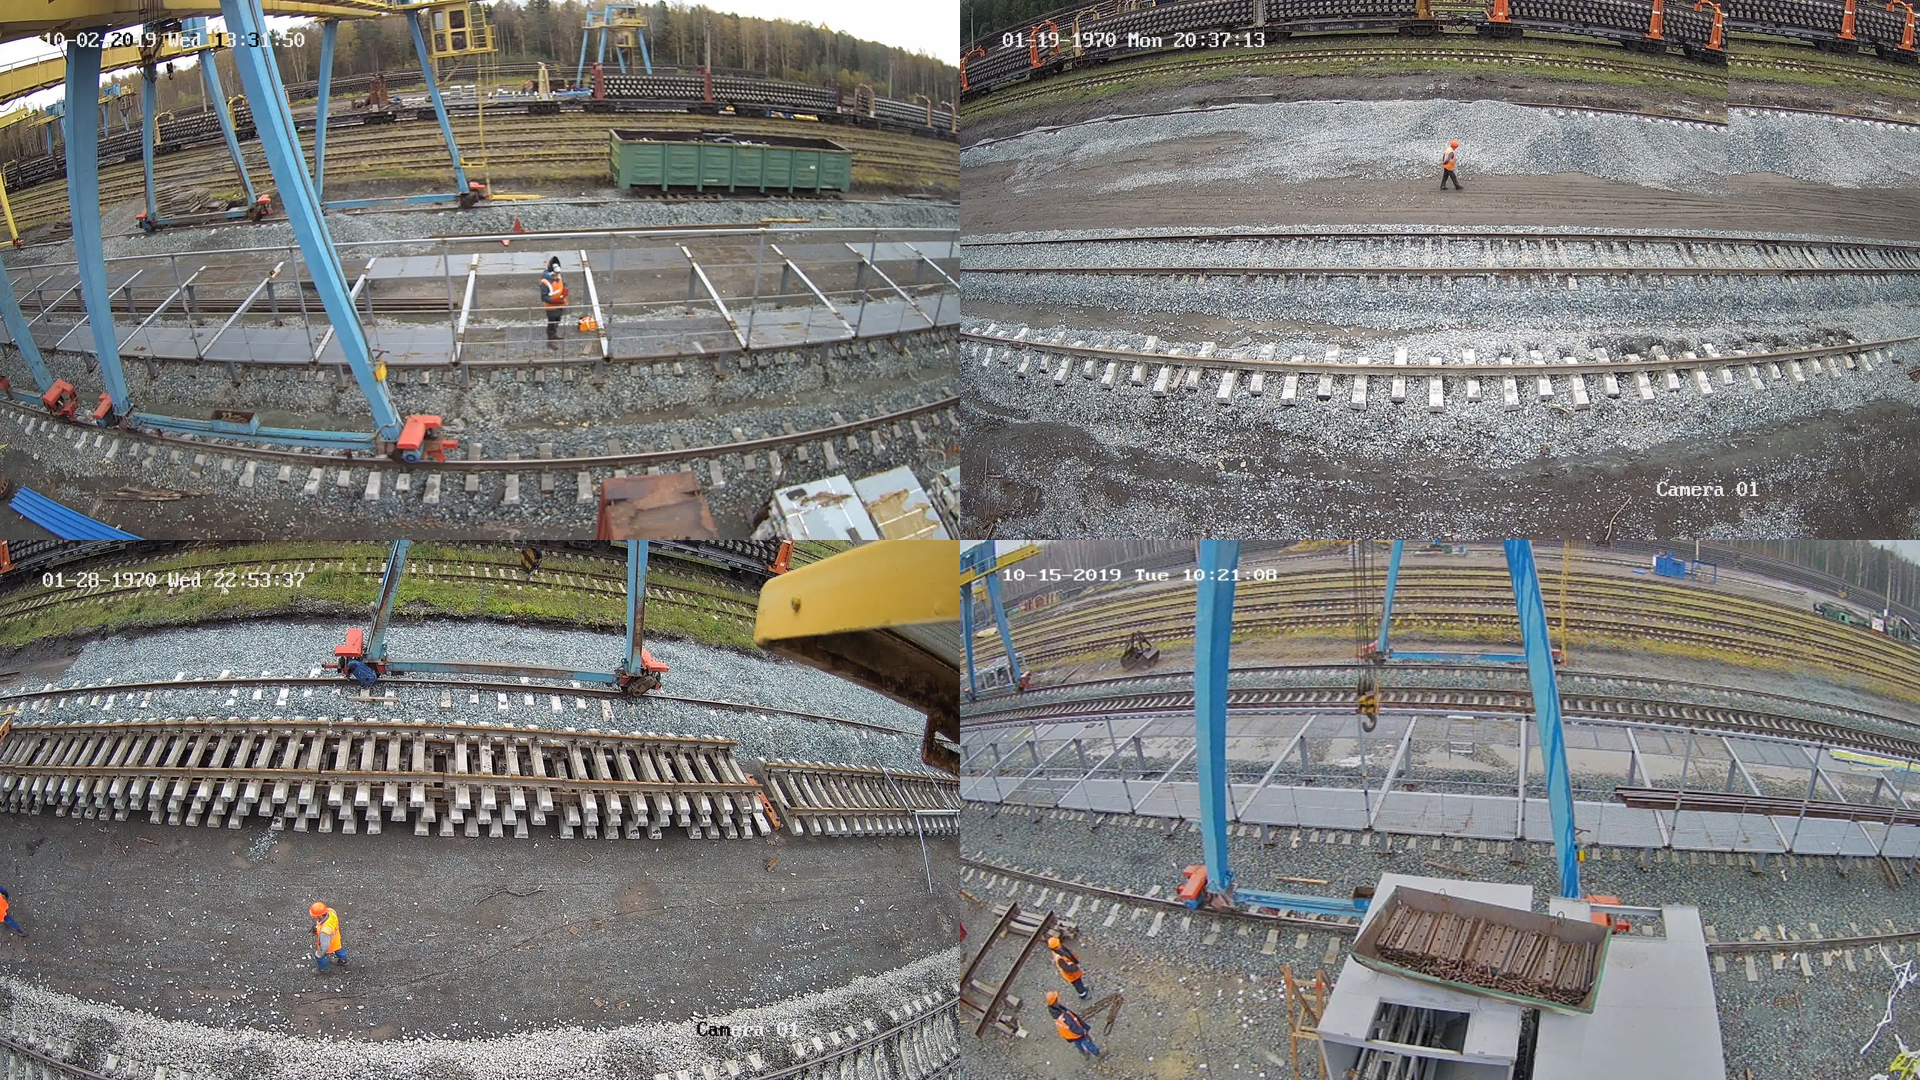
该数据集用于正确检测工人、他们的反光背心和安全帽。该数据集有3222张图片,其中包含三个标签:工人、反光背心和安全帽。AI Studio链接
用途举例:
- 可以判断是否有工人正在铁路上作业;
- 可以判断工人是否正确佩戴反光背心和安全帽规范作业。
部分数据集图片如下:
三、数据预处理
Step01: 解压数据集
!unzip /home/aistudio/data/data200816/dataset.zip -d /home/aistudio/work/
Step02: 将 txt 格式标注文件转换成 xml 格式标注文件,代码如下所示。
%cd /home/aistudio/work/dataset
!mv imgs JPEGImages
!mkdir Annotations
from xml.dom.minidom import Document
import os
import cv2


def makexml(picPath, txtPath, xmlPath):
    # 标签映射
    dic = {'0': "vest", '1': "helmet", '2': "worker"}
    files = os.listdir(txtPath)
    for i, name in enumerate(files):
        if name == ".ipynb_checkpoints":
            continue
        xmlBuilder = Document()
        annotation = xmlBuilder.createElement("annotation")  # 创建annotation标签
        xmlBuilder.appendChild(annotation)
        txtFile = open(txtPath + name)
        txtList = txtFile.readlines()
        img = cv2.imread(picPath + name[0:-4] + ".jpg")      # .jpg/.png
        Pheight, Pwidth, Pdepth = img.shape

        folder = xmlBuilder.createElement("folder")  # folder标签
        foldercontent = xmlBuilder.createTextNode("datasetRGB")
        folder.appendChild(foldercontent)
        annotation.appendChild(folder)

        filename = xmlBuilder.createElement("filename")  # filename标签
        filenamecontent = xmlBuilder.createTextNode(name[0:-4] + ".jpg")
        filename.appendChild(filenamecontent)
        annotation.appendChild(filename)

        size = xmlBuilder.createElement("size")  # size标签
        width = xmlBuilder.createElement("width")  # size子标签width
        widthcontent = xmlBuilder.createTextNode(str(Pwidth))
        width.appendChild(widthcontent)
        size.appendChild(width)

        height = xmlBuilder.createElement("height")  # size子标签height
        heightcontent = xmlBuilder.createTextNode(str(Pheight))
        height.appendChild(heightcontent)
        size.appendChild(height)

        depth = xmlBuilder.createElement("depth")  # size子标签depth
        depthcontent = xmlBuilder.createTextNode(str(Pdepth))
        depth.appendChild(depthcontent)
        size.appendChild(depth)

        annotation.appendChild(size)

        for j in txtList:
            oneline = j.strip().split(" ")
            object = xmlBuilder.createElement("object")  # object 标签
            picname = xmlBuilder.createElement("name")  # name标签
            namecontent = xmlBuilder.createTextNode(dic[oneline[0]])
            picname.appendChild(namecontent)
            object.appendChild(picname)

            pose = xmlBuilder.createElement("pose")  # pose标签
            posecontent = xmlBuilder.createTextNode("Unspecified")
            pose.appendChild(posecontent)
            object.appendChild(pose)

            truncated = xmlBuilder.createElement("truncated")  # truncated标签
            truncatedContent = xmlBuilder.createTextNode("0")
            truncated.appendChild(truncatedContent)
            object.appendChild(truncated)

            difficult = xmlBuilder.createElement("difficult")  # difficult标签
            difficultcontent = xmlBuilder.createTextNode("0")
            difficult.appendChild(difficultcontent)
            object.appendChild(difficult)

            bndbox = xmlBuilder.createElement("bndbox")  # bndbox标签
            xmin = xmlBuilder.createElement("xmin")  # xmin标签
            mathData = int(((float(oneline[1])) * Pwidth + 1) - (float(oneline[3])) * 0.5 * Pwidth)
            xminContent = xmlBuilder.createTextNode(str(mathData))
            xmin.appendChild(xminContent)
            bndbox.appendChild(xmin)

            ymin = xmlBuilder.createElement("ymin")  # ymin标签
            mathData = int(((float(oneline[2])) * Pheight + 1) - (float(oneline[4])) * 0.5 * Pheight)
            yminContent = xmlBuilder.createTextNode(str(mathData))
            ymin.appendChild(yminContent)
            bndbox.appendChild(ymin)

            xmax = xmlBuilder.createElement("xmax")  # xmax标签
            mathData = int(((float(oneline[1])) * Pwidth + 1) + (float(oneline[3])) * 0.5 * Pwidth)
            xmaxContent = xmlBuilder.createTextNode(str(mathData))
            xmax.appendChild(xmaxContent)
            bndbox.appendChild(xmax)

            ymax = xmlBuilder.createElement("ymax")  # ymax标签
            mathData = int(((float(oneline[2])) * Pheight + 1) + (float(oneline[4])) * 0.5 * Pheight)
            ymaxContent = xmlBuilder.createTextNode(str(mathData))
            ymax.appendChild(ymaxContent)
            bndbox.appendChild(ymax)

            object.appendChild(bndbox)  # bndbox标签结束

            annotation.appendChild(object)

        f = open(xmlPath + name[0:-4] + ".xml", 'w')
        # print(name)
        xmlBuilder.writexml(f, indent='\t', newl='\n', addindent='\t', encoding='utf-8')
        f.close()


if __name__ == "__main__":
    picPath = "/home/aistudio/work/dataset/JPEGImages/"  # 图片所在文件夹路径
    txtPath = "/home/aistudio/work/dataset/txt/"  # txt所在文件夹路径
    xmlPath = "/home/aistudio/work/dataset/Annotations/"  # xml文件保存路径
    makexml(picPath, txtPath, xmlPath)
!rm -rf /home/aistudio/work/dataset/txt
Step03: 可视化转换结果,判断转换是否正确,代码如下所示。
- 红色框(0,0,255):代表worker;
- 绿色框(0,255,0):代表helmet;
- 蓝色框(255,0,0):代表vest。
import xml.etree.ElementTree as ET
import os
import cv2

src_XML_dir = '/home/aistudio/work/dataset/Annotations'  # xml源路径
src_IMG_dir = '/home/aistudio/work/dataset/JPEGImages'  # IMG原路径
IMG_format = '.jpg'    # IMG格式
out_dir = '/home/aistudio/work/output'  # 输出路径

if not os.path.exists(out_dir):
    os.makedirs(out_dir)
xml_file = os.listdir(src_XML_dir)  # 只返回文件名称,带后缀

for each_XML in xml_file:  # 遍历所有xml文件
    # 读入IMG
    if each_XML == ".ipynb_checkpoints":
        continue
    xml_FirstName = os.path.splitext(each_XML)[0]
    img_save_file = os.path.join(out_dir, xml_FirstName+IMG_format)
    img_src_path = os.path.join(src_IMG_dir, xml_FirstName+IMG_format)
    img = cv2.imread(img_src_path)
    # 解析XML
    each_XML_fullPath = src_XML_dir + '/' + each_XML  # 每个xml文件的完整路径
    tree = ET.parse(each_XML_fullPath)  # ET.parse()内要为完整相对路径
    root = tree.getroot()  # 类型为element

    # 画框
    for obj in root.findall('object'):
        if obj.find('bndbox'):
            if obj.find('name').text == 'worker':
                bndbox = obj.find('bndbox')
                xmin = int(bndbox.find('xmin').text)
                xmax = int(bndbox.find('xmax').text)
                ymin = int(bndbox.find('ymin').text)
                ymax = int(bndbox.find('ymax').text)

                cv2.rectangle(img=img,
                            pt1=(xmin,ymin),
                            pt2=(xmax,ymax),
                            color=(0,0,255),
                            thickness=2)

            if obj.find('name').text == 'helmet':
                bndbox = obj.find('bndbox')
                xmin = int(bndbox.find('xmin').text)
                xmax = int(bndbox.find('xmax').text)
                ymin = int(bndbox.find('ymin').text)
                ymax = int(bndbox.find('ymax').text)

                cv2.rectangle(img=img,
                            pt1=(xmin,ymin),
                            pt2=(xmax,ymax),
                            color=(0,255,0),
                            thickness=2)

            if obj.find('name').text == 'vest':
                bndbox = obj.find('bndbox')
                xmin = int(bndbox.find('xmin').text)
                xmax = int(bndbox.find('xmax').text)
                ymin = int(bndbox.find('ymin').text)
                ymax = int(bndbox.find('ymax').text)

                cv2.rectangle(img=img,
                            pt1=(xmin,ymin),
                            pt2=(xmax,ymax),
                            color=(255,0,0),
                            thickness=2)


    cv2.imwrite(filename=img_save_file, img=img)
    # print('保存结果{}'.format(xml_FirstName))
部分可视化结果如下:

四、代码实现
4.1 检测数据分析
该数据集总共包含 3 个标签,各类标签的数量分别为:
- worker: 7973
- vest: 7883
- helmet: 6515
import os
from unicodedata import name
import xml.etree.ElementTree as ET
import glob

def count_num(indir):
    # 提取xml文件列表
    os.chdir(indir)
    annotations = os.listdir('.')
    annotations = glob.glob(str(annotations) + '*.xml')

    dict = {} # 新建字典,用于存放各类标签名及其对应的数目
    for i, file in enumerate(annotations): # 遍历xml文件

        # actual parsing
        in_file = open(file, encoding = 'utf-8')
        tree = ET.parse(in_file)
        root = tree.getroot()

        # 遍历文件的所有标签
        for obj in root.iter('object'):
            name = obj.find('name').text
            if(name in dict.keys()): dict[name] += 1 # 如果标签不是第一次出现,则+1
            else: dict[name] = 1 # 如果标签是第一次出现,则将该标签名对应的value初始化为1

    # 打印结果
    print("各类标签的数量分别为:")
    for key in dict.keys():
        print(key + ': ' + str(dict[key]))

indir='/home/aistudio/work/dataset/Annotations/'   # xml文件所在的目录
count_num(indir) # 调用函数统计各类标签数目
图像尺寸分析: 通过图像尺寸分析,我们可以看到该数据集图片的尺寸,均为 [1920, 1080]。
import os
from unicodedata import name
import xml.etree.ElementTree as ET
import glob

def Image_size(indir):
    # 提取xml文件列表
    os.chdir(indir)
    annotations = os.listdir('.')
    annotations = glob.glob(str(annotations) + '*.xml')
    width_heights = []

    for i, file in enumerate(annotations): # 遍历xml文件
        # actual parsing
        in_file = open(file, encoding = 'utf-8')
        tree = ET.parse(in_file)
        root = tree.getroot()
        width = int(root.find('size').find('width').text)
        height = int(root.find('size').find('height').text)
        if [width, height] not in width_heights: width_heights.append([width, height])
    print("数据集中,有{}种不同的尺寸,分别是:".format(len(width_heights)))
    for item in width_heights:
        print(item)

indir='/home/aistudio/work/dataset/Annotations/'   # xml文件所在的目录
Image_size(indir)
4.2 安装PaddleDetection
# 克隆PaddleDetection仓库
# !git clone -b develop https://github.com/PaddlePaddle/PaddleDetection.git

# 安装其他依赖
%cd /home/aistudio/PaddleDetection/
!pip install -r requirements.txt --user

# 编译安装paddledet
!python setup.py install
4.3 数据集划分
首先安装PaddleX。
!pip install paddlex
然后,我们通过 paddlex 中的 split_dataset 命令按照 0.9:0.1 的比例划分训练集和验证集。
!paddlex --split_dataset --format VOC --dataset_dir /home/aistudio/work/dataset --val_value 0.1
4.4 模型训练
# 替换配置文件
!rm -rf /home/aistudio/PaddleDetection/configs/rtdetr/_base_
!rm /home/aistudio/PaddleDetection/configs/rtdetr/rtdetr_hgnetv2_x_6x_coco.yml
!rm /home/aistudio/PaddleDetection/configs/runtime.yml
!rm /home/aistudio/PaddleDetection/configs/datasets/voc.yml
!cp -r /home/aistudio/config/_base_  /home/aistudio/PaddleDetection/configs/rtdetr/
!cp /home/aistudio/config/rtdetr_hgnetv2_x_6x_coco.yml /home/aistudio/PaddleDetection/configs/rtdetr/
!cp /home/aistudio/config/runtime.yml /home/aistudio/PaddleDetection/configs/
!cp /home/aistudio/config/voc.yml /home/aistudio/PaddleDetection/configs/datasets/
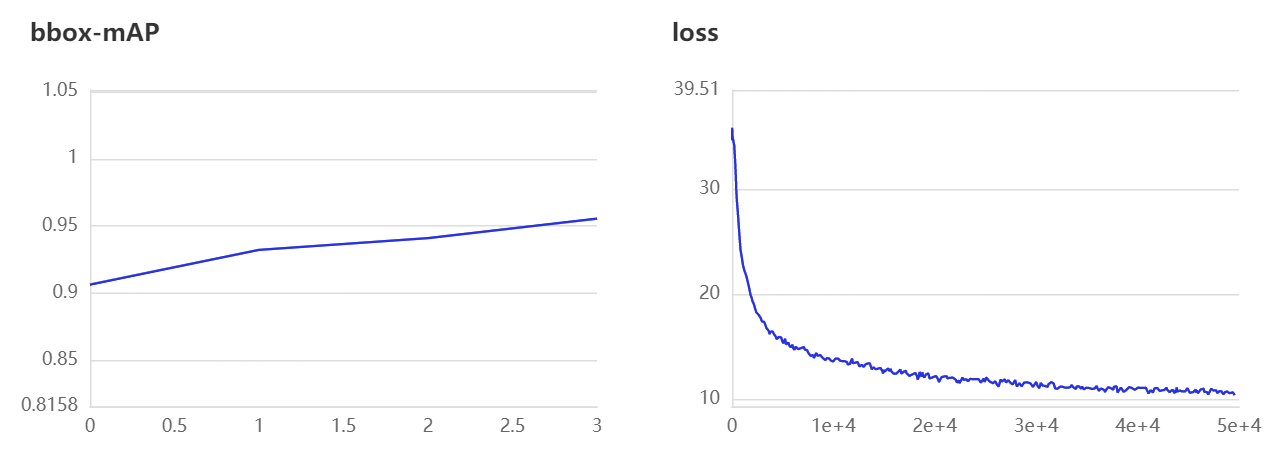
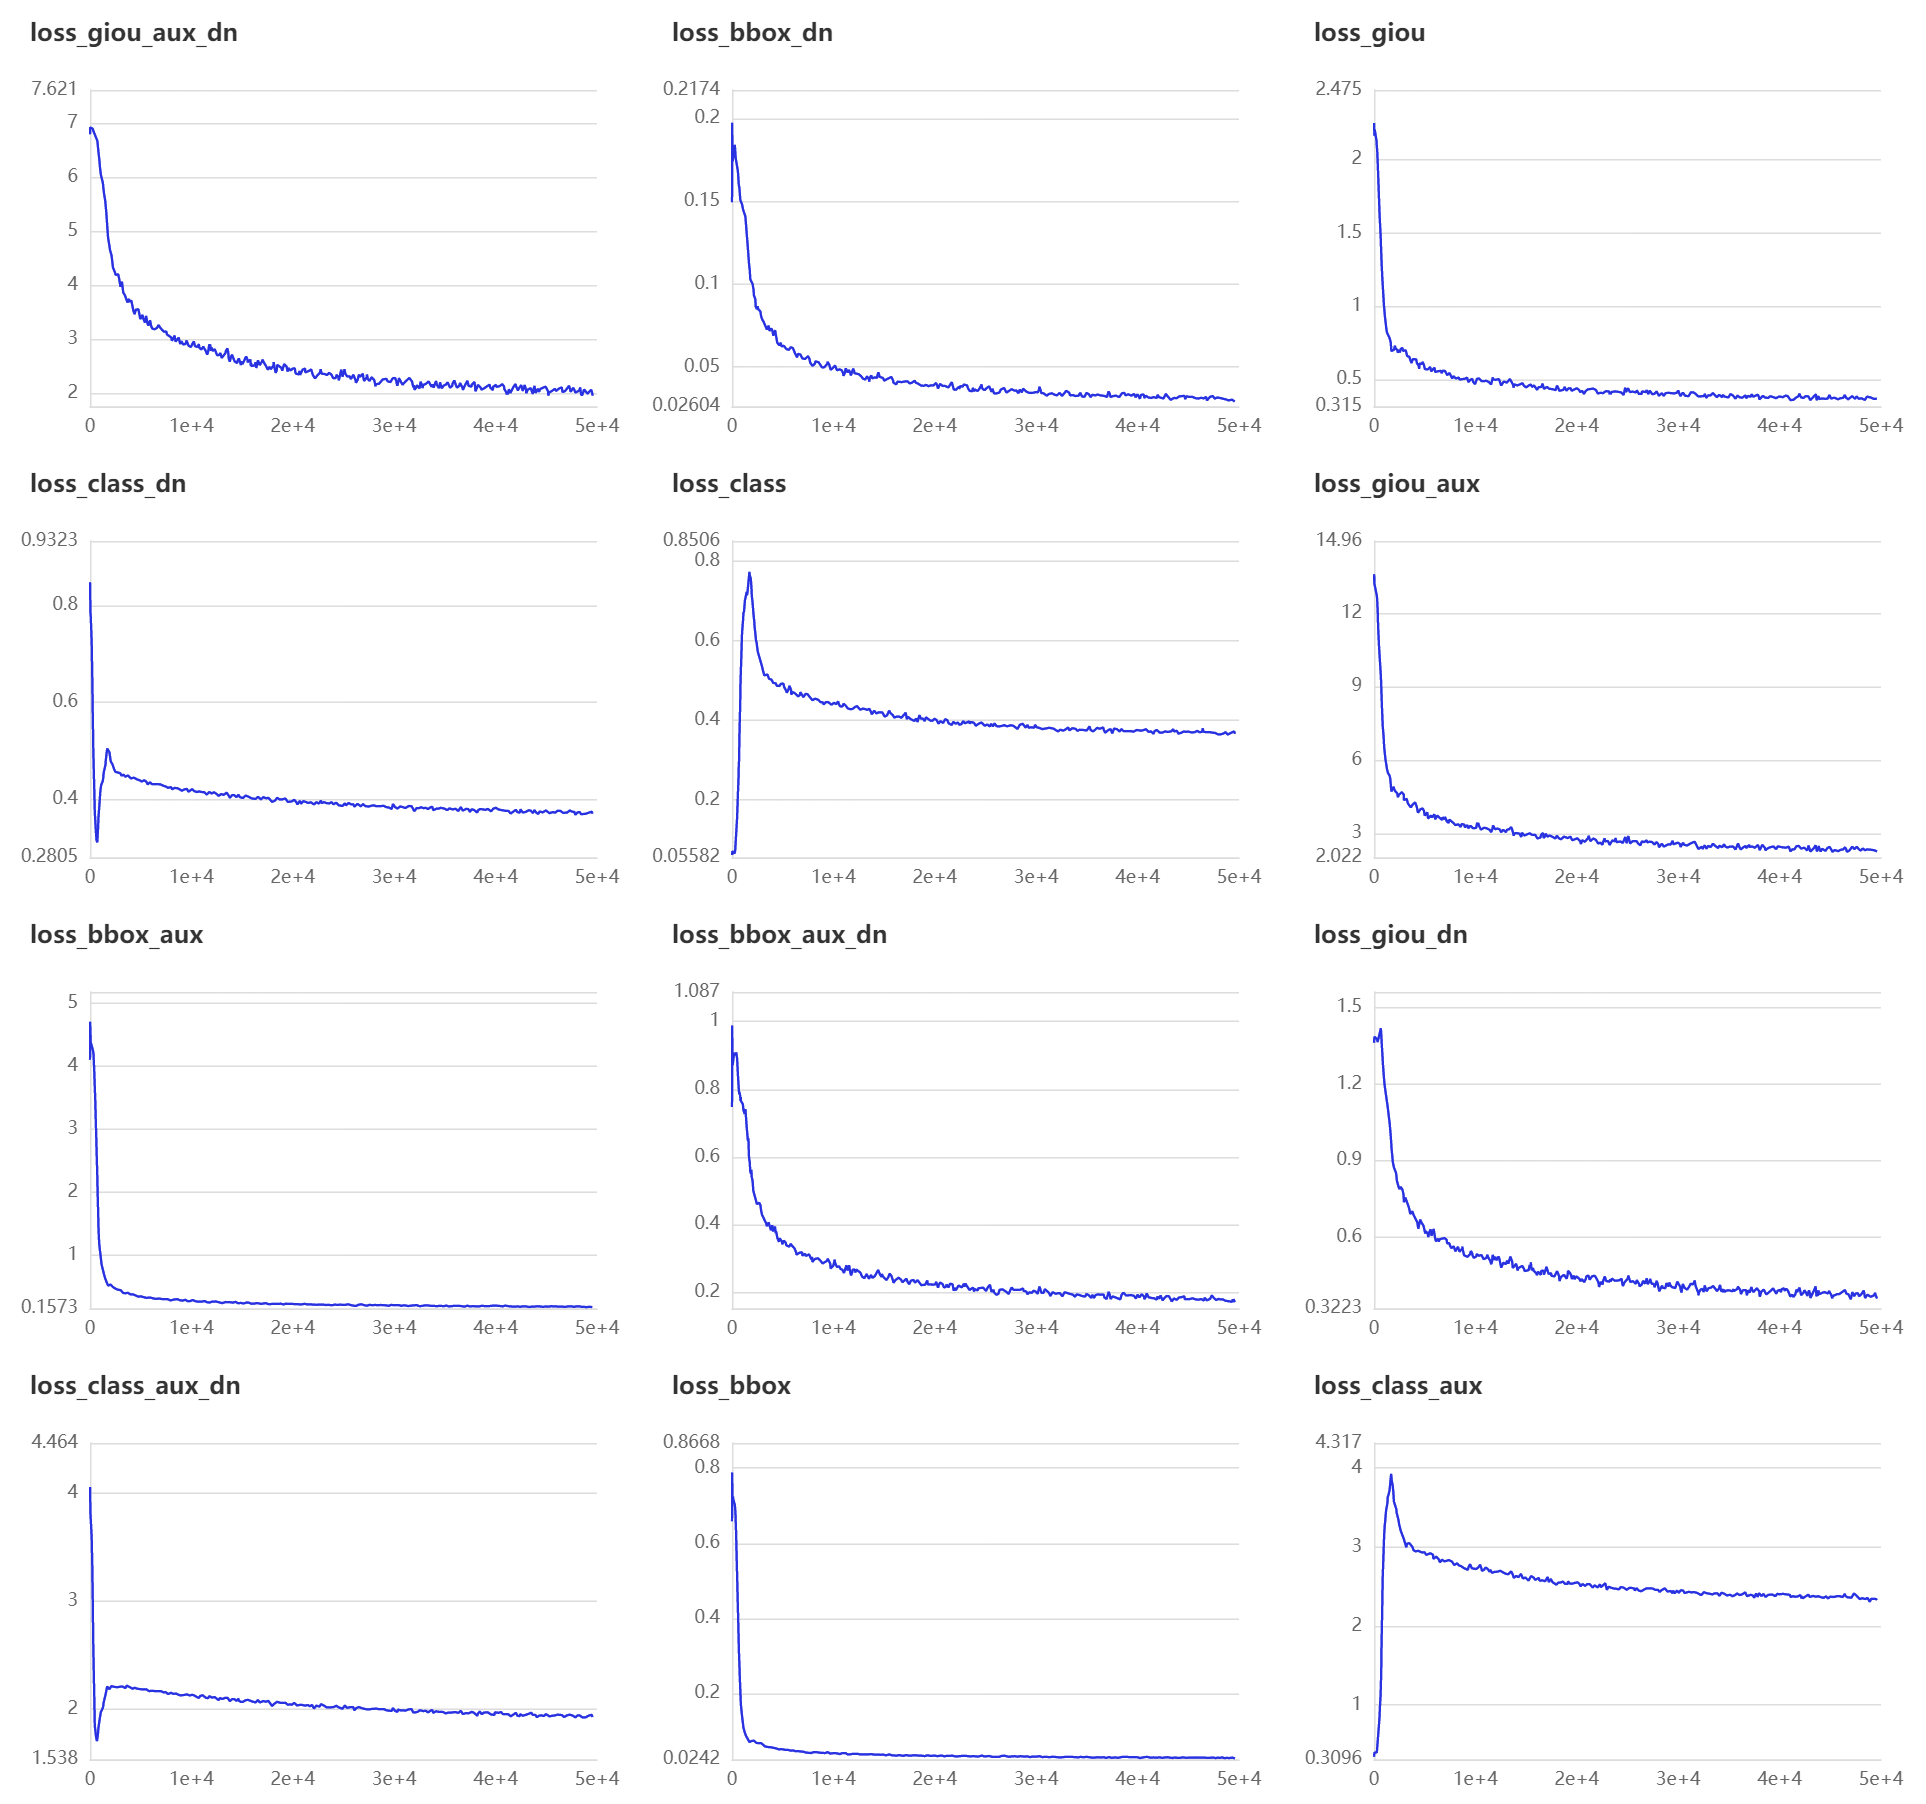
!python tools/train.py -c configs/rtdetr/rtdetr_hgnetv2_x_6x_coco.yml --eval --use_vdl True --vdl_log_dir vdl_log_dir/scalar
损失函数如图所示:
4.5 模型评估
通过如下命令在单个GPU上评估我们的验证集。
!python tools/eval.py -c configs/rtdetr/rtdetr_hgnetv2_x_6x_coco.yml -o weights=output/rtdetr_hgnetv2_x_6x_coco/best_model.pdparams
指标如下:
- mAP(0.50, 11point) = 96.26%
- Total sample number: 311, average FPS: 18.319225946781593
相比[AI达人特训营第三期]PPYOLOE遇上ViT助力铁路工人安全作业使用的以 ViT-base 为 backbone 的 PPYOLOE 模型,mAP(0.50, 11point) 提升了 8.62 的百分点,average FPS 提升了 4.4 个点。
| 模型名称 | mAP(0.50, 11point) | average FPS |
|---|---|---|
| ppyoloe_vit_base_csppan_cae_36e_coco | 87.64% | 13.92 |
| rtdetr_hgnetv2_x_6x_coco | 96.26% | 18.32 |
4.6 模型推理
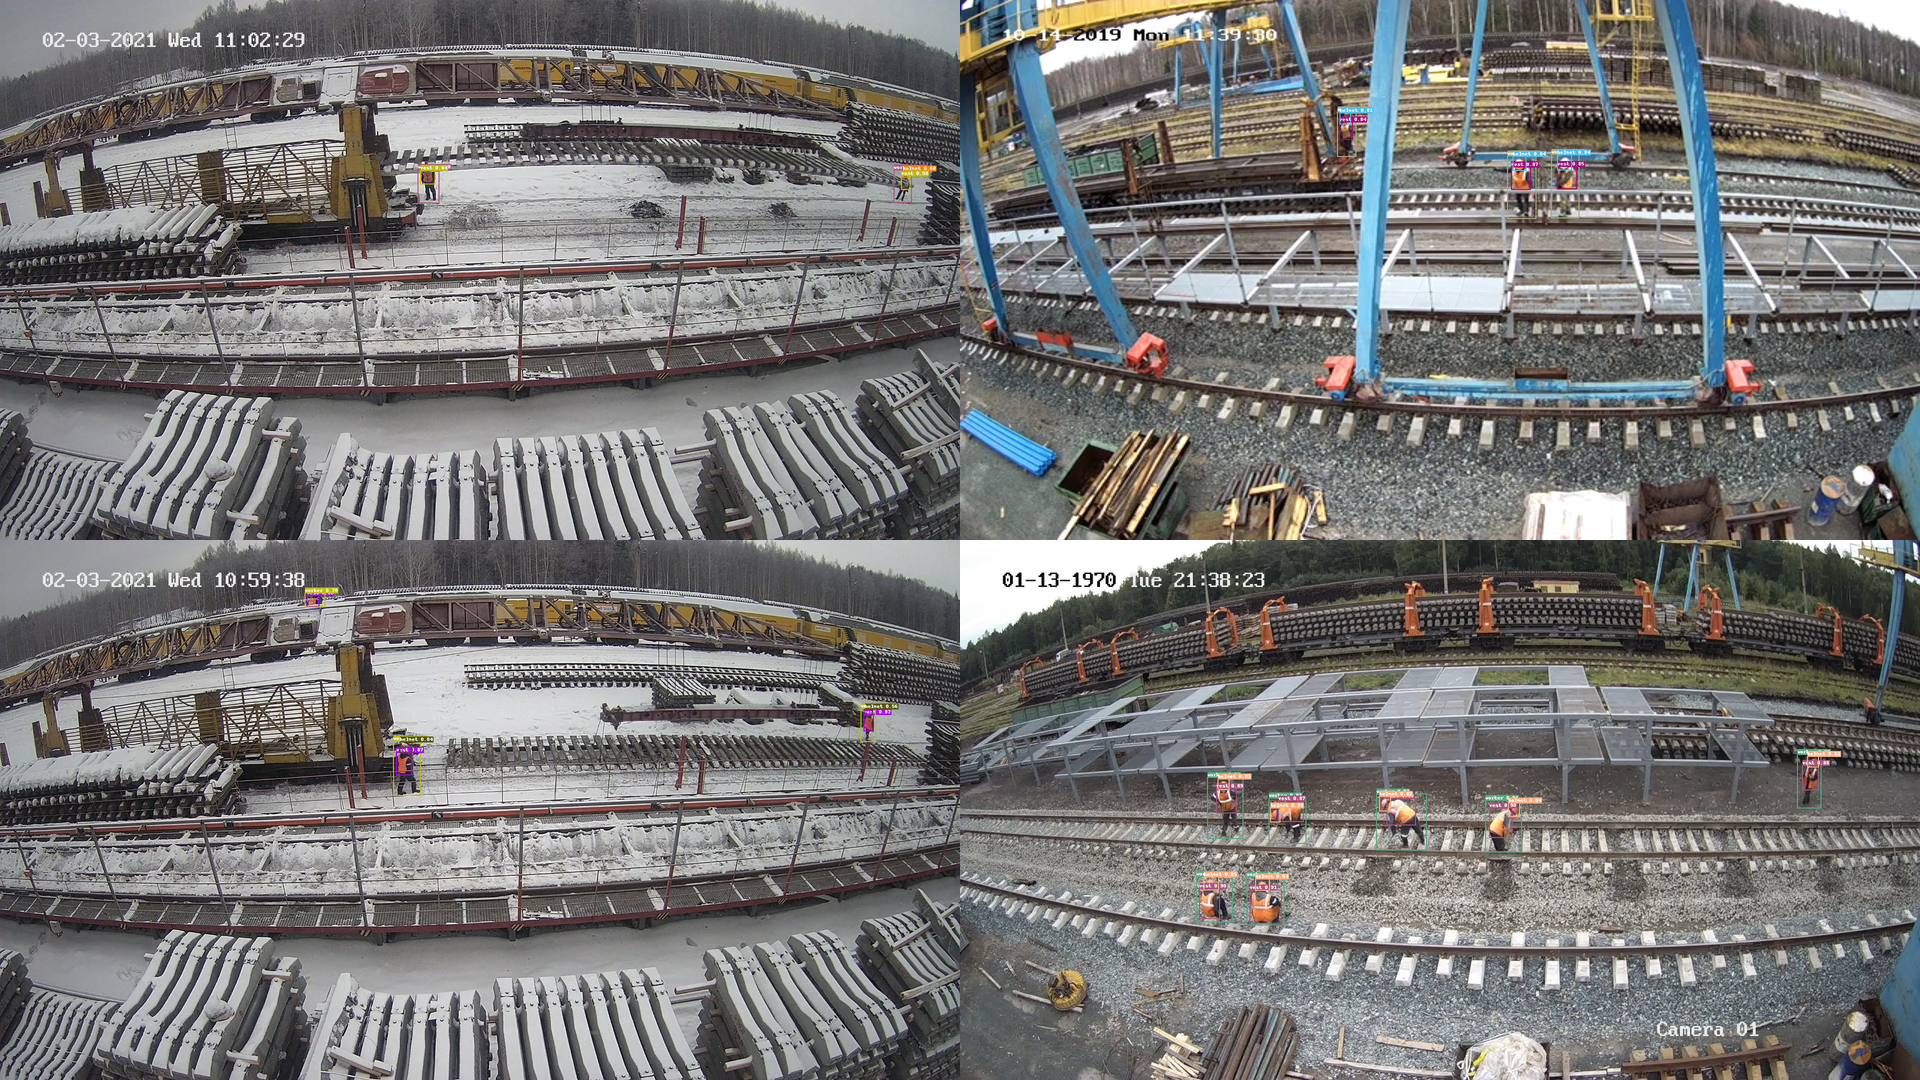
我们可以通过以下命令在单张GPU上推理文件中的所有图片。
!python tools/infer.py -c configs/rtdetr/rtdetr_hgnetv2_x_6x_coco.yml -o weights=output/rtdetr_hgnetv2_x_6x_coco/best_model.pdparams --infer_dir=/home/aistudio/work/dataset/JPEGImages --output_dir infer_output/
部分可视化结果如下:
4.7 模型导出
Step01. 导出模型
!python tools/export_model.py -c configs/rtdetr/rtdetr_hgnetv2_x_6x_coco.yml -o weights=output/rtdetr_hgnetv2_x_6x_coco/best_model.pdparams
Step02: 转换模型至ONNX
首先安装 Paddle2ONNX 和 ONNX。
!pip install onnx==1.13.0
!pip install paddle2onnx==1.0.5
然后转换模型。
!paddle2onnx --model_dir=./output_inference/rtdetr_hgnetv2_x_6x_coco/ \
            --model_filename model.pdmodel  \
            --params_filename model.pdiparams \
            --opset_version 16 \
            --save_file rtdetr_hgnetv2_x_6x_coco.onnx
五、ONNXRUNTIME部署示例
首先安装 ONNXRUNTIME。
!pip install onnxruntime
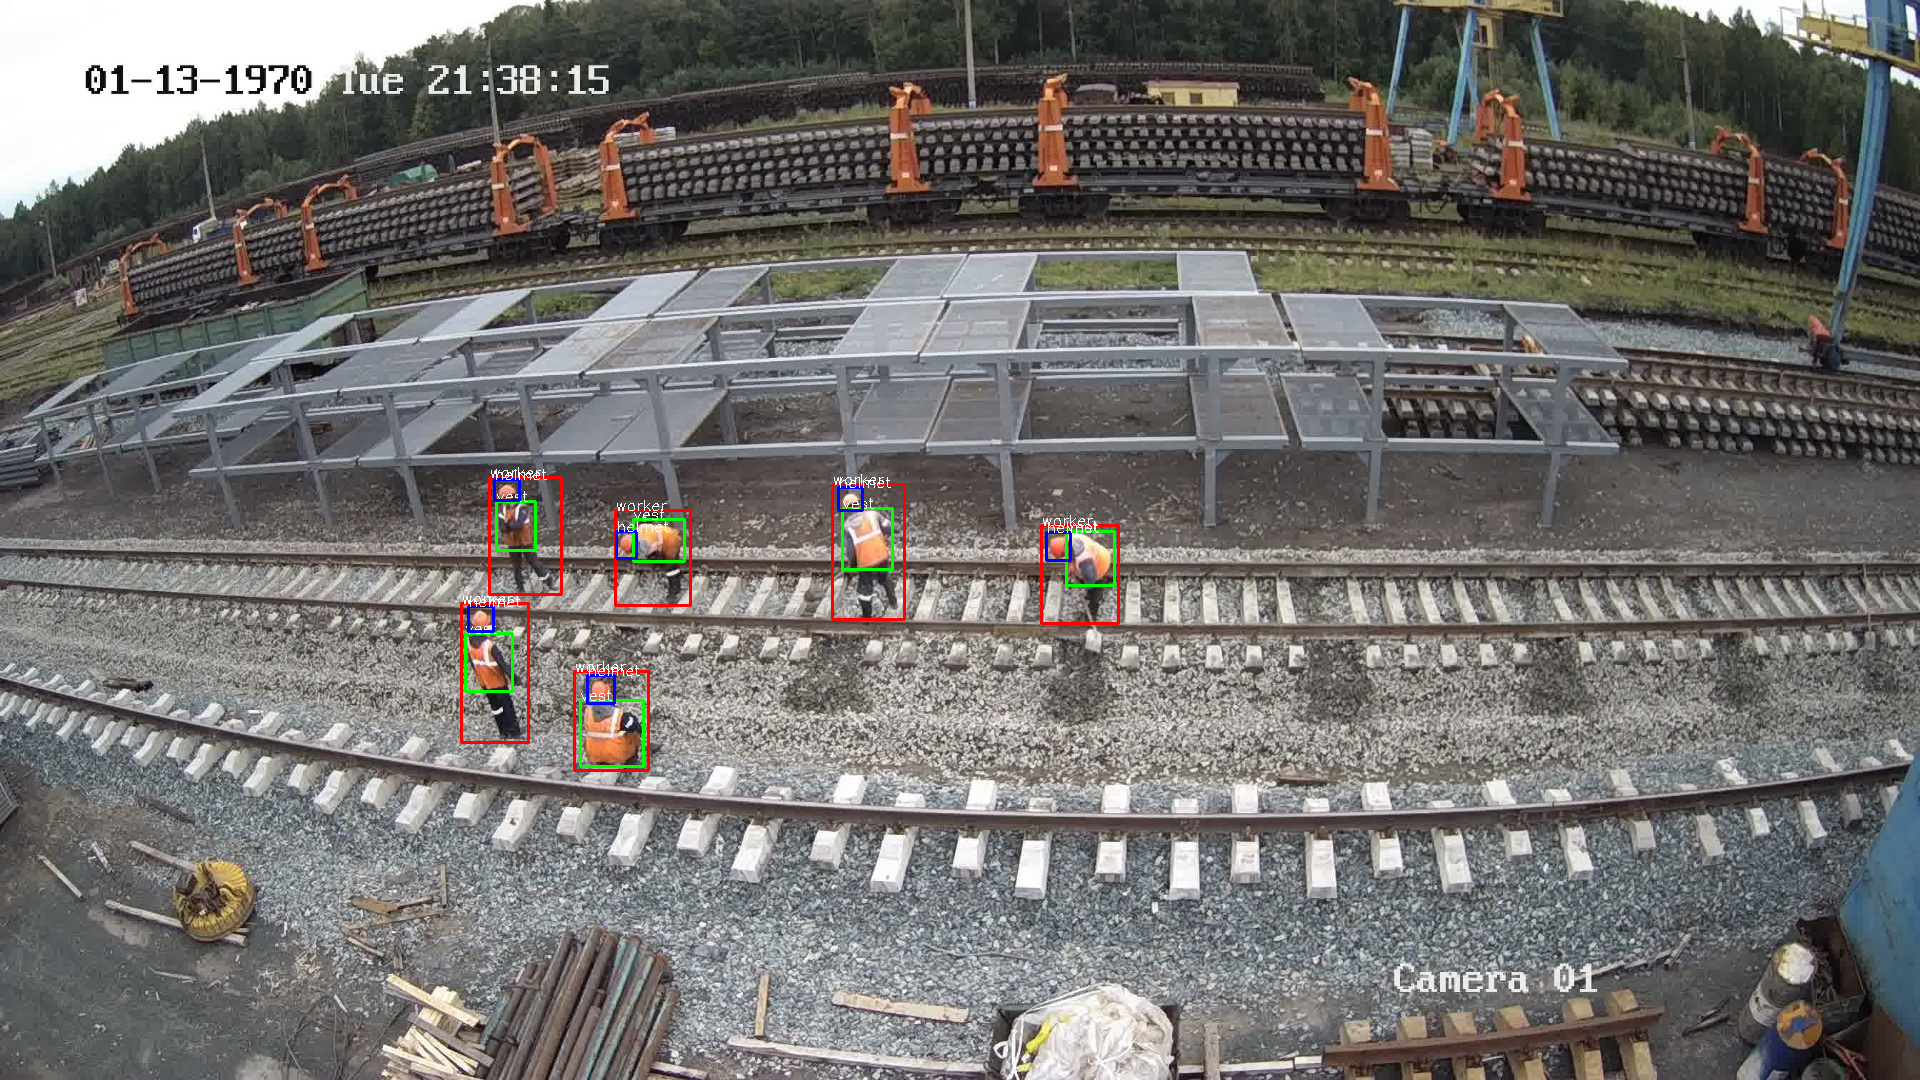
接下来是我用 ONNXRUNTIME 写的一个 demo,案例比较简单,大家可以自行了解。在这我就不多赘述了。
import onnxruntime as rt
import cv2
import numpy as np
sess = rt.InferenceSession("/home/aistudio/PaddleDetection/rtdetr_hgnetv2_x_6x_coco.onnx")
img = cv2.imread("/home/aistudio/work/dataset/JPEGImages/1174.jpg")
org_img = img
im_shape = np.array([[float(img.shape[0]), float(img.shape[1])]]).astype('float32')
img = cv2.resize(img, (640,640))
scale_factor = np.array([[float(640/img.shape[0]), float(640/img.shape[1])]]).astype('float32')
img = img.astype(np.float32) / 255.0
input_img = np.transpose(img, [2, 0, 1])
image = input_img[np.newaxis, :, :, :]
output_dict = ["reshape2_83.tmp_0","tile_3.tmp_0"]
inputs_dict = {
    'im_shape': im_shape,
    'image': image,
    'scale_factor': scale_factor
}
result = sess.run(output_dict, inputs_dict)
for item in result[0]:
    if item[1] > 0.5:
        if item[0] == 0:
            cv2.rectangle(org_img, (int(item[2]), int(item[3])), (int(item[4]), int(item[5])), (255,0,0), 2)
            cv2.putText(org_img, "helmet", (int(item[2]), int(item[3])), cv2.FONT_HERSHEY_SIMPLEX, 0.5, (255,255,255), 1)
        elif item[0] == 1:
            cv2.rectangle(org_img, (int(item[2]), int(item[3])), (int(item[4]), int(item[5])), (0,255,0), 2)
            cv2.putText(org_img, "vest", (int(item[2]), int(item[3])), cv2.FONT_HERSHEY_SIMPLEX, 0.5, (255,255,255), 1)
        elif item[0] == 2:
            cv2.rectangle(org_img, (int(item[2]), int(item[3])), (int(item[4]), int(item[5])), (0,0,255), 2)
            cv2.putText(org_img, "worker", (int(item[2]), int(item[3])), cv2.FONT_HERSHEY_SIMPLEX, 0.5, (255,255,255), 1)
cv2.imwrite("/home/aistudio/work/result.png", org_img)
可视化结果如下:
六、总结与提高
本项目是使用飞桨团队最新推出的 RT-DETR 模型来实现的。根据论文描述,模型可以达到实时检测的效果,个人认为该模型是 ViT 系列模型所取得的一个重大突破,揭开了 ViT 实时化的序幕。
相比[AI达人特训营第三期]PPYOLOE遇上ViT助力铁路工人安全作业使用的以 ViT-base 为 backbone 的 PPYOLOE 模型,mAP(0.50, 11point) 提升了 8.62 的百分点,average FPS 提升了 4.4 个点。
| 模型名称 | mAP(0.50, 11point) | average FPS |
|---|---|---|
| ppyoloe_vit_base_csppan_cae_36e_coco | 87.64% | 13.92 |
| rtdetr_hgnetv2_x_6x_coco | 96.26% | 18.32 |
大家快来 GitHub 给 PaddleDetection 点个 Star 叭!

如果需要在你的研究中使用RT-DETR,请通过以下方式引用我们的论文:
@misc{lv2023detrs,
      title={DETRs Beat YOLOs on Real-time Object Detection},
      author={Wenyu Lv and Shangliang Xu and Yian Zhao and Guanzhong Wang and Jinman Wei and Cheng Cui and Yuning Du and Qingqing Dang and Yi Liu},
      year={2023},
      eprint={2304.08069},
      archivePrefix={arXiv},
      primaryClass={cs.CV}
}
此文章为搬运
原项目链接

学大模型,用大模型上飞桨星河社区!每天8点V100G算力免费领!免费领取ERNIE 4.0 100w Token >>>
更多推荐


 2
2 0
0- 0


 已为社区贡献1437条内容

所有评论(0)